


How to Make a Flow Star at Home and Use It as Decor
Learning to make a Flow Star at home is a fun project if you enjoy sewing, fabric crafts, or making unusual decorations yourself. Although a Flow Star is primarily designed as a soft flow-arts prop for spinning, tossing, catching, and movement, its symmetrical shape and colorful fabric also give it plenty of decorative potential.
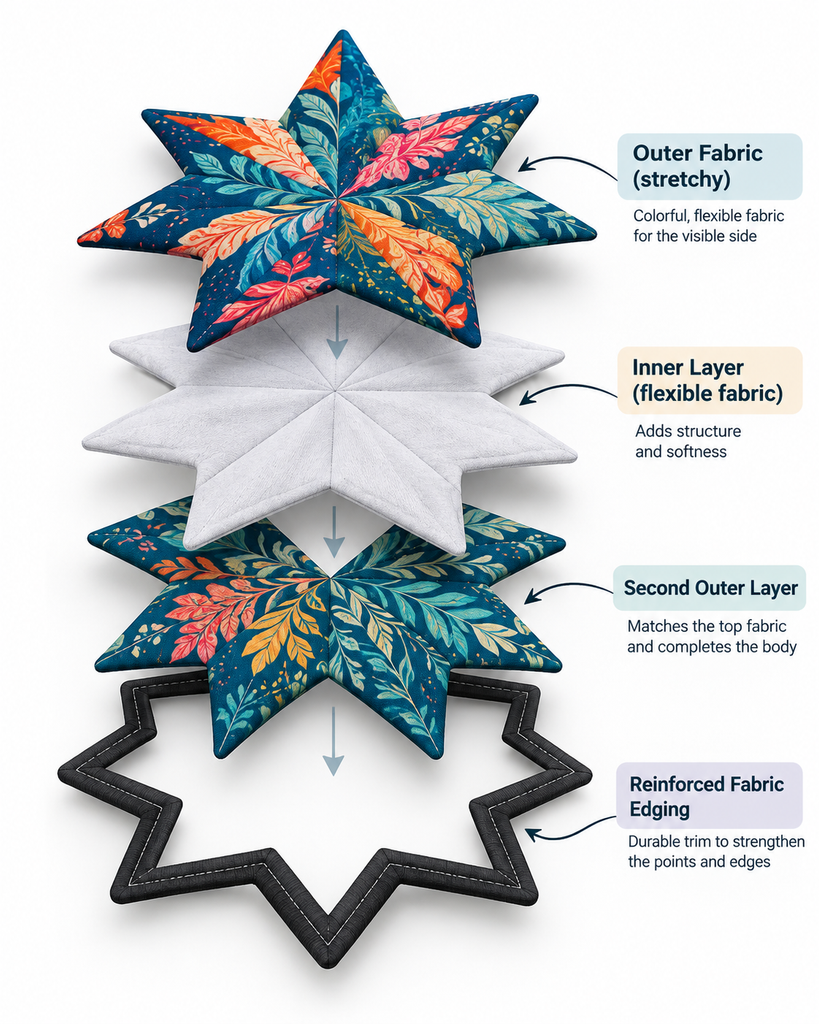
A proper Flow Star is more sophisticated than simply cutting a star from a piece of cloth. Commercial examples use a combination of outer fabric, flexible inner material, structural edging, and reinforced stitching to help the star retain its shape while moving.
For a homemade version, you can borrow those basic construction ideas without trying to reproduce a commercial product exactly. Once yours is finished, you can practice with it or turn it into textile wall art for a bedroom, craft room, studio, or meditation space.
What Is a Flow Star?
A Flow Star, also commonly written as flowstar, is a soft fabric prop associated with flow arts. Unlike a rigid throwing star or conventional fabric ornament, it stays flexible while opening into its recognizable multi-pointed shape in motion.
Looking at how a modern Flow Star is constructed helps explain why the materials matter. One current commercial design uses polyester outer fabric, a four-way-stretch polyester-spandex inner layer, thick cotton canvas trim, and reinforced zigzag stitching.
Each component serves a purpose. The outer fabric provides the visible design, the inner material contributes flexibility and shape, and the heavier perimeter helps the star remain open.
Your DIY version does not have to use exactly the same materials. However, understanding that construction gives you a better starting point than treating a Flow Star like an ordinary stuffed fabric ornament.
What You’ll Need to Make a Flow Star
No single DIY Flow Star pattern or material combination works for everyone. Your choices should depend partly on whether you want a functional spinning prop or mainly a decorative piece.
For a beginner-friendly sewn version, gather:
- Stretchy polyester-spandex or another flexible fabric for the visible sides
- Lightweight flexible fabric for the inner layer
- Strong cotton fabric or binding for the perimeter
- Polyester sewing thread
- Fabric scissors or a rotary cutter
- Measuring tape or ruler
- Fabric marker or tailor’s chalk
- Pins or sewing clips
- Sewing machine
- Large paper or cardboard for making your pattern
Four-way stretch fabric is a sensible starting point for a Flow Star you intend to spin because flexibility affects how the star opens and moves. Commercial Flow Stars likewise use stretch material as part of their construction.
If you’re mainly interested in home decoration, you have more freedom. Decorative cotton, patterned fabric, fabric remnants, or textiles that coordinate with your room may matter more than spinning performance.
If you enjoy turning fabric into handmade decorations, HomeUpright’s guide to making decorative flowers from silk is another useful project for learning how fabric choice, cutting, shaping, and careful assembly affect the final appearance.
Before You Start: Decide What Kind of Flow Star You Want
It helps to answer one question before cutting anything:
Do you want to spin your Flow Star, display it, or do both?
For a functional Flow Star, flexibility, symmetry, edge construction, durability, and balanced weight matter more. The characteristics that help a Flow Star hold its shape are closely connected to its stretch fabric, structural trim, and reinforced stitching.
For a decorative Flow Star, appearance becomes the priority. You can choose fabric according to your interior colors, make the star slightly firmer so it hangs flat, or experiment with prints and textures that might not be ideal for spinning.
If you want both, prioritize function first. You can always choose attractive fabric without compromising the construction.
How to Make a Flow Star at Home
A basic homemade Flow Star starts with a symmetrical pattern. You then cut matching fabric pieces, add flexible inner material, secure the layers, and reinforce the perimeter.
Because Flow Stars vary in construction, treat this as a practical DIY starting method rather than an exact commercial manufacturing pattern.
1. Create an Eight-Point Star Template
Start with paper rather than your good fabric.
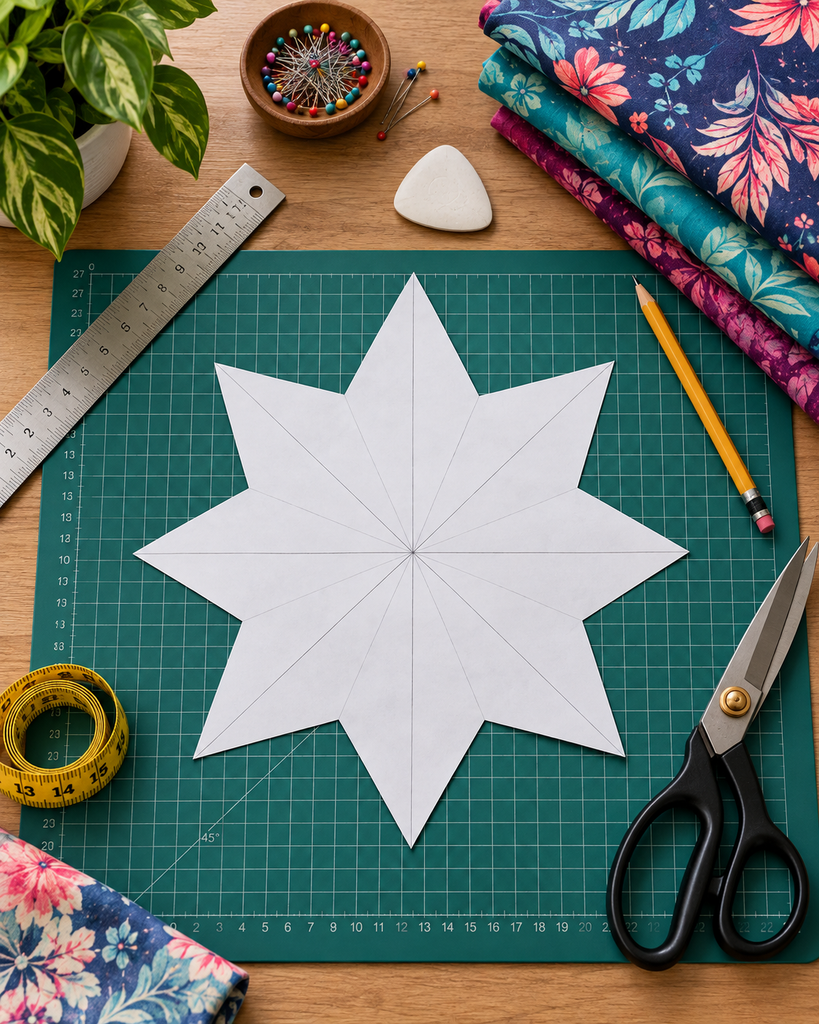
Draw a symmetrical eight-point star. One simple way to establish the basic geometry is to imagine two squares centered on one another, with one rotated relative to the other. Then refine the points and inner angles until the shape resembles the Flow Star you want.
Fold the paper vertically, horizontally, and diagonally to compare opposite points. Symmetry matters, especially if you plan to spin the finished star.
Don’t worry about making a large version right away. A paper prototype lets you experiment with proportions without wasting fabric.
2. Test Your Fabric
Before cutting the full star, handle a small piece of your chosen material.
Stretch it in different directions. Fold it, release it, and see how readily it returns to shape. If the fabric is very slippery, excessively stiff, or barely stretches, it may be more appropriate for a decorative star than one intended for flow practice.
This small test can save you from discovering a material problem after you’ve already completed the sewing.
3. Transfer the Template to the Fabric
Place your template flat on the fabric and trace around it using tailor’s chalk or a removable fabric marker.
Cut two matching outer pieces carefully. Keep the fabric orientation consistent so corresponding parts of the star behave the same way when stretched.
Don’t rush around the points. Small cutting errors can accumulate and make one side visibly different from the other.
4. Cut the Inner Layer
Use the same template as the starting point for your inner material.
The inner layer should provide some body without making the star rigid. A functional Flow Star needs to bend and fold, so thick upholstery foam or dense stuffing is not a good substitute for flexible textile layers.
Lay the pieces together before sewing, and move them by hand. If the stack already feels stiff and bulky, it is unlikely to become more flexible after you add edge binding.
5. Stack and Secure the Layers
Align the pieces carefully.
Use sewing clips or pins to prevent the fabric from moving as you work. Start by securing opposite sections rather than working continuously in one direction, which helps prevent the material from gradually shifting to one side.
Check the points again before sewing. This is your last easy opportunity to correct major alignment problems.
6. Sew the Main Sections
Stitch the layers together so they behave as one piece.
Depending on your design, you can add seams from the center toward the spaces between the points to create separate sections. Keep your stitching pattern symmetrical so one area does not become substantially heavier or stiffer than another.
Use a stitch appropriate for your fabric’s stretch. If you’re unfamiliar with sewing stretch materials, practice on scraps made from the same layers first.
7. Reinforce the Outer Edge
The perimeter is one of the most important parts of the project.
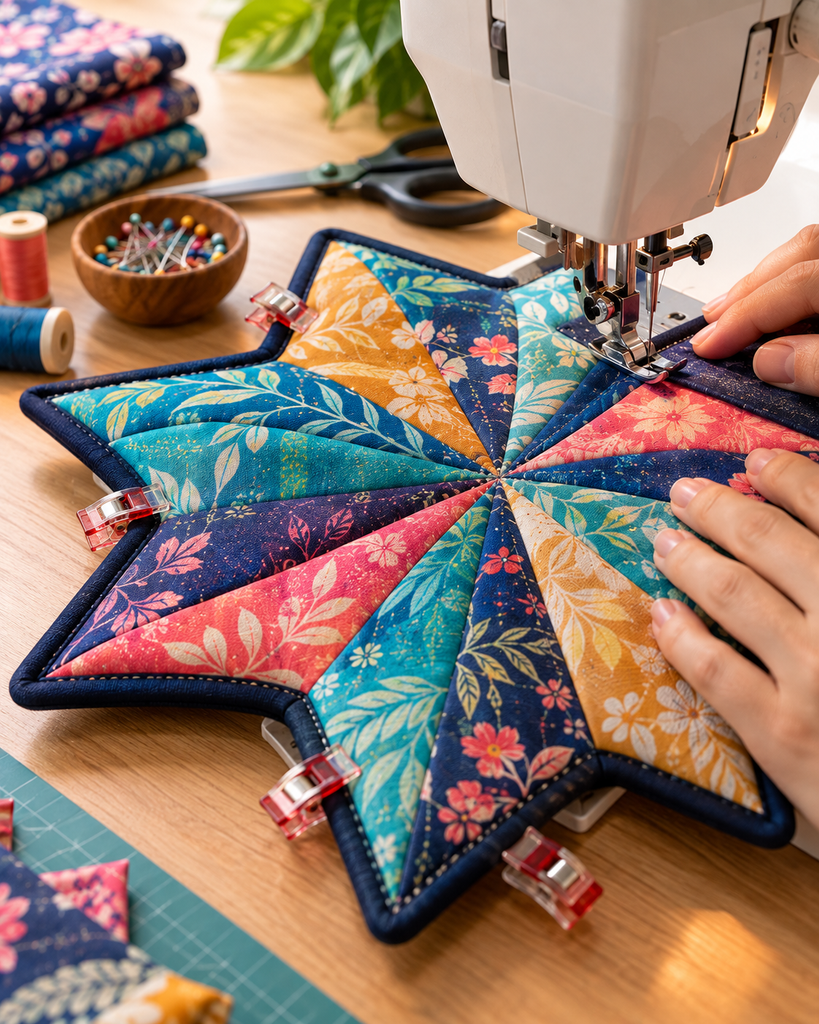
Eight points create numerous corners and changes in sewing direction. Apply your fabric binding consistently around the outside, working slowly as you approach each point.
This isn’t merely decorative. Commercial Flow Stars use structural fabric trim around their points and edges, showing how the perimeter can help the star stay open.
Avoid creating thick lumps where binding sections overlap. An uneven perimeter can affect the finished star’s appearance and balance.
8. Inspect the Finished Shape
Place your Flow Star flat on a table or clean floor.
Look at it from directly above. Opposite points should be similar in length and width, the center should not pull strongly in one direction, and the edging should lie reasonably flat.
Inspect the stitching for:
- Loose threads
- Open seams
- Missed sections
- Exposed raw edges
- Bunched fabric
- Uneven binding
- Shifted inner material
Fix construction problems before attempting to spin it.
Does a Homemade Flow Star Need Weights?
Adding weight randomly is not a good way to fix a Flow Star that doesn’t open properly.
Weight distribution affects balance. Placing coins, metal washers, beads, or other hard objects inside individual points could create uneven movement and turn an otherwise soft prop into something that could hurt when tossed or caught.
For a first DIY version, concentrate on consistent fabric layers, symmetrical construction, and even perimeter binding.
If your main purpose is decoration, you don’t need to imitate the exact weight or handling characteristics of a performance Flow Star at all.
Why Fabric Choice Matters So Much
Two Flow Stars made from the same template can behave very differently if they use different textiles.
Stretch affects movement. The inner material influences structure. Perimeter fabric contributes additional body. Even the stitching can change how easily the finished piece flexes.
That’s why a professionally made Flow Star is described as a multi-layer textile product rather than a single piece of fabric.
For a functional DIY version, look for a material that is flexible but not excessively loose. For a decorative version, concentrate more heavily on visual characteristics such as pattern, texture, and color.
This is also where scraps come in handy. Make a small test section from leftover material and stitch a piece of your intended binding around it. That will tell you far more about the final feel than judging the fabric while it is still on the roll.
How to Use a Flow Star in Home Decoration
A Flow Star isn’t traditionally a home decoration, but you can still display one.
Its symmetrical geometry makes it particularly suitable as textile wall art. And because it is lightweight compared with many conventional wall decorations, you have several display options.
Display It as Textile Wall Art
The simplest approach is hanging the star flat against a wall.
A brightly patterned Flow Star can become a focal point on an otherwise neutral surface. Give it enough empty wall space so the shape stays recognizable, rather than surrounding it with too many competing objects.
The visual effect works particularly well in bedrooms, craft rooms, studios, gaming rooms, or other informal creative spaces.
If you use adhesive hanging products, choose one appropriate for both the object’s weight and your wall finish, and follow the manufacturer’s instructions. Some adhesives can damage paint or leave residue.

Put It in a Shadow Box
If you make a Flow Star that you particularly like, consider framing it in a deep shadow box.
This changes its appearance from a piece of equipment into something closer to textile art. It also protects the fabric from frequent handling and helps prevent it from collecting as much dust.
Leave a little space between the star and the frame edges so its shape remains visually clear.
This option is best for a Flow Star you intend to display permanently rather than one you use every day.
Decorate a Craft Room
A handmade Flow Star feels particularly appropriate in a craft or sewing room.
Display it above your sewing station, near organized fabric storage, or alongside other handmade textile projects. If you’ve already experimented with handmade fabric flowers for home decor, the Flow Star can become part of a broader collection of DIY textile pieces.
You don’t have to make every item from matching fabric. Repeating one or two colors across different handmade decorations is usually enough to make them feel connected.
Use It in a Yoga or Meditation Space
Symmetry naturally creates a strong visual center, which makes a Flow Star suitable for a calm, balanced wall arrangement.
Try centering one above a low cabinet, yoga mat storage area, or simple bench. Muted blues, greens, earthy colors, or soft geometric patterns may work better than bright, festival-style prints if you want the room to stay visually quiet.
Keep textile decorations away from candles, heaters, fireplaces, and other heat sources.
Make It Part of a Creative Bedroom
A bedroom gives you more freedom to use playful fabric patterns.
You could place a Flow Star above a desk, beside a gallery wall, or over a small reading area. If the rest of the room is already colorful, choose a Flow Star that repeats one existing color rather than introducing several unrelated ones.
The same principle applies to other parts of the home. HomeUpright’s advice for creating a warm and practical modern farmhouse entryway demonstrates how decorative details work best when they complement the surrounding materials and practical needs rather than competing for attention.
Create a Small Flow Star Gallery
If you enjoy the first project, make two or three additional stars using related fabrics.
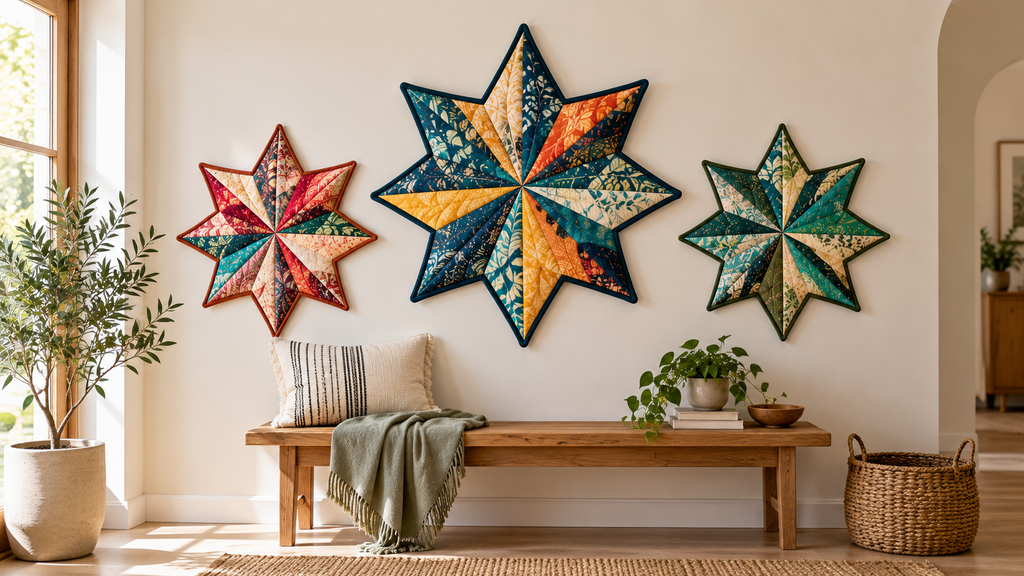
Instead of hanging them in a straight line, experiment with a loose triangular arrangement. Use one larger or more visually strong star as the focal point, with smaller pieces around it.
Keep enough space between them for each outline to remain recognizable.
If You Want One Flow Star for Spinning and Decorating
You don’t necessarily have to make separate stars.
A functional Flow Star can hang on the wall when you’re not using it. In fact, that may be more practical than folding it into a drawer after every practice.
If you want a dual-purpose design, prioritize:
- Balanced construction
- Flexible fabric
- Secure stitching
- Consistent edge binding
- A color or pattern that suits your room
Don’t permanently attach beads, buttons, charms, metal ornaments, or other hard decorations to a Flow Star you intend to spin. These additions can change its balance and could hurt someone during an accidental impact.
A display-only star gives you much more freedom to experiment.
Common Problems When Making a Flow Star
Your first Flow Star probably won’t behave exactly like a professionally manufactured one, and that’s okay. Most problems can tell you what to change in your next version.
| Problem | Possible cause | What to try |
|---|---|---|
| Star collapses too easily | Too little structure | Experiment with a more supportive inner layer or perimeter |
| Star feels too stiff | Layers are too heavy or dense | Use lighter, more flexible material |
| One side feels heavier | Uneven layers or binding | Check symmetry and perimeter construction |
| Points look different | Inaccurate template or cutting | Correct the paper template before making another |
| Fabric puckers | Layers shifted during sewing | Use more clips and work symmetrically |
| Edge looks bulky | Binding overlaps unevenly | Reduce excess material and sew corners slowly |
| Seams begin opening | Stitching isn’t handling the movement | Reinforce stressed areas with a suitable stitch |
Avoid trying to solve every handling problem by adding more material. More fabric can just make the star heavier without correcting the actual construction issue.
How to Care for Your Homemade Flow Star
Your fabric label should determine how you clean the finished star.
Don’t automatically put it into a hot washer or dryer. Different outer fabrics, inner layers, threads, and bindings may respond differently to heat and agitation.
If it only needs minor cleaning, start with the gentlest method appropriate for your materials. Avoid ironing a finished Flow Star unless you’re certain that every layer can tolerate the temperature.
If you use it primarily as decoration, occasional gentle dust removal may be enough.
Store a functional Flow Star somewhere dry and away from sharp objects. Before spinning it again after a long period on display, inspect the seams and edge binding for damage.
Should You Make or Buy a Flow Star?
It depends on what you want from the project.
If your primary goal is learning flow arts and you want predictable handling, a commercially manufactured Flow Star may make more sense. Its construction has been deliberately developed around movement, durability, flexibility, and balance.
If you enjoy sewing and experimentation, however, making one yourself can be part of the appeal. Even commercial Flow Star makers acknowledge that DIY construction involves trial and error, particularly because trim weight, inner stretch, and stitching influence how the finished star performs.
For home decoration, DIY has another advantage: complete control over appearance.
You can select a fabric that coordinates with your room, resize your pattern, use remnants from another project, or make several stars that form a coordinated wall display.
Frequently Asked Questions
Can I make a Flow Star at home?
Yes. You can sew a Flow Star at home using flexible fabric, inner textile layers, strong thread, and reinforced edging. Creating one that handles like a professionally manufactured Flow Star may require experimentation because fabric stretch, symmetry, edge structure, and overall balance affect its movement.
What is the best fabric for a homemade Flow Star?
A flexible polyester-spandex blend is a useful starting point if you want the star to move and stretch. Four-way-stretch polyester-spandex is one of the materials used in layered commercial Flow Star construction, although your DIY version doesn’t need to copy that material specification exactly.
For a wall-only decorative star, you can choose fabric primarily for its appearance.
Can a Flow Star be used as home decor?
Yes. Although a Flow Star is primarily a flow-arts prop, its geometric shape and colorful textile construction can work well as wall decor. You can hang one directly, place it inside a shadow box, or combine several stars into a textile wall display.
Can beginners make Flow Stars?
A beginner with basic sewing skills can try one, but the project is more involved than a typical fabric star ornament. Creating a symmetrical template is fairly straightforward; getting the fabric, flexibility, perimeter structure, and stitching to work together is the more challenging part.
Can I make a Flow Star without a sewing machine?
You can certainly hand-sew a decorative fabric star. For a Flow Star you intend to spin frequently, however, consistent and durable seams matter more, making a sewing machine the more practical option for most people.
Can I hang my Flow Star when I’m not using it?
Yes, and this is one of the easiest ways to combine its original function with home decoration. Use a hanging method suitable for the star’s weight and your wall surface, and avoid anything sharp that could damage the fabric.
Final Thoughts
Learning how to make a Flow Star at home is less about following one perfect recipe and more about understanding how fabric, flexibility, symmetry, stitching, and perimeter construction work together.
If you want to spin your finished star, concentrate first on balanced construction and flexible materials. Your first attempt may need refinement, but it can teach you what to adjust in the next version.
If home decoration is your main goal, you have much more creative freedom. Choose a fabric that works with your room, hang the finished Flow Star as textile wall art, frame it, or make several coordinating pieces for a larger display.
And an imperfect first attempt doesn’t necessarily belong in the scrap bin. If it doesn’t spin quite the way you hoped, it may still be the Flow Star that looks best on your wall.