


Wood Filler for Hardwood Floors: What Works and What to Avoid
A few nail holes or narrow cracks can make an otherwise beautiful hardwood floor look worn. Reaching for a tub of filler may seem like the obvious solution, but the real question isn’t simply which product to buy. You first need to know why the opening appeared and whether it stays the same size throughout the year.
The right wood filler for hardwood floors can repair small, stable cracks, chips, nail holes, and surface damage. It is far less reliable in wide gaps or joints that expand and contract as indoor humidity changes. Put a rigid filler in a moving gap, and it may crack, crumble, or work its way back out.
This guide explains which fillers suit different repairs, how to avoid an obvious color mismatch, and when a gap needs something more substantial than filler.
Quick Answer
For small defects in an unfinished floor, choose a sandable, water-based latex or wood-flour filler made specifically for hardwood flooring. For an isolated chip or nail hole in a finished floor, use a color-matched putty or touch-up compound that does not require aggressive sanding.
Do not use ordinary rigid filler in wide or seasonal gaps. If a gap opens during dry weather and closes when humidity rises, control the indoor humidity and monitor the floor before attempting a permanent repair.
Key Takeaways
- Use floor-specific filler for small, stable cracks, chips, nail holes, and shallow gouges.
- Choose a full-trowel or wood-flour filler when preparing an unfinished floor for sanding and finishing.
- Use color-matched putty for minor cosmetic damage in an already finished floor.
- Don’t fill a seasonal gap just because it is visible in winter.
- Repair loose boards, moisture problems, and structural movement before addressing appearance.
- Test the filler with the intended stain and finish because “stainable” does not guarantee an invisible match.
- Follow the manufacturer’s limits for gap width, depth, drying time, and finishing compatibility.
Can You Use Wood Filler on Hardwood Floors?
Yes, but only when the filler suits the damage and the floor’s current condition.
Hardwood floor filler generally works well for:
- Finish-nail and staple holes
- Small chips around board edges
- Minor cracks within a board
- Shallow dents and gouges
- Narrow, stable seams
- Small defects discovered during sanding
- Minor surface imperfections that are not caused by rot or moisture
Filler improves the surface; it does not secure a loose board or solve movement beneath the floor. If the wood flexes when you step on it, the repair will keep experiencing stress no matter how hard the filler becomes.
Before a large refinishing or repair project, evaluate the condition of the boards, subfloor, finish, and room. HomeUpright’s guide to planning hardwood flooring work explains why moisture exposure, traffic, existing damage, and long-term maintenance should be considered before choosing a flooring treatment.
Wood Filler, Wood Putty and Floor Patch: What Is the Difference?
These terms are often mixed up, but the products serve different purposes.
Wood filler
Wood filler dries or cures into a solid repair. Many formulas can be sanded and covered with stain, paint, or a clear finish. Filler is normally most useful on bare wood or during refinishing.
Wood putty
Wood putty is commonly used for small cosmetic repairs after the floor has been finished. It comes in premixed colors, and some formulas stay slightly pliable instead of curing as hard as conventional filler.
Putty can hide a nail hole or shallow chip without requiring you to sand through the surrounding floor finish.
Full-trowel filler
Full-trowel filler has a relatively thin consistency. You can spread it across an unfinished floor to fill small cracks, grain openings, nail holes, and minor defects before the final sanding stages.
This is different from packing thick household wood filler into every joint between boards.
Wood-flour cement
Wood-flour cement is a liquid binder mixed with fine sanding dust from the actual floor. Because the dust comes from the flooring, the mixture can begin closer to the wood’s natural color.
It can still absorb stain differently, so a test remains necessary.
Two-part filler
Two-part fillers cure hard and can repair more serious, localized humidity damage. They work well in the right setting but can be difficult to sand and color-match.
Their rigidity also makes them unsuitable for many moving floor joints.
Should Hardwood Floor Gaps Be Filled?
Some gaps should be filled. Others are a normal result of wood movement.
The easiest way to decide is to observe the gap’s size, location, and behavior.
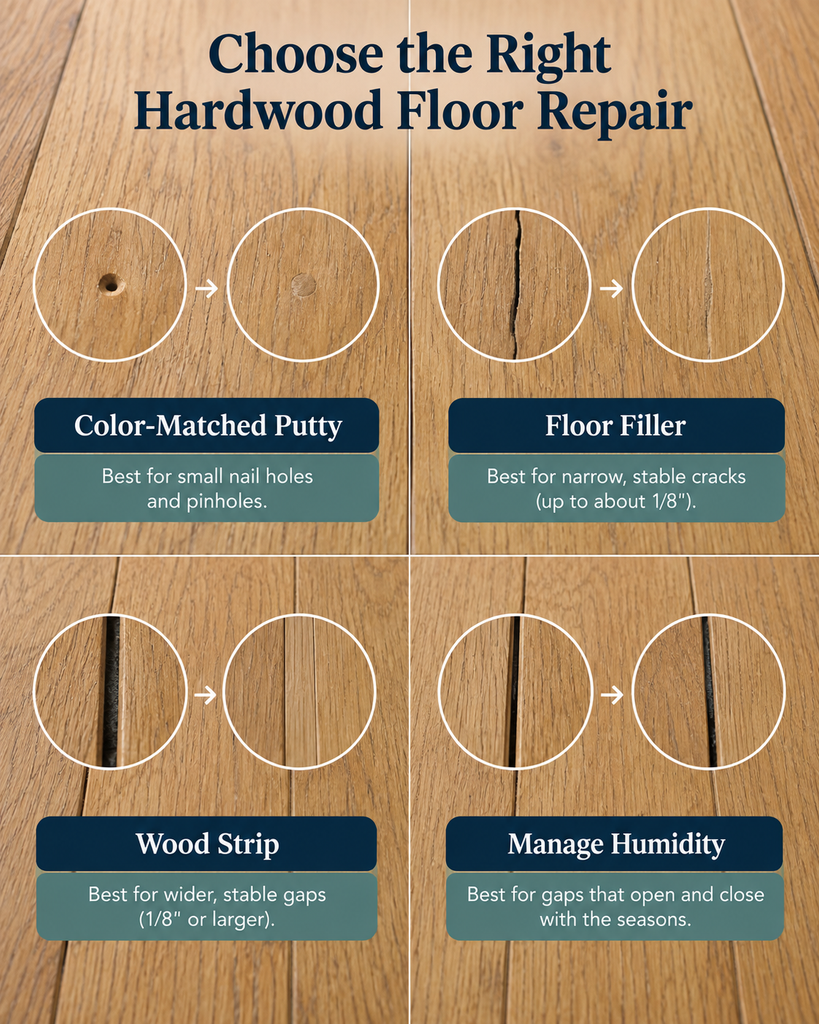
| Floor condition | Usually suitable repair | What to avoid |
|---|---|---|
| Nail hole in unfinished wood | Sandable floor filler | Flexible caulk |
| Small chip in a finished floor | Color-matched putty | Sanding a large area |
| Narrow, stable crack | Floor-specific filler | Overfilling the surrounding grain |
| Many small defects before refinishing | Full-trowel filler | Household wall patch |
| Small seams across an unfinished floor | Manufacturer-approved wood-flour filler | Ordinary glue mixed with dust |
| Wide, stable gap | Matching hardwood strip or sliver | A thick mass of rigid filler |
| Seasonal gap | Humidity management and monitoring | Permanent rigid filler |
| Loose or damaged board | Fastening, repair or replacement | Cosmetic filler alone |
| Rot or ongoing moisture damage | Correct the moisture source first | Hiding the damage with putty |
Small, stable gaps
A small gap that stays approximately the same width may accept a floor-specific filler. Confirm that the opening falls within the product’s stated size limit.
Filling a deep space in several thin applications may also be more reliable than trying to fill it in one heavy layer.
Wide, stable gaps
A wide gap often needs a fitted strip of matching hardwood rather than filler. You can secure, trim, and finish a tapered wood sliver to match the surrounding boards.
This type of repair takes more work, but it is less likely to crumble than a thick filler patch.
Some traditional plank floors are repaired with natural-fiber rope. The rope can accommodate more movement and prevent debris from collecting in the opening, but it may not suit every floor.
Seasonal gaps
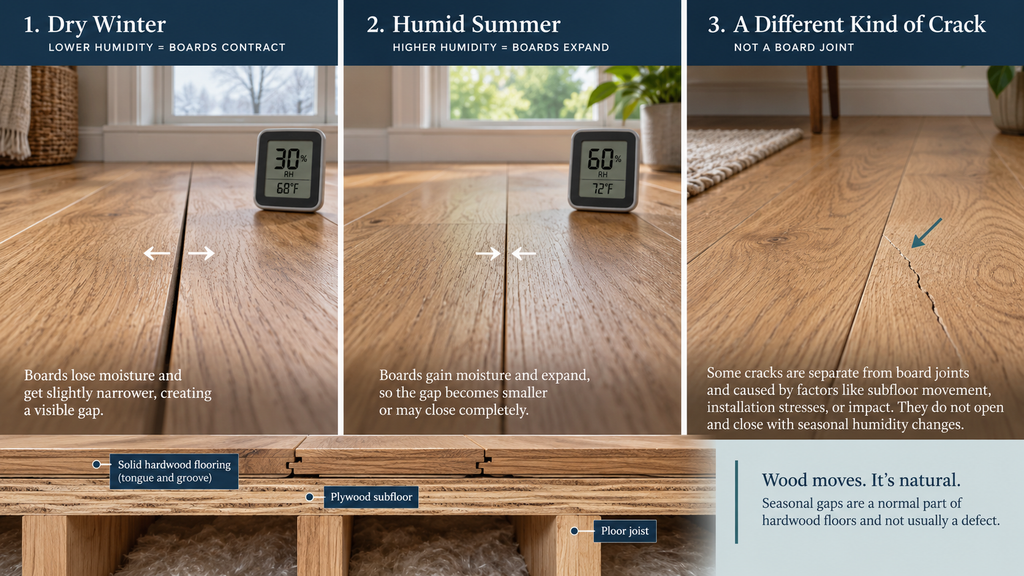
Seasonal gaps appear as boards lose moisture and shrink during dry conditions. They may narrow or close again when the humidity rises.
Filling the boards while they are at their driest can leave insufficient room for later expansion. This pressure may damage board edges or contribute to buckling.
The National Wood Flooring Association’s wood-floor problem-prevention guidance suggests maintaining indoor conditions around 60–80°F and 30–50% relative humidity year-round. Your flooring manufacturer may specify a different range, so its instructions should take priority.
What Is the Best Wood Filler for Hardwood Floors?
No single product is best for every floor. The best choice depends on whether the surface is finished, how you apply the filler, and whether the repair needs to be sanded.
The products below are established options worth comparing. This is not a claim that they were tested side by side for this article.
| Product or filler type | Best suited to | Application | Important limitation |
|---|---|---|---|
| Bona Pacific Filler | Small defects and full-trowel filling on unfinished hardwood | Premixed waterborne filler | Intended for use before finishing; confirm color and finish compatibility |
| Timbermate Water-Based Wood Filler | Cracks, nail holes and blemishes in stable interior flooring | Spot-filled or spread across prepared flooring | Interior-grade product; the floor must be dry and free of movement |
| WOODWISE Full-Trowel Filler | Numerous small cracks and defects before the final sanding stages | Spread over an unfinished floor | Not appropriate for large or moving gaps |
| Glitsa Wood Flour Cement | Repairs where matching the actual floor species is important | Mixed with fine sanding dust | Requires clean, suitably fine dust and careful mixing |
| Minwax Stainable Wood Filler | Small localized cracks, holes and gouges in unfinished wood | Applied with a putty knife | Stain may look different on filler than on natural wood |
| Color-matched putty or wax | Nail holes, chips and scratches in finished flooring | Pressed into a small cosmetic defect | Usually unsuitable for wide, deep or structural damage |
Bona Pacific Filler
Bona Pacific Filler is a high-solids waterborne compound intended for cracks, holes, chips, gouges, and broken edges in hardwood flooring. You can use it for spot filling or full-trowel application before finishing the floor.
It makes the most sense when you’re already preparing an unfinished floor for sanding and finishing. It is not a universal fix for large gaps between moving boards.
Timbermate Water-Based Wood Filler
Timbermate Water-Based Wood Filler can be applied to cracks, nail holes, knots and other blemishes. Its manufacturer also provides instructions for applying it across prepared flooring before sanding.
The floor must be stable, dry and free of movement. Build deep repairs in layers rather than filling them all at once. Timbermate is an interior-grade product, so it should not be used for exterior floor repairs.
WOODWISE Full-Trowel Filler
WOODWISE wood filler products include full-trowel and spot-filling formulations made for hardwood floors. Full-trowel filler is useful when an unfinished floor contains many tiny seams, nail holes, and grain imperfections.
Because it is made for small surface defects, don’t expect it to bridge a large moving gap.
Glitsa Wood Flour Cement
Glitsa Wood Flour Cement is designed to be mixed with fine sanding dust. Using floor dust can create a more convincing base color than a generic premixed shade.
The result still depends on dust quality, mixture consistency, wood species, and finish. Don’t replace a proper binder with ordinary wood glue just because both can hold sawdust together.
Minwax Stainable Wood Filler
Minwax Stainable Wood Filler is intended for localized cracks, gouges, nail holes, and other defects in unfinished wood. Its directions call for a clean, dry surface, complete drying, and sanding before applying the finish.
It works for spot repairs but isn’t designed as a full-floor gap-filling system. Minwax also warns that deeper repairs may require layered applications.
Color-matched putty or wax
For a finished floor, a small container of color-matched putty or a wax repair stick is often more practical than a sandable filler. These products can disguise nail holes, chips, and shallow scratches without removing the surrounding coating.
Match the product to the final floor color—not simply the underlying wood species.

How to Match Filler to a Hardwood Floor
Color matching is usually the hardest part of the repair. Even a perfectly level patch can remain obvious if it dries lighter or darker than the surrounding boards.
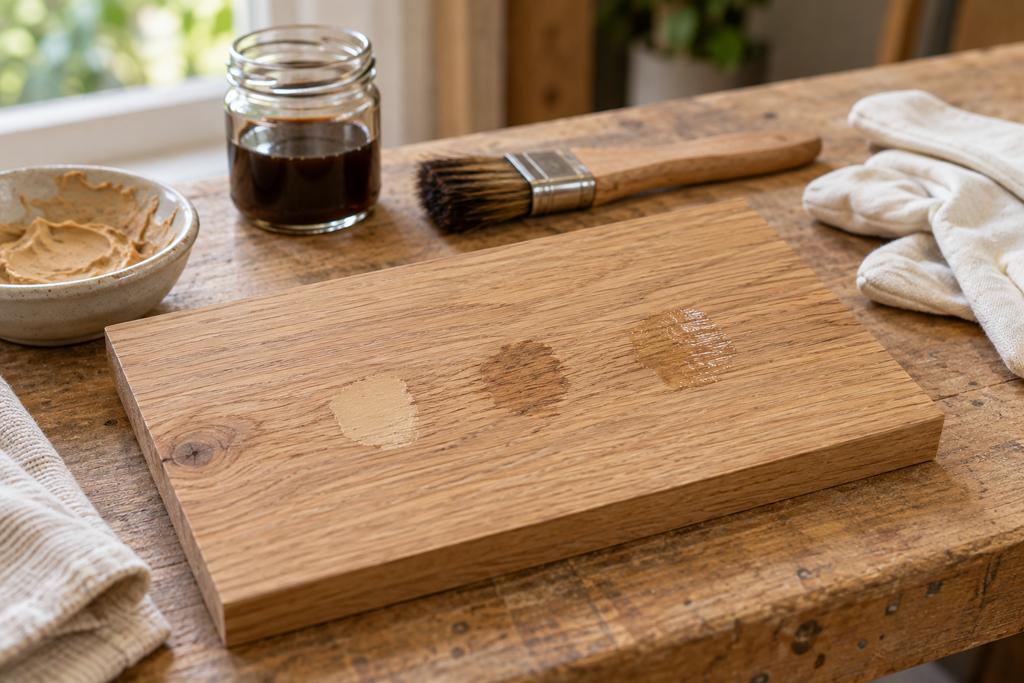
Natural wood contains pores, grain lines, and variations that absorb stain unevenly. Filler is more uniform. A product described as stainable may accept stain, but it will not necessarily react like oak, maple, pine, or walnut.
Use this process to improve the match:
- Identify the wood species, existing stain, and finish sheen.
- Choose a filler close to the floor’s finished color.
- Test on scrap wood or a hidden part of the floor.
- Let it dry completely.
- Sand it using the same method planned for the repair.
- Apply the intended stain and clear finish.
- Check the result in daylight and artificial light.
A test may reveal that a slightly lighter filler blends better than an exact-looking wet match. Dark patches usually draw more attention than minor lighter variations.
If the floor will receive a darker color, review HomeUpright’s guide to choosing and applying black wood stain before deciding how the filler, wood grain, and topcoat should work together.
Can You Make Hardwood Floor Filler With Sawdust and Glue?
Mixing sawdust with wood glue is popular because it seems inexpensive and promises a perfect color match. Unfortunately, the result can be harder to stain and sand than expected.
Ordinary glue may:
- Seal the surrounding wood grain
- Resist penetrating stain
- Create pale or dark patches
- Become harder than the nearby wood
- Crack when floorboards move
- Leave a visible halo around the repair
If you want to use sanding dust, combine it with a floor-filler binder designed for that purpose. Use fine, clean dust from the appropriate sanding stage, follow the binder’s mixing instructions, and test the finished color before spreading it across the floor.
How to Apply Wood Filler for Hardwood Flooring
Always read the manufacturer’s instructions first. Drying times, sanding sequences, and depth limits vary between products.
The following process works as a general guide for small repairs in unfinished hardwood.
What you will need
- Floor-compatible wood filler
- Vacuum with a soft-brush attachment
- Narrow plastic or stainless-steel putty knife
- Clean cloth
- Manufacturer-recommended sandpaper
- Compatible stain and floor finish
- Gloves and eye protection
- Moisture meter if dampness is suspected
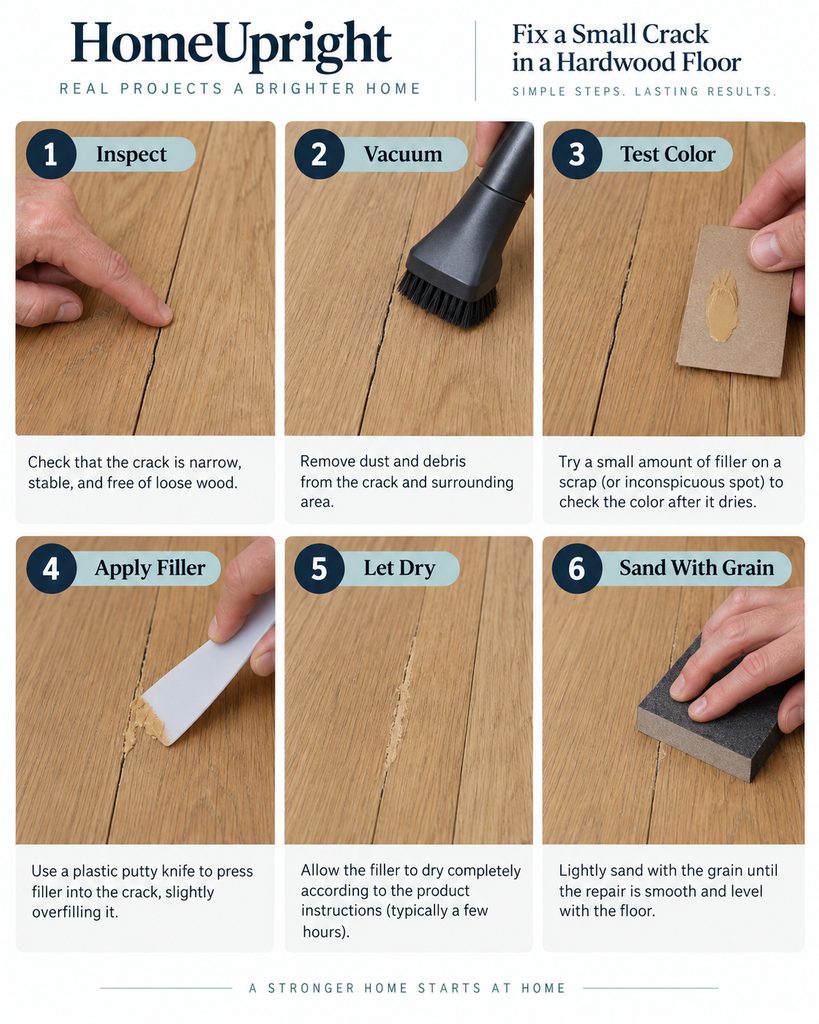
1. Find out why the defect appeared
Look beyond the visible crack. Gently press nearby boards and listen for movement. Check for water staining, softness, raised edges, or an unusual odor.
A stable surface defect may be suitable for filler. Loose boards, leaks, and rot require a proper repair first.
2. Check the room conditions
Don’t fill a gap just because the air is temporarily dry. Measure the indoor relative humidity and consider whether the opening changes with the seasons.
If the floor has been exposed to a leak, allow a professional to assess the wood and subfloor rather than assuming the surface is ready once it feels dry.
3. Clean the damaged area
Vacuum the opening thoroughly. Remove loose splinters and failing old filler without cutting into sound wood.
The area must be free from dust, oil, wax, polish, and cleaning-product residue. These contaminants can prevent the new material from bonding.
4. Test the product
Apply the filler to scrap wood or a hidden location. Complete the test with the actual stain and clear finish.
This small step can prevent a much larger color problem in the center of the room.
5. Press the filler into the defect
Use a narrow putty knife to work the product firmly into the opening. Keep the application controlled instead of smearing filler across the surrounding grain.
On an unfinished surface, leave the repair slightly raised if you plan to sand it level. For deep defects, apply the filler in layers when required by the manufacturer.
6. Let it dry completely
A filler can appear dry on the surface while remaining soft underneath. Temperature, humidity, repair depth, and product composition all affect drying time.
Sanding too soon can pull the material out or create a rough depression.
7. Sand with the grain
Sand the dry repair until it is level with the board. Use the grit recommended for the flooring and finishing system.
Take extra care with engineered hardwood. The real-wood wear layer may be thin, and aggressive sanding can expose the material beneath it.
8. Remove the dust
Vacuum the surface and use the finish manufacturer’s approved cleaning method. Dust left in the grain can affect stain absorption and topcoat adhesion.
9. Apply the stain and finish
Apply the selected stain only after confirming its compatibility with the filler. Protect the completed repair with a floor-rated finish and follow the required drying, ventilation, and curing instructions.
Can You Fill Hardwood Floor Gaps Without Sanding?
You can complete some minor repairs without sanding, especially when the floor already has a finished surface.
A color-matched putty, wax stick, or no-sand touch-up compound may work for:
- Pinholes
- Finish-nail holes
- Small edge chips
- Shallow scratches
- Tiny cosmetic cracks
These products improve appearance. They do not replace board fastening, refinishing, moisture correction, or structural repair.
Avoid sanding one small section of a finished floor unless you know how the new coating will blend with the existing surface. Spot sanding can leave a noticeable change in color, texture, or sheen.
Why Does Wood Filler Keep Coming Out?
Repeated filler failure is usually a symptom, not a product shortage.
Common causes include:
- Seasonal expansion and contraction
- A gap wider than the product can support
- Loose or flexing floorboards
- Dust, wax, or oil inside the repair
- Filler applied over an incompatible finish
- Incomplete drying before sanding
- Excessive repair depth
- Ongoing moisture variation
- Poor adhesion to deteriorated wood
Do not continue adding filler to the same failing joint. Carefully remove the loose material and investigate the movement before choosing another repair.
Mistakes That Make Hardwood Floor Repairs More Visible
Filling every gap during dry weather
A room may look better temporarily, but the boards still need room to expand when humidity returns.
Choosing a product by color alone
Color matters, but so do hardness, flexibility, depth limits, and compatibility with the floor finish.
Trusting the word “stainable”
A stainable filler can still absorb significantly more or less pigment than natural wood. Testing is the only reliable way to judge the finished appearance.
Spreading filler too widely
Filler lodged in the surrounding grain can produce a flat, discolored patch after staining. Keep the application close to the defect.
Ignoring the existing finish
Many fillers bond best to bare wood. Applying them over wax, polish, or a sealed surface can lead to poor adhesion.
Using filler as a structural repair
Filler cannot secure a loose board, rebuild a damaged subfloor, or stop continuing moisture intrusion.
When Should You Call a Flooring Professional?
Professional evaluation is sensible when:
- Gaps appear suddenly across a large area
- Boards are cupping, crowning, lifting or buckling
- The floor feels soft or moves underfoot
- You find rot, mold or insect activity
- A plumbing leak or flood has occurred
- Wide gaps remain open throughout the year
- Previous filler repeatedly cracks or falls out
- The engineered floor has an unknown wear-layer thickness
- The flooring is historic, valuable, or difficult to match
- Several boards may need replacement
A flooring professional can determine whether the floor needs moisture correction, better fastening, a fitted wood strip, refinishing or partial board replacement.
Frequently Asked Questions
Can wood filler be used between hardwood floorboards?
You can use wood filler between floorboards when the gaps are small, stable, and within the product’s stated limit. Don’t pack it into joints that regularly expand and contract with seasonal humidity.
What is the best wood filler for hardwood floor gaps?
For narrow, stable gaps in unfinished flooring, use a floor-specific waterborne, full-trowel or wood-flour filler. A wide, stable gap may need a matching wood strip, while a seasonal gap should first be managed through more consistent indoor humidity.
Is hardwood floor filler permanent?
Filler can remain durable in a clean, stable defect, but no rigid product is guaranteed to survive continued floor movement. Moisture changes, loose boards, and heavy traffic can cause the repair to crack or loosen.
Can you use wood putty on finished hardwood?
Yes. A color-matched putty is useful for small nail holes, chips, and cosmetic defects in a finished floor. Test the color and confirm that the putty is compatible with the existing coating.
Can wood filler be stained to match a hardwood floor?
Many fillers accept stain, but they rarely absorb it exactly like natural wood. Test the filler with the intended stain and clear finish before repairing a prominent area.
Should you fill hardwood floor gaps before sanding?
Small, stable gaps and surface defects are often filled during sanding and refinishing. Follow the product’s instructions, as the right application point can vary between spot fillers, full-trowel products, and wood-flour systems.
What can be used for large gaps in old hardwood floors?
A fitted strip or tapered sliver of matching wood is often more durable than conventional filler. Natural-fiber rope is another traditional option for some old plank floors, particularly where limited movement must be accommodated.
Final Thoughts
The right wood filler for hardwood flooring can make nail holes, small cracks, chips, and minor surface damage far less noticeable. For unfinished floors, use a sandable floor-specific product that works with the planned stain and topcoat. For small defects in finished flooring, color-matched putty usually requires less disruption.
When choosing wood filler for hardwood floor gaps, pay close attention to movement. A narrow stable opening may accept filler, while a wide gap may need a wood strip. A seasonal gap may need no cosmetic repair at all.
Take time to identify the cause, test the color, and read the manufacturer’s instructions. A careful, modest repair nearly always looks better than filling every visible joint with the hardest product available.