


Black Wood Stain: How to Choose, Test, and Apply It Without Regret
Black can make a plain piece of wood feel expensive, modern, and intentional. Yet black wood stain is also one of the easiest finishes to get wrong, because the word “black” hides a dozen important decisions. The same can look charcoal on pine, brown-black on a warm board, blue-black under cool lighting, or almost painted once a clear coat is added.
I would never choose black from a tiny store swatch alone. A black stain that looks beautiful on red oak can look uneven on pine, and a finish that works indoors can disappoint quickly outside. This guide gives you a simple way to decide before you buy, test, sand, stain, and seal.
Quick answer: when black is the right choice
black wood stain is a good choice when you want the wood grain to remain part of the design. It works best on bare, absorbent wood and on projects where visible texture matters more than a perfectly uniform, solid-black surface. For a cabinet door, a smooth veneer, or a heavily used tabletop, the right answer may be a gel-based finish, a tinted clear coat, or paint instead.
| If your priority is… | Start with… | Why it helps |
|---|---|---|
| Clearly visible grain | A penetrating black stain on bare open-grain wood | It colors inside the wood instead of covering it fully. |
| More even color on pine or birch | A conditioning step and a gel-style black stain | It gives you more control over blotchy areas. |
| A near-solid black furniture finish | A compatible black colorant plus a protective clear coat, or paint | A penetrating stain alone may not be opaque enough. |
| An outdoor door, siding, or deck detail | A product specifically labeled for exterior wood | Sun, moisture, and movement demand a different finish system. |
| A soft, low-sheen look | A matte or flat compatible topcoat | The sheen comes mainly from the protective coat, not the stain color. |
Why “black” is not one color on wood
The biggest mistake is assuming that black covers every undertone. Wood has color, density, open pores, knots, grain direction, and sanding marks. When a translucent pigment sinks into it, all of those things remain part of the result.
A warm board may still show a walnut color beneath a black layer, especially at the grain lines and edges. That can be beautiful if you want depth, but frustrating if you expected a cool, ink-black finish. The answer is not necessarily a second coat. It is first to decide whether you want black with character or a solid black surface.
Make your truth panel from offcuts or from the back of an unseen section. Divide it into strips and test one variable at a time: one strip without conditioner, one with conditioner, one coat, two coats, and one strip with the final clear coat. Photograph it in daylight and in the room where the finished piece will live, then wait until the next day before choosing.
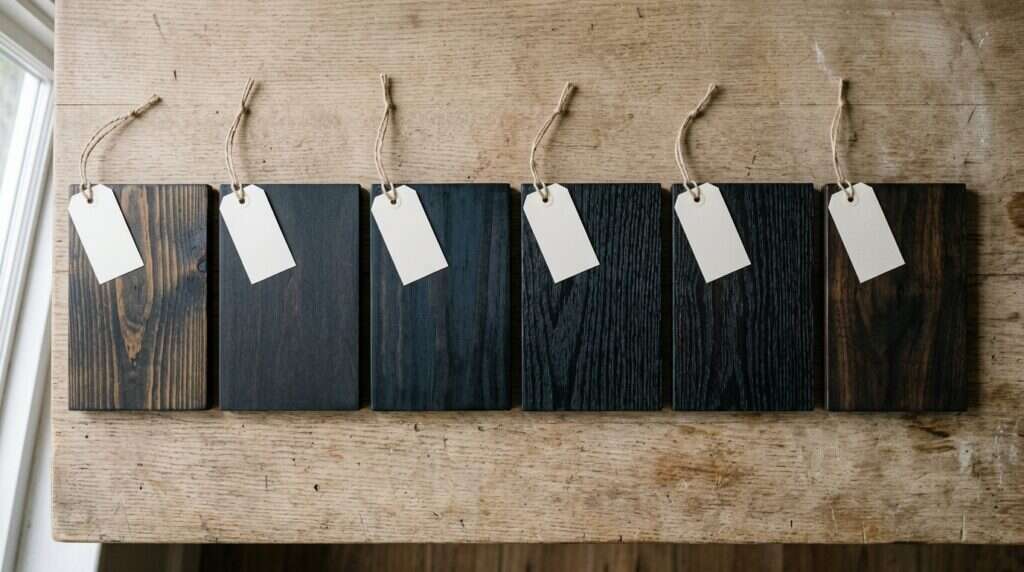
The light test matters more than most buying guides say
Color is not fixed once the finish dries. A black tabletop near a warm lamp can reveal a brown or plum cast, while the exact same table under cooler task lighting can look more neutral or slightly blue. This is one reason it helps to read how soft white and daylight lighting change a room before finalizing a dark finish for a kitchen, office, or living room.
Wood grain is a feature, not a defect
Black can make open grain look almost architectural. Oak and ash often develop strong dark pores and raised lines, while maple, birch, and smooth poplar can look flatter or more uneven. Neither result is automatically better, but you should know which one you want before buying stain.
Understand the finishes before you choose a black stain
Most confusion comes from treating every dark product as the same thing. A penetrating black stain, a gel finish, an opaque exterior stain, a tinted clear coat, and black paint can all look dark from a distance, but they behave differently on the wood. They also repair differently, which matters once the project is scratched, spilled on, or left in the sun.
| Finish type | Best use | What you will see | Main watch-out |
| Penetrating black stain | Bare furniture, trim, open-grain wood | Grain and color variation stay visible | Needs absorbent wood and usually needs protection on high-use pieces. |
| Gel-style black stain | Pine, birch, vertical surfaces, some previously colored wood | More controlled color with less soaking | Can look muddy if applied too heavily or without wiping evenly. |
| Dye or very transparent colorant | Strong, even color on bare wood | Clearer grain and deeper color potential | Requires a careful test and a compatible finish schedule. |
| Opaque or solid exterior stain | Siding, trim, fences, weathered outdoor wood | Much more coverage than a penetrating stain | It changes the look from “grain-led” to “coating-led.” |
| Tinted topcoat or paint | Veneer, laminate, near-solid black goals | Uniform color with less visible wood | Repairs and prep differ from ordinary stain work. |
Penetrating black stain
A penetrating black stain is usually the best place to begin on freshly sanded, solid wood when you want the wood to remain recognizable. It enters the surface rather than forming the whole color layer on top. For an interior shelf, picture frame, or oak side table, that can create exactly the deep but natural look people mean when they say they want stained black wood.
Gel-style black stain
A thicker black stain stays nearer the surface, which can make it easier to control on woods that absorb color unevenly. This is why many DIYers consider it for pine, birch plywood, or vertical furniture parts where a thin liquid stain can run or sink in too fast. It can be a smart middle ground when you want more coverage without fully switching to paint.
Black Wood Stain Spray
Black Wood Stain Spray can be useful for a small open-grain object, a carved detail, lattice, or a project with many narrow surfaces. It is not the easiest first choice for a tabletop or a large piece of furniture because even overlap and wipe control take practice. If you choose a spray product, use only one that is clearly labeled for the material and setting, and follow its safety, drying, and recoat directions exactly. The tradeoff is that water based spray paint is more sensitive to humidity while it is drying, and it can take a little longer to reach full hardness in damp conditions compared to a well ventilated dry room.
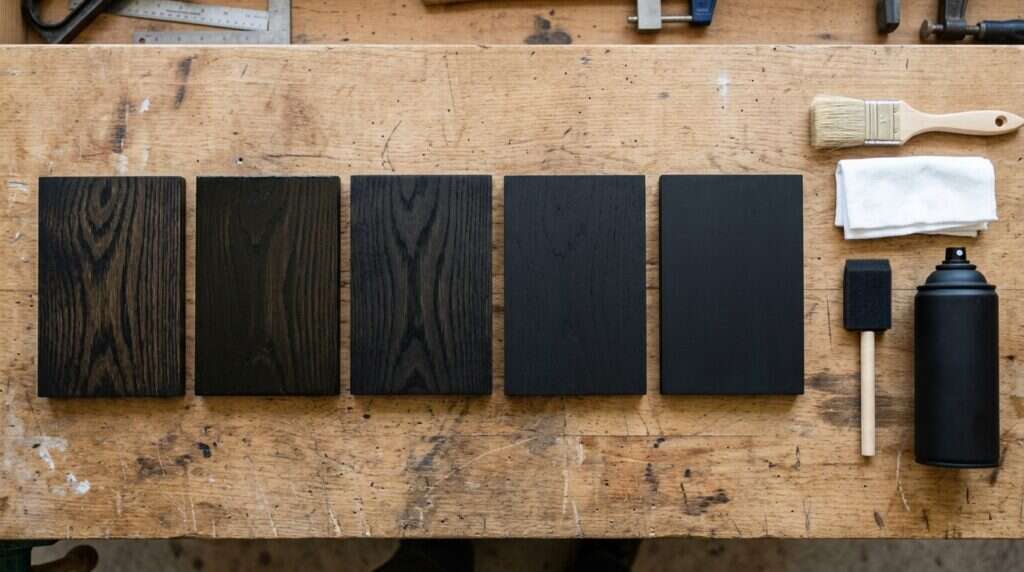
Black wood stain vs paint: choose by the finish you want to live with
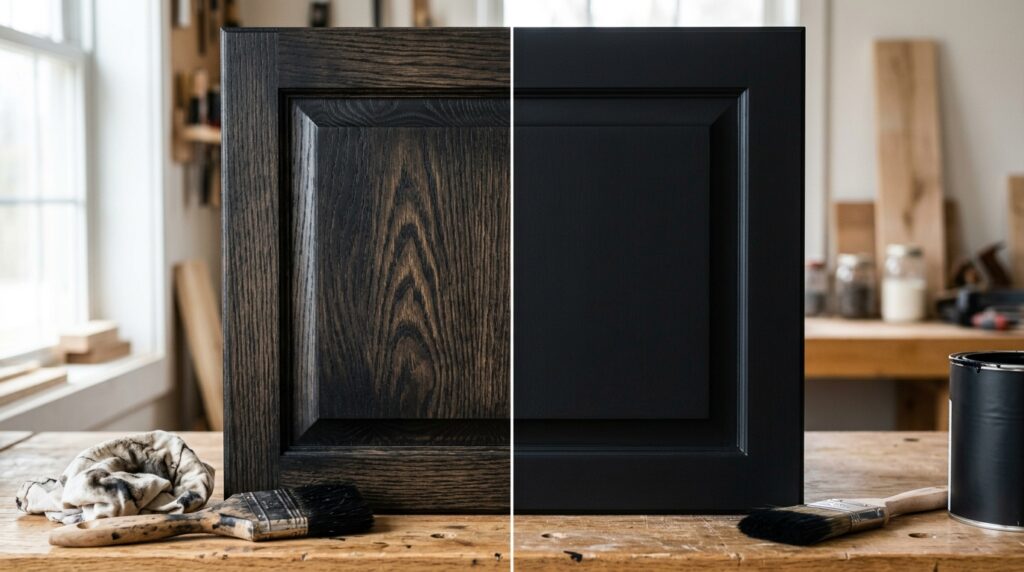
The choice between black wood stain vs paint is not about which one is “better.” It is about whether you want the wood itself to stay visible. A stain lets color and grain work together. Paint creates a more uniform color film and usually makes more sense when the substrate is uneven, manufactured, damaged, or not truly bare wood.
For me, the deciding question would be simple: if I would be disappointed to lose the grain, I would stay on the stain side. If I would be disappointed to see warm undertones, knots, pore lines, or uneven color, I would move toward paint or an opaque coating. That one honest decision can save several days of trying to make stain behave like something it is not.
| Question | black wood stain | Black paint |
| Will the grain remain visible? | Usually yes, to some degree | Sometimes texture remains, but color is much more uniform. |
| Does it need bare, absorbent wood? | Usually yes for a penetrating product | No, with correct cleaning, sanding, and primer. |
| Can it look truly solid black? | Sometimes, but not reliably on every wood | More reliably, especially on smooth surfaces. |
| Does it need a protective coat? | Often yes for furniture, counters, floors, and handling | Depends on the paint system and use, but a protective system may still help. |
| How does repair feel? | Small worn areas can sometimes blend with careful work | Touch-ups may flash or show a sheen difference. |
Both systems can fail if the preparation is wrong. Stain can look patchy, and paint can chip, scratch, or show poor adhesion. The high-hiding primer guidance for a dark color change is useful if you decide a painted finish better fits the surface.
When paint is honestly the smarter option
Choose paint when the piece is laminate, plastic-coated, heavily veneered, full of repairs, or already sealed with a factory finish that you do not want to strip to bare wood. It is also a better fit when you want a completely even black with no visible golden or reddish undertone. In these cases, forcing a penetrating stain onto a closed surface is more work and less reliable than choosing the right coating system from the beginning.
Black wood stain for furniture: start with the wood, not the color name
Furniture is where a black finish can look incredibly polished, but it is also where everyday wear exposes weak choices. Tabletops meet water, rings, crumbs, and repeated wiping. Chair legs get kicked. Drawer fronts get touched in the same spots every day. A beautiful black color needs a finish plan that accepts this reality.
Before buying, find out what your furniture actually is. Solid wood, solid-wood edges with a veneer panel, plywood, MDF, and laminate are very different surfaces. Look underneath, inside a drawer, or on the back. A grain pattern that repeats exactly, a very thin edge layer, or exposed particleboard is a warning that a deep sanding and penetrating stain plan may not be safe.
Pine, fir, and softwood furniture
Pine is affordable and takes dark color quickly, but it can absorb black unevenly around knots, end grain, and softer earlywood. This does not mean you cannot use black stain wood on pine. It means the sample board is non-negotiable, and a compatible conditioner or gel-style option may give a calmer result.
Oak, ash, and other open-grain hardwoods
Oak and ash can be excellent candidates for black because their grain remains visible and creates texture. A black stain may settle into pores and make the pattern feel deliberate rather than flat. If you want a dramatic dining table or a moody shelving unit, this is the type of wood that can deliver that grain-first look.
Walnut and naturally dark hardwoods
Walnut already has a deep brown foundation. A black stain can turn it into a very dark brown-black with subtle warmth, which looks refined in a traditional or modern room. If you expect an inky blue-black, test first. The natural walnut color can remain visible through a transparent product, especially in brighter light.
Veneer, plywood, MDF, and laminate
MDF and laminate do not absorb penetrating stain like wood. A black stain may sit unevenly, wipe away, or create a confusing, blotchy coating. Choose a product designed for the material, and do not assume a listing that says “wood stain” will transform every furniture surface.

Black wood stain interior: protection, light, and air quality matter
black wood stain interior projects benefit from a clear plan for ventilation and curing. The indoor-air guidance on volatile organic compounds explains that VOCs are emitted by many consumer products and that indoor concentrations can be higher than outside. Read the label, use the recommended ventilation, and give the finish the full cure time before placing it in a small closed room.
black wood stain interior projects benefit from a clear plan for ventilation and curing. The indoor-air guidance on volatile organic compounds explains that VOCs are emitted by many consumer products and that indoor concentrations can be higher than outside. Read the label, use the recommended ventilation, and give the finish the full cure time before placing it in a small closed room.
Use lighting to choose the right black
A dark wood stain looks its most elegant when it relates to the room around it. Warm bulbs can bring out brown, burgundy, or plum undertones, while cooler bulbs may make charcoal or blue undertones feel stronger. If you like a relaxed, warm room, soft white versus warm white lighting can help you plan the rest of the space around a black-stained furniture piece.
Choose topcoat strength by use, not by appearance
Test the topcoat over the stain on your sample board. Some clear coats make a black finish look deeper or slightly warmer, while a high sheen can make dust, fingerprints, and tiny scratches more obvious. The right black color with the wrong sheen can still feel like the wrong choice.
Black wood stain exterior: the color is only half the decision
Black wood stain exterior projects need more planning than indoor furniture because outdoor wood moves, gets wet, dries, and faces sunlight. The Forest Service guidance on finishing wood makes the core priority clear: outdoor finishes must be chosen for protection from water, sunlight, and weathering, not appearance alone. Never use an indoor-only stain on exterior wood simply because the shade is perfect.
Black is also a heat decision. Dark surfaces absorb more solar energy than light ones, and solar-reflectance guidance notes that lighter colors are generally more reflective, although color alone does not tell the whole story. That does not ban black on an exterior. It means you should be honest about intense sun, hot-touch surfaces, wood movement, and the need to inspect the finish regularly.
Where black works well outside
A black-stained front door, pergola detail, trim element, fence accent, or covered outdoor furniture piece can look striking. It pairs especially well with light siding, stone, brick, pale decking, and green planting. Use contrast deliberately. A small black detail can feel sophisticated without turning every exterior surface into a heat-absorbing statement.
On a broad sun-exposed surface, choose the exterior formulation carefully and test a hidden area first. The technical guide to exterior stains explains why penetrating stains can avoid the cracking and peeling associated with film-forming finishes, but every finish still needs inspection and renewal.
Do not ignore moisture and end grain
The ends of boards, joints, lower rails, and horizontal surfaces usually need extra attention because water collects or enters there more easily. A flawless black face will not rescue untreated end grain or a design that traps water. Take time to clean, dry, and prepare those areas before staining.

How to apply black wood stain for an even finish
The application itself is simple once the preparation is right. The hard part is resisting the urge to rush. Black shows uneven sanding, dust, fingerprints, glue residue, wet edges, and poor wipe-off faster than a medium brown stain does.
1. Confirm what surface you have
Check whether the surface is solid wood, veneer, plywood, laminate, or already finished. A penetrating stain needs a clean, porous surface. If water beads on the piece, that is a clue that a finish or contaminant may still be blocking absorption.
2. Remove old finish only as far as the plan requires
For a true penetrating stain, the wood usually must be taken back to bare, absorbent material. A clear coat, wax, oil, or factory finish can prevent even penetration. On veneer, be cautious. Aggressive sanding can remove the thin top layer long before the old color is gone.
3. Sand evenly and clean completely
Sand with the grain, use an even progression, and pay special attention to old drips, glue squeeze-out, and rough patches. Do not obsess over a universal grit number because wood and product labels differ. Your aim is a clean, consistent surface with no glossy spots and no obvious scratch swirls.
4. Make your truth panel before touching the project
Use the same wood, the same sanding, the same stain, and the same planned topcoat. Write down what you did, including how long you left the stain before wiping. You do not need a laboratory, but you do need enough consistency to tell whether a difference came from the wood or from your application.
5. Use conditioner only after testing it
Conditioner can reduce uneven absorption on some softwoods and blotch-prone surfaces, but it can also lighten the final color or change how deeply a stain enters. That is why the test panel needs a conditioner strip and a no-conditioner strip. Do not assume that more preparation always produces a darker or better result.
6. Apply in manageable sections and wipe consistently
Use the applicator the product label calls for. Work in the direction of the grain and maintain a wet edge, but keep the section small enough that you can wipe it evenly before it starts to set. Black stain rewards a steady pace much more than a fast pace.
7. Let it dry fully before evaluating or recoating
A wet black stain often looks darker and richer than it will after it dries. Give it the full drying time from the label before deciding it needs another coat. Recoating too soon can lift color, make the surface tacky, or turn the grain into a hazy mess.
8. Add the right protective topcoat and allow cure time
For furniture, especially tabletops and touch points, a compatible protective clear coat is usually what makes the finish practical. Apply it in thin, even layers according to its instructions. A thick coat is not automatically stronger if it dries poorly or traps texture.
The safety guidance on oily finishing rags also matters here: certain oil- or solvent-soaked rags can create a fire risk. Follow the product’s disposal instructions, spread or store used rags safely as directed, and never leave them crumpled in a pile.

Matte black wood stain: why sheen should be chosen last
Matte black wood stain is often used as if it were one single product category, but “matte” usually describes the final sheen more than the black color itself. The stain controls much of the color. The topcoat controls much of the reflection, touch feel, and how forgiving the finished piece looks in daily life.
A glossy clear coat reflects light sharply, which can make black look rich but also reveal dust, fingerprints, and fine scratches. A low-sheen or matte-compatible coat softens reflections and can make grain feel more modern and calm. The tradeoff is that some very flat surfaces can be trickier to clean or touch up invisibly, so choose based on use rather than trend.

A simple buyer’s checklist before you buy
When you are standing in front of black finishes, the label can feel more confusing than helpful. Use this checklist to narrow the options. It makes the commercial decision practical without pretending there is one best can for every person.
- Match the product to the surface and location. Look for clear wording that it is suitable for bare interior furniture, exterior trim, decks, or the exact material you have. A rich black on the label is not enough if the product is not made for your surface.
- Decide whether you need penetration or coverage. If you want visible grain, look for a finish that stains bare wood. If you need a uniform black on a difficult surface, consider a more covering system rather than forcing a penetrating black stain to do the wrong job.
- Plan for safe application and cleanup. Review ventilation, personal protection, cleanup solvent or water, and rag disposal before opening the container. The guidance on VOC exposure indoors is a useful reminder to treat finishing products with care even in a home workshop.
Common black stain problems and the fixes that actually make sense
“It looks brown, not black”
This is often a product-and-wood combination issue, not an application mistake. Warm wood, a transparent formula, and warm lighting can create a rich dark brown instead of a cool black. Go back to the truth panel and compare a different black formulation, a different pre-treatment, or a more opaque path.
“The finish is blotchy”
Blotching usually comes from uneven absorption, uneven sanding, leftover glue or finish, or inconsistent wipe time. The correct fix depends on where it happened. If it is on scrap, change the process. If it is on the project, stop and evaluate before adding another coat.
“It is too black, and the grain disappeared”
This tells you the finish is more opaque than your design goal. You may be able to lighten the look by changing the sheen rather than changing the color, but do not assume a topcoat will restore grain that has been buried. On the next sample, try one coat, a more transparent formula, or a different wood species.
“The topcoat changed the color”
Clear finishes can make black look deeper, warmer, cooler, or shinier depending on the product and light. This is normal enough that I treat the topcoat as part of the color decision, not a separate final step. Always test the complete stack, not just the raw stain.
“The surface feels sticky days later”
Sticky finish often points to heavy application, poor drying conditions, a recoat-window problem, or a compatibility issue. Stop using the surface and review every product label you used. More topcoat will not fix a base layer that has not dried correctly.
Expert tips for a more expensive-looking result
The most polished black wood finishes usually look restrained, not forced. They have an even base, visible grain where grain belongs, and a sheen that fits the furniture. They also work with the room rather than fighting every other warm or cool surface around them.
- Use contrast around black. Black-stained wood looks especially good against pale walls, textured fabric, warm brass, natural stone, light rugs, and green plants. You do not need every object in the room to be dark for the finish to feel dramatic.
- Respect maintenance. Dust and fingerprints are more obvious on very dark, high-sheen surfaces. A soft cloth, gentle cleaning, and prompt spill care can keep the piece looking better than harsh scrubbing or abrasive cleaners.
Frequently asked questions about black wood stain
Can I put black wood stain over an existing stain?
Sometimes, but only if the existing surface is bare enough to accept the new color or the product is designed for previously finished surfaces. If a clear coat is still on top, a penetrating stain will not soak in evenly. Test a hidden area first, and do not assume a light scuff alone will turn a sealed table into stain-ready wood.
What wood looks best with black stain?
Open-grain woods such as oak and ash often look dramatic because the grain remains visible. Walnut can create a sophisticated warm black, while pine can look attractive but needs more testing because absorption can be uneven. The “best” wood is the one whose grain and undertone support your intended result.
Is black stain durable enough for a dining table?
The color layer alone is not the whole durability story. For a dining table, choose a stain compatible with a protective topcoat designed for repeated use, then allow the full cure time before setting dishes, placemats, or decorations on it. Follow the product directions for cleaning and heat resistance rather than assuming all clear coats perform the same way.
Can I use black wood stain outside?
Yes, but only use a finish that is expressly labeled for the exterior application you have. Outdoor black requires protection from sunlight, water, and weathering, and it may become hotter in direct sun than a light finish. Check the surface regularly and plan to maintain it according to the product label.
Is Black Wood Stain Spray better than brushing or wiping?
It is not automatically better. It can be practical for narrow details, lattice, or complex shapes, but it adds overlap control, spray safety, and equipment technique to the job. Wiping or brushing is often easier for a beginner who wants to control absorption and remove excess on a flat furniture surface.
Final thoughts: make black look intentional
The best black wood stain project begins with a small test, not a full can. Once you understand the wood, the level of coverage you want, the lighting, the use of the piece, and the required protection, the actual application becomes much less stressful. You stop chasing “the blackest black” and start choosing the finish that will still look right after it dries, cures, and becomes part of your home.
Start with the truth panel, then choose the finish system that matches it. If you are planning a moody room, keep the whole picture in mind: the black stain, the wood grain, the light bulbs, the wall color, and the other natural materials around it. That is how a dark finish feels rich and considered rather than flat or accidental.