


How to Remove Popcorn Ceiling Without Making a Mess
If you are searching for how to remove popcorn ceiling without turning your room into a storm of wet texture and dust, the real work starts before you pick up a scraper. The cleanest result depends on three checks: whether the material could contain asbestos, whether the surface has been painted, and how much repair the hidden drywall will need.
While researching this job, I noticed that many guides reduce it to “spray and scrape.” That skips containment, painted texture, drywall repair, drying time, and the final smooth finish. Scraping is only the middle of the job.
The short answer is to test first, empty and seal the room, soften a small area, scrape at a low angle, collect the damp debris immediately, repair the drywall, then prime and paint. If water beads on the surface or the ceiling contains asbestos, stop and choose a different route rather than forcing the scraper.
Quick answer: For an asbestos-free, unpainted ceiling, the best way to remove popcorn ceiling is to mist a small section, wait until the texture softens, and slide a wide rounded scraper nearly flat against the drywall. Work in small zones and catch the material while it is damp so it cannot spread through the house.
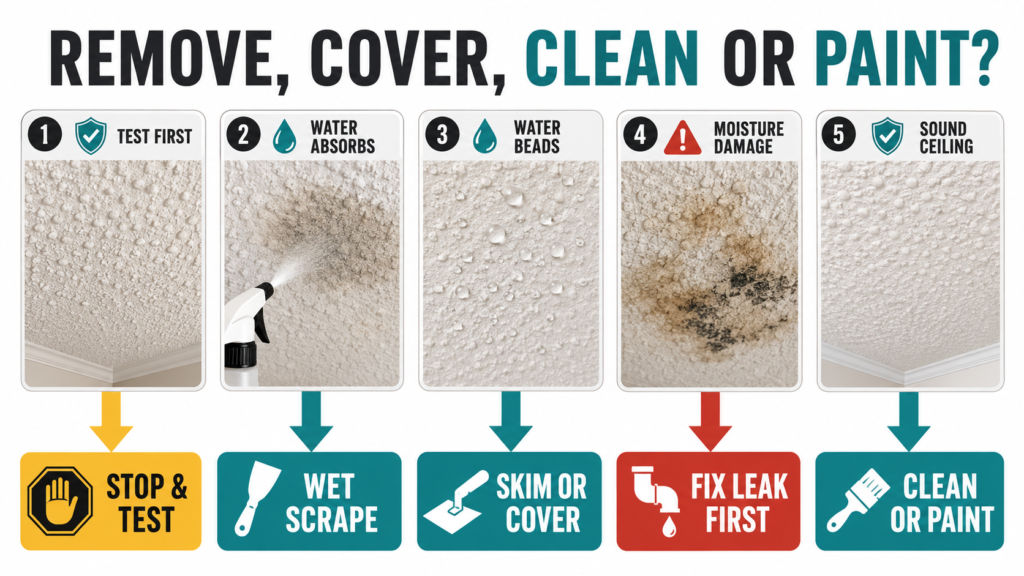
Should You Remove, Cover, Clean, or Paint the Ceiling?
Do not assume removal is automatically the best choice. The right method depends on testing, paint, ceiling condition, budget, and the finish you want. Decide before buying tools because this can prevent a weekend of failed scraping.
| Ceiling condition | Best starting option | Why it makes sense |
|---|---|---|
| Asbestos status unknown | Stop and arrange proper testing | Appearance cannot confirm whether asbestos is present. |
| Tested negative, unpainted, and softens with water | Wet scrape | This is usually the cleanest and most beginner-friendly removal route. |
| Tested negative but covered with several paint layers | Test a small area, then consider skim coating or covering | Paint may block water and make scraping slow or damaging. |
| Confirmed asbestos in sound condition | Leave it alone or discuss professional enclosure | Drilling, sanding, scraping, and amateur removal can release fibers. |
| Water-damaged, sagging, or moldy | Fix the moisture source and assess the drywall first | A cosmetic finish will not solve an active building problem. |
| Texture is sound but only looks dull | Clean or paint after safety checks | A refresh may cost less and avoid demolition. |
To replace popcorn ceiling texture with a smooth surface, you can scrape, skim, cover, or hire a qualified contractor. If this were my room, I would use a one-square-foot trial after the hazard check because it shows how the full ceiling may behave.
Safety Checks Before You Touch a Popcorn Ceiling
This is the section I would never skip. Old texture, paint, moisture, electrical fixtures, and ladder work can turn a cosmetic job into a health or repair problem. Check them before spraying, scraping, drilling, sanding, or cleaning.
Check for Asbestos Before Scraping
You cannot identify asbestos by color, age, or texture. The official testing guidance says certainty requires analysis by a qualified laboratory and recommends that a trained, accredited inspector take the sample. Bad sampling can be more hazardous than leaving sound material alone.
Textured paint and wall or ceiling patching compounds are among the older materials that may contain asbestos. The home asbestos safety guide also warns that sanding, drilling, or scraping such surfaces may release fibers, so do not make a “test scrape” before the material has been cleared.
If the result is positive, do not treat a respirator and plastic sheet as permission to remove it yourself. Current federal asbestos guidance says sound material is often best left undisturbed, and that removal or major repair should be handled by trained professionals. It also says not to dust, sweep, or vacuum debris that may contain asbestos.
Rules for residential work, contractor licensing, notification, and waste disposal differ by location. Use the official list of state asbestos contacts to verify local requirements, and use plain-language real-estate guidance as a starting point for related property questions.
Consider Lead Paint on Older Coatings
The popcorn mixture and the paint applied over it are separate materials, so a negative asbestos result does not answer every safety question. If renovation will disturb a coating in a home built before 1978, the lead-safe renovation guidance recommends checking for lead and using containment, protective equipment, dust control, careful waste handling, and detailed cleanup.
Paid contractors working in covered pre-1978 properties generally have certification duties. Rental property, childcare use, and house-flipping can change how rules apply, so verify your situation rather than assuming a DIY exemption.
Investigate Water Stains, Mold, and Sagging
A brown ring, musty smell, soft drywall, or sag is not just an ugly texture problem. Find and repair the roof, plumbing, bathroom ventilation, or condensation source before removal; this leaking shower head troubleshooting guide can help when the stain sits below bathroom plumbing. Wet drywall may lose strength, and a fresh skim coat can hide damage without fixing it.
For mold, size and source matter more than the color of the spot. The mold cleanup guidance says an area smaller than about 10 square feet can often be handled by the homeowner, while larger areas, major water damage, contaminated water, HVAC involvement, or health concerns call for added professional help. A textured, porous ceiling may require material removal rather than surface wiping.
Make the Work Area Electrically and Physically Safe
Water and ceiling electrical boxes do not mix. Switch off the correct circuit before removing or working around a light, fan, smoke alarm, or vent, then verify the power is off with an appropriate tester. If you are not confident with fixture removal or wiring, use a licensed electrician.
Use a properly opened stepladder on a firm, level floor. Never stand on furniture, stack objects under a ladder, or lean sideways for extra reach. Move the ladder often and use an extension pole where practical.

Popcorn Ceiling Removal Tools and Materials
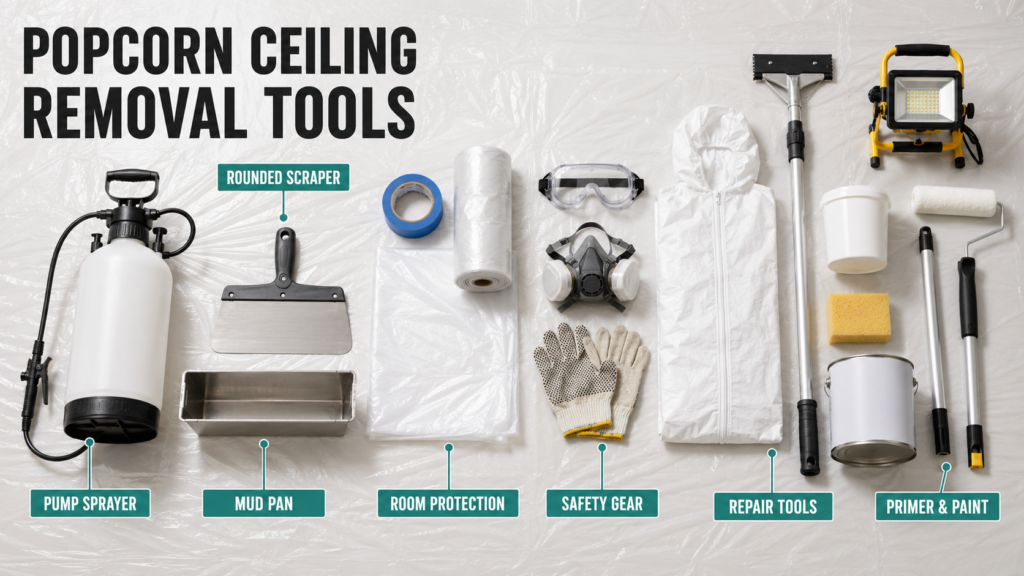
The most useful popcorn ceiling removal tool is not always expensive. A flexible 6- to 12-inch taping knife gives good control, while a ceiling scraper may accept a pole and catch bag. I prefer control because a huge rigid blade can catch seams and tear paper.
| Item | Purpose | Practical buying tip |
| Pump sprayer or spray bottle | Softens water-soluble texture | A pump sprayer gives even mist over a larger room. |
| Flexible taping knife or ceiling scraper | Lifts softened texture | Round or file sharp blade corners so they do not gouge drywall. |
| Mud pan or light catch tray | Catches damp scrapings | It stays easier to control than an overfilled bag attached to the scraper. |
| Plastic sheeting and painter’s tape | Seals floors, walls, doors, and vents | Use enough material to create continuous containment, not scattered drop cloths. |
| Eye protection, gloves, coveralls, and suitable respirator | Reduces contact with dust and debris | Choose equipment for the confirmed hazard and follow its instructions. |
| Stable ladder or work platform | Provides safe access | Select a height that lets you work without standing on the top steps. |
| Joint compound, knives, sanding tools, primer, and paint | Creates the finished ceiling | Budget for finishing before removal starts because scraping exposes flaws. |
Also keep basic hand tools, a voltage tester, bags, clean water, sponges, rags, and a work light nearby. Never begin with a power sander, especially when hazard status is unknown, because it can spread airborne dust.
How to Remove Popcorn Ceiling Yourself With Less Mess
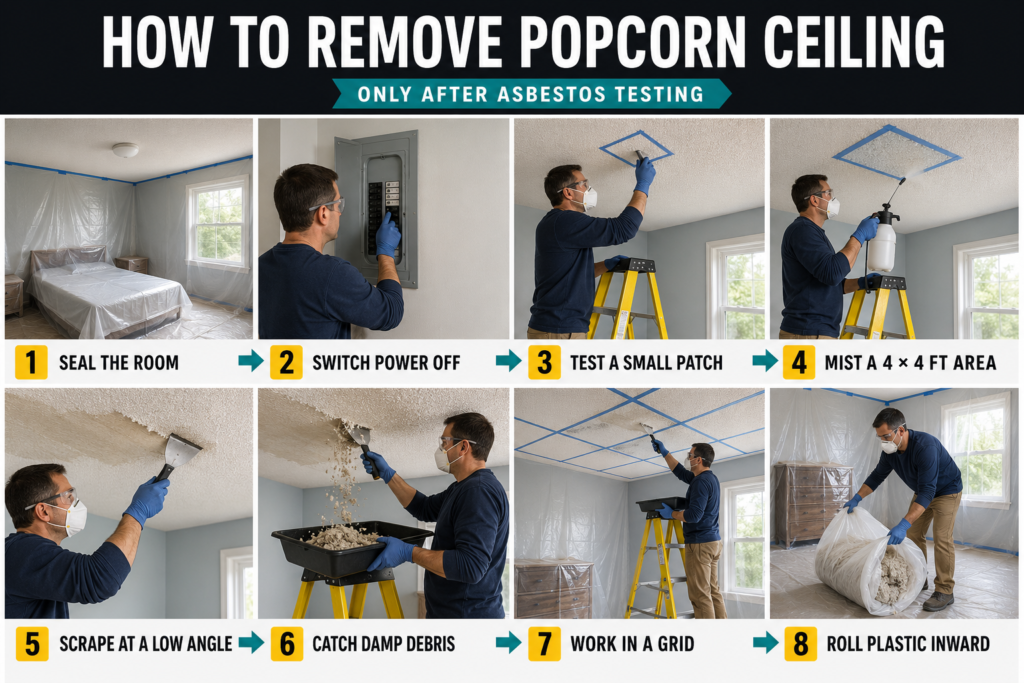
The easiest way to remove popcorn ceiling is a controlled loop: protect, mist, wait, scrape, catch, and bag. Do not wet the whole ceiling at once. Small zones keep the texture workable and stop water from soaking into the drywall face.
1. Empty and Seal the Room
Remove furniture, curtains, rugs, electronics, and loose items instead of covering everything. Tape continuous plastic over the floor and up the walls, then seal doors, closets, vents, and returns so debris cannot travel.
Keep children, pets, and other people outside the contained area. Plan a protected exit path so dirty shoes and tools never touch a clean floor.
2. Remove Fixtures and Protect Openings
After switching off and verifying power, remove fixtures that block the scraper. Protect open boxes from moisture and remove vent covers instead of scraping around them.
Photograph fixture positions and bag their screws. This makes reassembly easier after repair and paint.
3. Run a Water-Absorption Test
After safety clearance, choose an inconspicuous one-square-foot area. Try a light dry edge first; if it resists, mist it with warm water and wait about 10 minutes.
The texture should darken and soften without dripping or making drywall spongy. If water beads, it is probably painted or sealed, so use the painted-ceiling method below.
4. Mist a Small Working Zone
Mist roughly 4 by 4 feet evenly. Wait 10 to 15 minutes, then use a gloved finger or blade edge to check whether it releases.
If it remains firm, apply a second light mist instead of soaking it. Plain water is usually enough; chemicals will not fix paint that blocks absorption.
5. Scrape at a Low Angle
Hold the blade almost parallel and use steady, light pressure. Slide under the softened texture instead of digging through paper; rounded corners help prevent gouges.
Work in one direction and stop at resistance. Re-mist, wait, and retry instead of forcing the blade; use a narrower knife near seams and edges.
6. Catch Debris While It Is Damp
Hold a mud pan beneath the scraper, so most material misses the floor. A catch-bag scraper can help, but empty it often because weight changes the blade angle.
Bag damp material before it dries. Even asbestos-free construction waste may have local disposal rules, so confirm the destination first.
7. Keep a Wet Edge Without Overlapping Chaos
Mist the next zone while bagging the first. Mark a simple grid so you know which areas are dry, soaking, scraped, and ready for inspection.
This four-status grid is my favorite mess-control trick because it prevents random spraying and repeated ladder moves. It also gives you a natural stopping point if your shoulders tire or the ceiling begins behaving differently.
8. Remove Residue and Complete the First Cleanup
After the main texture is gone, use a clean sponge or broad knife on loose, damp residue without scrubbing through paper. A thin film can often be handled during repair and priming.
Fold wall plastic inward and roll floor protection from the edges toward the center. Bag waste, clean tools inside containment, and install fresh protection before sanding.
How to Remove Popcorn Ceiling That Has Been Painted
Learning how to remove painted popcorn ceiling begins with accepting that water may not reach the texture. A latex coat may soften after a small scratch exposes the material beneath, while several coats or an oil-based finish can remain water-resistant. Do not score, scratch, or sand anything until testing confirms the material is safe to disturb.
On a cleared ceiling, make a shallow opening in the paint film without cutting the drywall paper. Mist it and wait; if small flakes release gently, continue in narrow strips and expect extra patching.
If the film stays hard, consider a skim coat, new drywall, an approved panel system, or professional removal with dust extraction. Repeated soaking can damage drywall, while uncontrolled dry sanding creates a major dust problem. A heavily painted ceiling often should not be scraped.
Repair, Prime, and Paint After Removal
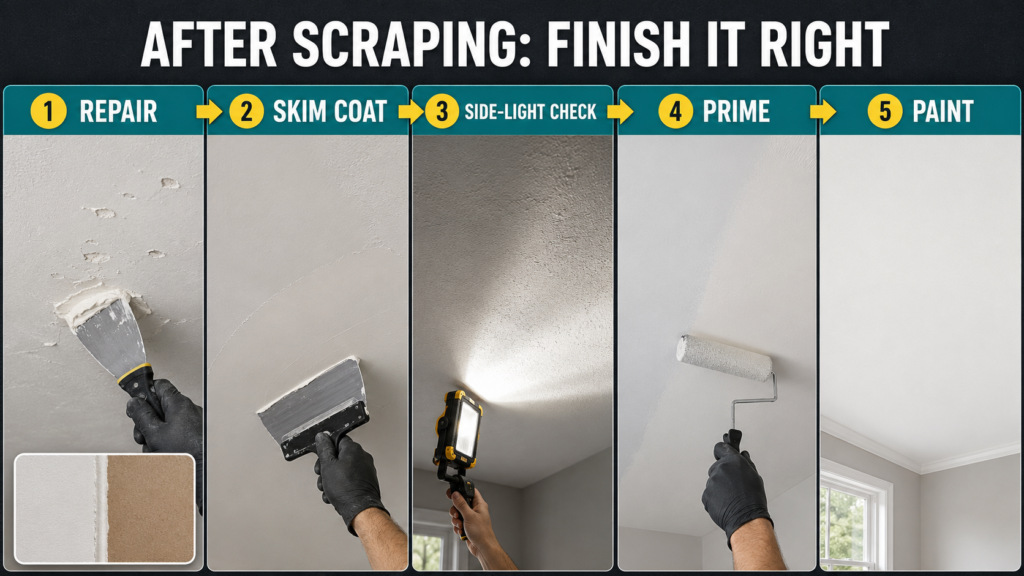
A scraped ceiling is rarely ready for paint. Popcorn texture was often used to hide uneven joints, fastener heads, patches, and modest finishing work. Set a portable light near the wall so it shines sideways across the ceiling, and use this soft white versus daylight guide to choose a clear task light for inspection.
Allow the ceiling to dry fully before repair. Drying-type joint compound commonly needs about 24 hours under normal conditions, and the manufacturer’s drying guidance notes that cooler or more humid conditions slow it down. Do not trap moisture under compound or primer to meet a one-day deadline.
Fill small gouges with thin coats of joint compound, repair loose seam tape, and reset or replace exposed fasteners correctly. If scraping tore away the white paper and exposed brown drywall facing, seal the torn area with a compatible problem-surface sealer before applying water-based compound, or the damaged paper may bubble.
For a truly smooth finish, apply a thin skim coat where needed rather than building isolated thick patches. Sand only after the compound is dry, use side light again, and remove dust with a suitable vacuum and damp wipe. Avoid sanding into intact drywall paper.
For a truly smooth finish, apply a thin skim coat where needed rather than building isolated thick patches. This guide to skim coating, sanding, priming, and painting shows the same finishing sequence on another textured surface. Sand only after the compound is dry, use side light again, and remove dust with a suitable vacuum and damp wipe.
How Much Does It Cost to Remove Popcorn Ceiling?
The answer to how much to remove a popcorn ceiling depends on what “remove” includes. A low quote may cover scraping and disposal only, while a higher quote may include containment, repairs, a skim coat, sanding, primer, two finish coats, fixture handling, and cleanup. Compare scope before comparing totals.
| Cost item | Current planning range | What to check |
| Basic professional removal | $1.84 to $3.46 per sq. ft. | This May 2026 estimate assumes favorable conditions and excludes hazardous-material work. |
| Removal with refinishing | About $2 to $6 per sq. ft. | Confirm whether skim coating, primer, paint, and disposal are included. |
| Separate skim coat | About $0.95 to $1.35 per sq. ft. | Multiple coats, repairs, height, and difficult access may increase it. |
| Asbestos popcorn-ceiling abatement | About $9 to $20 per sq. ft. | Licensing, containment, clearance, disposal, and local rules affect the quote. |
The current basic removal calculator places favorable-condition work at $1.84 to $3.46 per square foot and clearly excludes asbestos, lead, permits, fixtures, and work not listed. Broader removal and refinishing estimates are higher because the smooth finished ceiling costs more than the scrape itself.
For a 12-by-15-foot room, the ceiling area is 180 square feet. At the basic removal range, the arithmetic is about $331 to $623 before excluded finishing or hazard work. This is a planning example, not a quote, because ceiling height, paint, repairs, access, local labor, and minimum service charges can change the total.
When asking how much does it cost to remove popcorn ceiling, request an itemized price with eight lines: testing, room containment, scraping, waste, drywall repair, skim coat, primer and paint, and fixture work. Also ask whether the contractor carries appropriate insurance and whether the final finish will be inspected under side light.
How Long Does It Take to Remove Popcorn Ceiling?
For an average bedroom, plan by stages rather than promising yourself a one-day makeover. An asbestos-free, unpainted ceiling may scrape in several hours, but drying, patching, sanding, priming, and recoating commonly turn the project into two to four calendar days. Painted texture, high ceilings, damaged seams, humidity, and inexperience can extend it further.
| Stage for a 150 to 250 sq. ft. room | Sensible DIY planning allowance |
| Emptying and containment | 2 to 4 hours |
| Fixture protection and test area | 1 to 2 hours |
| Wet scraping and damp cleanup | 3 to 8 hours |
| Drying before repair | Often overnight or longer |
| Patching or skim coating | 2 to 6 working hours plus drying |
| Sanding, priming, and painting | 4 to 8 working hours plus recoat time |
These are workflow allowances, not productivity guarantees. How hard is it to remove popcorn ceiling? The scraping is often moderate, but sustained overhead work and producing a smooth finish make the complete job moderately difficult to hard for a beginner.
How to Clean Popcorn Ceiling Without Removing It
Before deciding how to clean popcorn ceiling, apply the same safety rule used for removal. If asbestos is suspected, confirmed, damaged, or shedding, do not dust, brush, sweep, or vacuum it. Limit access and get qualified advice because cleaning can disturb the material.
For a sound, asbestos-free ceiling, use the gentlest dry method. To learn how to remove dust from popcorn ceiling, hold a low-suction soft brush just off the peaks or pass a microfiber duster lightly in one direction. Protect the floor because rubbing breaks the texture.
For an ordinary mark, test a hidden area with a barely damp white sponge and mild detergent solution. Dab without soaking, stop if texture transfers, and let the test dry before judging the color.
How to Remove Mold From Popcorn Ceiling
Do not begin with bleach or paint. Fix the moisture source and check whether the material has softened or holds growth behind the surface. Damaged porous drywall may need replacement instead of wiping.
If the patch is small, the ceiling is asbestos-free, the water source is clean and fixed, and no vulnerable person is at risk, follow official mold-cleanup precautions. For more than about 10 square feet, extensive water damage, sewage, recurring growth, HVAC contamination, or health concerns, use experienced professional help rather than spreading spores through scraping.
Painting Popcorn Ceiling Instead of Removing It
Painting popcorn ceiling can refresh a clean, dry, secure texture, but it also makes future wet scraping harder. Test for hazards first, repair the moisture source, remove loose dust gently, and seal stains with a compatible primer. Do not paint material that is crumbling, damp, moldy, or already pulling away.
A sprayer gives even coverage with little contact but needs overspray containment and skill. A thick-nap roller is simpler, yet repeated pressure can pull texture loose. Load it well, make a light pass, and avoid overworking the surface.

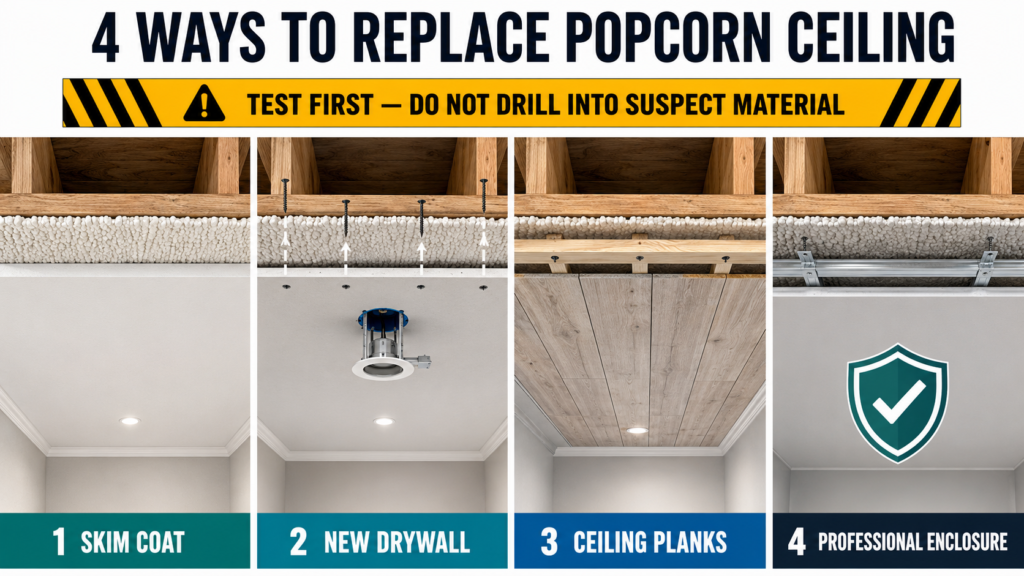
Ways to Replace Popcorn Ceiling When Scraping Is Wrong
Removal is not the only route to a modern ceiling. If an asbestos-free surface is heavily painted or hides poor drywall, covering may be cleaner. Joists, electrical boxes, ceiling height, fire rating, and installation instructions still matter.
| Alternative | Best use | Main drawback |
| Skim coat over sound texture | Stable, painted texture with good adhesion | Adds weight and demands strong finishing skill. |
| New thin drywall fastened to framing | Very rough or damaged-looking ceiling | Requires lifting, fastening, taping, box extensions, and careful fixture work. |
| Ceiling planks or approved panel system | A decorative finish is wanted | Costs more and may reduce height or complicate fixtures. |
| Professional enclosure or encapsulation | Confirmed asbestos that will remain in place | Future work must account for hidden material and follow a documented plan. |
| New light texture after scraping | A perfectly smooth finish is not essential | Texture can still collect dust and be difficult to patch later. |
Never drill, screw, sand, or nail through suspect or confirmed asbestos. The guidance on managing asbestos in place treats enclosure and sealing as professional repair methods.
Expert Tips for a Cleaner, Better-Looking Result
Judge the job by the finished ceiling, not by how quickly texture reaches the floor. These checks prevent successful scraping followed by paint that exposes every seam.
- Test the whole system in one small zone. Scrape, patch, prime, and paint a one-square-foot sample before committing to the room.
- Round the blade corners. A few careful passes with a file can stop sharp corners from digging into drywall while the center of the blade lifts texture.
- Use side light twice. Inspect after repair and primer because it reveals pinholes, ridges, and torn paper.
- Separate wet and dry phases. Bag damp texture, then install fresh protection so it does not mix with sanding dust.
- Ask what “smooth” means in a quote. Scrape-only, spot repair, full skim coat, and higher-level smooth finishes are different scopes and should not share one vague price.
- Know when to stop. A ceiling that resists water, tears in sheets, sags, or exposes widespread seam failure is telling you to change methods, not push harder.
Pros and Cons of DIY Popcorn Ceiling Removal
| Pros | Cons |
| Can reduce labor cost on a tested, simple room | Requires careful hazard testing and containment |
| Gives you control over schedule and finish | Overhead work is tiring and ladder-intensive |
| Wet scraping can keep ordinary dust down | Painted texture may barely respond to water |
| A smooth ceiling can look brighter and cleaner | Hidden drywall flaws can double the finishing work |
Because this project affects health, property, and local waste rules, treat every online guide as general educational information, not professional advice. A qualified inspector, contractor, electrician, or local authority may be necessary.
Frequently Asked Questions
What Is the Easiest Way to Remove Popcorn Ceiling?
For tested, asbestos-free, unpainted texture, the easiest way to remove popcorn ceiling is to mist a small zone, wait 10 to 15 minutes, and scrape gently with a wide, rounded knife. Catch the damp material in a pan and repeat in a planned grid instead of soaking the full room.
What Is the Best Way to Remove Popcorn Ceiling With Minimal Dust?
The best way to remove popcorn ceiling with minimal ordinary dust is wet scraping after safety testing, followed by immediate bagging while the debris remains damp. Full floor and wall containment matters just as much as the water because it stops fragments from reaching vents, halls, and furniture.
Which Popcorn Ceiling Removal Tool Works Best?
A flexible 6- to 12-inch taping knife with rounded corners gives beginners good control. A pole scraper can add speed, but a mud pan catches debris without pulling the blade off angle.
How Do You Remove a Popcorn Ceiling That Has Been Painted?
After safety clearance, open a tiny part of the paint film and test whether water softens the texture. If it stays hard, choose skim coating, an approved cover, or professional removal instead of soaking or power-sanding.
How to Remove Popcorn Ceiling With Asbestos
Do not scrape, sand, drill, sweep, or vacuum it yourself. Leave sound material undisturbed and consult a qualified asbestos professional about inspection, repair, removal, clearance, and disposal.
How Much to Remove a Popcorn Ceiling in One Room?
Multiply the room’s length by width, then multiply that area by the contractor’s exact scope rate. A 180-square-foot room at the current basic removal range of $1.84 to $3.46 per square foot works out to about $331 to $623 before excluded repairs, finishing, testing, fixtures, or hazardous-material work.
How Long Does It Take to Remove Popcorn Ceiling?
Scraping an easy bedroom may take several hours, but a finished DIY project often spans two to four days because the ceiling must dry before repair, sanding, primer, and paint. Painted texture, humidity, high ceilings, and extensive skim coating add time.
How Hard Is It to Remove Popcorn Ceiling Yourself?
Wet scraping an unpainted, cleared ceiling is usually straightforward, but containment, ladder work, shoulder fatigue, drywall repair, and smooth finishing raise the overall difficulty. Beginners should start with a small room and stop if the ceiling is painted, damaged, hazardous, or unusually high.
How Do You Remove Dust From Popcorn Ceiling?
First, confirm the texture is safe and secure. Then use very light contact with a microfiber duster or low-suction soft brush held just off the peaks, work in one direction over floor protection, and stop if the texture begins to shed.
Can You Paint Instead of Remove Popcorn Ceiling?
Yes, if the texture is hazard-cleared, clean, dry, firmly attached, and free of unresolved mold or leaks. Remember that paint may lock the texture in place and make later removal harder, so use it as a deliberate finish choice rather than a temporary shortcut.
Final Thoughts
Knowing how to remove popcorn ceiling is less about force and more about making the correct decision at each stage. Test first, use a small absorption trial, contain the room completely, scrape gently, let the surface dry, and give repair and primer the same attention as removal.
Before buying a full set of tools, complete one safe sample area and price the finished result, not just the scrape. If the ceiling contains asbestos, repels water, sags, carries widespread mold, or needs major drywall work, pause and get the right professional so the update does not create a larger problem.