


How to Remove Window Tint From Car and Home Windows
Peeling a loose corner looks easy until the film tears, sticky glue spreads across the glass, or a rear defroster line begins to lift with it. If you are searching for how to remove window tint, the safest answer is not one universal trick. You first need to identify the film, the glass beneath it, and anything attached to that glass.
My rule is simple: treat the film and the adhesive as two separate jobs. Warm and peel the film first, then soften and lift the glue. I would rather spend ten extra minutes keeping the adhesive warm than spend an hour rubbing a cold, gummy mess around the window.
This guide covers car side glass, old film, rear defroster glass, glue residue, and home windows. It also explains where blades and strong heat create unnecessary risk.
The Short Answer: The Safest Removal Method
For most removable film, start with a garment steamer, plastic scraper, soapy water, and clean microfiber towels. Warm one corner, lift it, and pull the film slowly back over itself at a low angle while feeding steam just ahead of the peel line.
Do not begin with a razor, high heat, or dry pulling. Never use a metal blade on rear defroster lines, coated glass, acrylic, polycarbonate, or an unknown pane.
Quick Removal Sequence
- Identify and protect. Confirm that the darkness comes from applied film, then look for coatings, printed lines, damage, electronics, trim, and upholstery that need protection.
- Test and peel. Warm a small corner, lift it with plastic, and pull low and slow while keeping the advancing edge warm.
- Clean and check. Soften the glue separately, move it with a plastic scraper, wash the glass, and test the window or defroster after everything is dry.

First, Find Out What Is Actually on the Glass
Darkness can come from aftermarket film, static-cling film, factory privacy glass, or a sprayed coating. Trying to peel something that is part of the glass wastes time and can damage the surface.
Applied Tint Film
Most automotive film is placed on the cabin side. Current automotive film guidance confirms that tint is typically applied to the interior surface, even if it was shaped outside first. Look at the top edge of a roll-down window for a thin film line.
Bubbles, purple color, lifting corners, or a faint seam also point to applied film. On a home window, inspect beside the frame with angled light and avoid hard tools until you know whether a coating is exposed.
Factory Privacy Glass
Factory privacy glass is colored within the glass and has no peelable edge. You cannot remove that color with steam, solvent, or scraping because there is no separate film layer.
If privacy glass also has aftermarket film, only the applied layer can come off. Check the top edge, compare the shade inside the door channel, or ask a shop to inspect and meter it.
Static-Cling, Adhesive, and Safety Film
Static-cling film usually lifts with little glue, while adhesive film may leave a sticky layer. Thick security film can be attached to the frame with sealant and should not be treated like decorative film.
Get professional advice for large doors, overhead glazing, cracked panes, or attached safety film. The film may be helping hold damaged glass together, so removal is more than a cleaning job.
Check for Defrosters, Antennas, and Glass Coatings
Rear defroster lines and some antenna traces are printed on the interior surface, where they can be pulled or cut. Coated home glass can also be harmed by blades, abrasives, strong chemicals, or excessive heat.
For a home pane, look for an etched mark, label, or warranty paperwork. Although some films suit dual-pane and low-emissivity glass, compatibility depends on the film and glass construction. Use only gentle methods when the surface is unknown.
Choose the Right Method Before You Start
Steam is my first choice for beginners because it supplies moist, even heat. A hair dryer is slower, while a heat gun can create hot spots, distort trim, burn skin, and stress glass if it pauses.
An ammonia-and-black-bag soak can loosen stubborn adhesive, but it adds fumes and cleanup. Steam usually gives you more control with fewer chemical concerns.
| Method | Best use | Main advantage | Main limitation |
|---|---|---|---|
| Garment steamer | Car side glass, rear glass, most home film | Moist heat softens film and glue together | Hot condensate can drip into trim or electronics |
| Hair dryer | Small areas and thin film | Gentle and commonly available | Slower on old or multilayer film |
| Heat gun | Experienced users on accessible plain glass | Fast, focused heating | Easy to overheat glass, seals, film, or trim |
| Covered soak | Brittle film and glue residue | Keeps the surface wet while adhesive softens | Needs patience and careful chemical selection |
| Professional removal | Rear grids, coatings, security film, large panes | Lower risk and better access | Higher upfront cost |

Tools and Supplies You Actually Need
Gather everything before heating the glass so soft adhesive does not cool while you search for a towel. Use clean tools because grit in a scraper or cloth can mark glass.
- Use a garment steamer or hair dryer for heat. Reserve a heat gun for someone who can control its temperature and movement.
- Use a plastic razor, card, or nonmarring scraper. Replace it if its edge becomes damaged or gritty.
- Mix warm water with a few drops of mild dish soap. Too much soap leaves a film that needs extra rinsing.
- Separate clean microfiber towels by task. Use one for glue, one for washing, and one for the final dry buff.
- Use a drop cloth, absorbent towels, and painter’s tape for protection. Cover car switches, speakers, upholstery, the dashboard, and the rear shelf.
- Nitrile gloves, eye protection, and heat-resistant gloves reduce preventable injuries. Follow every product label, and use strong cleaners only with the ventilation and protective equipment the label requires.
Optional supplies include plastic for a covered soak, isopropyl alcohol for compatible bare glass, and adhesive remover. Keep solvent away from trim, plastics, seals, fabric, and insulated-glass edges unless the label permits contact.
Do a Small Release Test Before the Full Peel
A test corner tells you more than the film’s appearance. Choose an accessible edge, protect the area beneath it, and warm a patch only a few inches wide. Lift enough film to see whether the adhesive stays on the sheet, transfers to the glass, or splits into a clear second layer.
Keep the first piece instead of throwing it away. Examine both sides in angled light and compare them with the exposed glass. This simple check helps you choose the correct balance of steam, soak time, peel angle, and cleanup before most of the pane is exposed.
| What happens in the test | What it means | Your next move |
| Film and most glue lift together | Heat and peel angle are working | Continue slowly and keep steam ahead of the edge |
| Film lifts but glue stays on glass | Adhesive is too cool or has separated | Add steam, lower the peel angle, and plan glue cleanup |
| Only the top film layer lifts | The tint has delaminated with age | Work in small wet sections under plastic covering |
| Film stretches without releasing | Adhesive is still firm | Stop pulling and increase gentle dwell time |
| Printed line or coating appears on film | The underlying surface is moving | Stop immediately and use professional help |
Weather and starting temperature affect this test. Cold glass loses heat quickly, while sun-heated glass can make a heat gun unnecessarily aggressive and can dry cleaning solution before it works. Aim for a moderate, stable starting temperature and use moving steam rather than trying to overpower the adhesive.
Also test the cleaner separately from the peel. Put a small amount on exposed adhesive, wait according to the label, and check whether it softens the glue without clouding the glass or changing adjacent rubber, paint, or plastic. A successful film test does not prove that every solvent is compatible with the materials around it.
Use the result to divide the project into realistic zones. An intact side-window film may come off in one sheet, while brittle home film may need several controlled panels and fresh towels for each one. If the test already reveals a weak rear grid, unknown coating, cracked pane, or adhesive that will not release under gentle methods, stopping early is a successful diagnosis rather than a failed DIY attempt.
How to Remove Car Window Tint From a Side Window
Start with a roll-down side window because it is accessible and has no defroster grid. Park in shade or use a ventilated garage so the glass temperature stays predictable.
Turn the vehicle off and cover the door with an absorbent towel over a waterproof layer. Keep liquid and hot condensate away from switches and speakers.
Step 1: Expose and Test the Top Edge
Lower the window about two inches to expose the film edge. Warm a corner with moving steam until the film becomes flexible, not until the glass becomes hot.
Lift a tab with a fingernail or plastic blade. Add more steam or change the peel angle if glue stays behind, and use the old-tint method below if the sheet flakes.
Step 2: Peel Back Over the Film
Fold the tab back close to the glass and pull slowly across the pane. Feed steam just ahead of the moving edge so the adhesive releases warm.
Keep tension steady and never yank. If the film splits, stop, reheat, and create a wider tab because a broad sheet tears less easily.
Step 3: Raise the Window and Finish the Lower Section
Raise the window once the top strip is free, then continue toward the bottom. Keep metal away from the belt molding, felt, and hidden rubber.
If film extends into the door channel, keep it intact and pull gently upward as the pane rises. Stop if access requires panel removal and you cannot safely handle clips, airbags, cables, and connectors.
Step 4: Deal With Adhesive Without Smearing It
Keep the exposed glue wet with warm soapy water. Push softened residue into rolls with a plastic scraper and lift them into a disposable cloth instead of spreading them with broad wiping.
For stubborn spots on confirmed bare glass, use a small amount of compatible remover or isopropyl alcohol on a cloth. Test first and finish with mild soap and clean water.
Step 5: Final Cleaning and Function Check
Wash both sides, buff with a fresh towel, and inspect from several angles in daylight. A sticky haze often appears only in low, crossing light.
Run the dry window up and down, listen for scraping, and check the weather strip. Before retinting, follow the installer’s surface-preparation instructions because some cleaners leave an adhesion-blocking film.

How to Remove Old Window Tint That Tears or Delaminates
Old film may separate into a colored top layer, clear layer, and adhesive. Dry pulling makes it fracture faster than the glue releases.
Keep a hand-sized area warm and damp. Cover it with plastic to slow evaporation, lift a broad edge, peel a few inches, and reapply steam.
On confirmed plain glass, overlapping packing tape can support fragmented film as you peel. Never try this on defroster lines, antenna traces, damaged glass, or a delicate coating because it adds pulling force.
If film turns into confetti, stop chasing dry fragments. Wet and cover the area until its edge releases under gentle pressure.
How to Remove Window Tint Glue Cleanly
Learning how to remove window tint glue is what separates clear glass from a smeared result. Adhesive can disappear while wet and return as haze when dry, so inspect with low-angle light.
Start with the mildest compatible method to protect seals, coatings, printed circuits, trim, and paint. Test any stronger product on a hidden spot and follow its label.
The Wet, Dwell, Push, Lift Method
- Wet the adhesive instead of rubbing it dry. Warm water with a few drops of dish soap is a sensible first pass on bare glass.
- Give the liquid time to work. Plastic covering limits evaporation and keeps residue soft.
- Push glue into rows with a plastic scraper. Work from clean glass toward the sticky center.
- Lift the rows into a disposable towel. Change the contact area before the cloth redeposits glue.
- Spot-treat the final haze. Put compatible remover on the cloth and avoid soaking seals or trim.
- Wash away solvent film. Use mild soap and clean water, then dry with a separate towel.
The same logic works when removing stickers from glass, but tint covers a larger area. Finish one zone before moving on so softened glue does not dry again.
For greasy haze, the final cleaning steps in this guide to removing candle wax from glass may help. Do not copy every wax method onto car trim or coated glass because the surface still determines what is safe.
Should You Use Ammonia?
Ammonia can soften some old adhesive, but most jobs do not require it. If you use an ammonia product, provide strong fresh-air circulation, follow its protective-equipment directions, and stop if fumes irritate your eyes or breathing.
Most importantly, ammonia must never be mixed with chlorine bleach, because dangerous chloramine gas can form. Ammonia safety guidance calls for fresh air and label-directed protection, so never combine cleaners to make a stronger mixture.

How to Remove Window Tint From a Back Window
The rear window needs its own method because its conductive defroster grid often sits on the cabin-side surface beneath the film. A blade, abrasive pad, harsh solvent, or fast pull can break it.
Use professional removal when the film is very old, the grid is damaged, antenna traces share the glass, or access is poor. Test and photograph the defroster first, and keep metal away from the grid entirely.
Rear-Window Removal Steps
- Protect the interior and switch the vehicle off. Cover the shelf, speakers, trim, and seat, then catch condensation before it reaches electronics.
- Warm the film with moving steam. Begin at an accessible upper corner and let the glass warm gradually.
- Lift a wide edge with a fingernail or plastic tool. Confirm that no printed material comes up with the film.
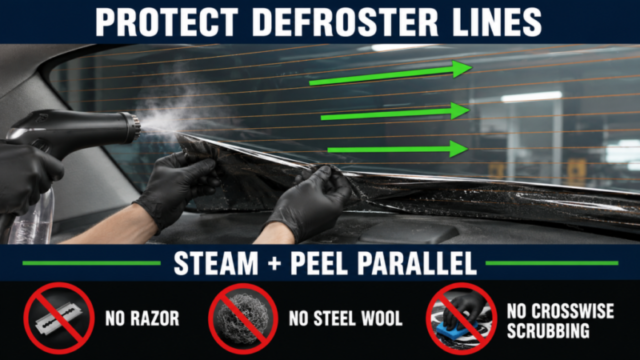
- Peel close to the glass and along the grid direction. Use gentle tension and feed steam ahead of the release line.
- Stop at the first sign of grid movement. Pause if a line changes color, lifts, or clings to the film.
- Use moisture and soft materials for glue. Wipe parallel to the lines and use plastic gently between them.
- Let the glass dry before testing. Follow the vehicle instructions and look for areas that fail to clear evenly.
Do not use steel wool, scrub across the lines, or power the defroster as a heating shortcut while the glass is wet. Steam gives you better control without energizing the grid.
How to Remove Window Tint From Home Windows
Home film uses the same heat-and-peel principle, but panes may be insulated, laminated, tempered, coated, or difficult to reach. Strong solvents and runoff can also damage frames and edge seals.
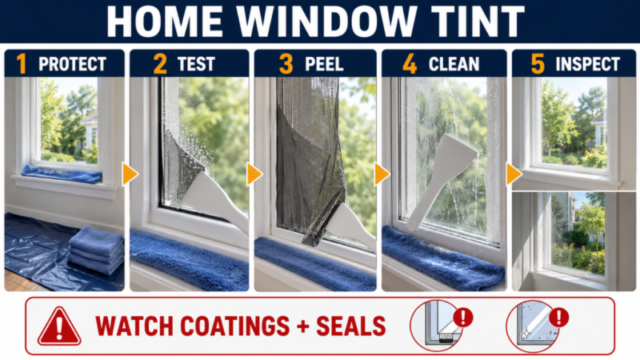
Identify the glazing and check any warranty before starting. Move furniture, remove window coverings, protect the sill and floor, and never use hot tools from an unsafe position.
Step 1: Test a Lower Corner
Test a small corner with moving steam and a plastic scraper. Stop if a coating appears to lift, change color, or mark.
Glass-industry guidance recommends a test area and warns that metal scrapers should not be part of routine glass cleaning. Use plastic, moisture, and patience when a coating may be exposed.
Step 2: Peel in Manageable Vertical Sections
Do not control a large sheet all at once. Beginners should work from existing seams or peel broad sections without cutting the glass, with a helper managing steam on large reachable panes.
Work top to bottom, catch runoff at the sill, and keep the steamer cord away from water. Warm cold glass gradually instead of concentrating heat in one corner.
Step 3: Clean the Adhesive Without Flooding the Frame
Apply soapy water with a cloth or controlled mist. Cover stubborn areas, use plastic and microfiber, and catch liquid before it reaches wood, paint, gaskets, or insulated-unit seals.
Use stronger remover only when its label permits contact with the glass, coating, and frame. Ventilate, protect nearby finishes, and avoid aggressive solvents near vinyl, paint, sealant, and unknown coatings.
Step 4: Rinse, Dry, and Inspect in Daylight
Wash with mild detergent and clean water, dry, then inspect both sides in angled daylight. A mark may be glue, an exterior mineral deposit, seal failure, a scratch, or coating damage.
Surface cleaning cannot reach cloudiness between panes, and film on cracked glass may be stabilizing loose pieces. Use a professional for attached safety film, high windows, cracked panes, and unknown coatings.
What Not to Do During Window Tint Removal
Damage usually comes from speed, concentrated heat, dry friction, or a mismatched tool. A method that works on plain side glass can still ruin a rear grid or coated home pane.
- Do not yank cold film away from the glass. It tears, leaves glue, and stresses printed lines.
- Do not hold a heat gun still. Uneven heat can harm trim, plastic, film, and glass.
- Do not scrape dry glass. Moisture adds lubrication and reduces dragged grit.
- Do not trust a universal blade-safe claim. Grids, coatings, acrylic, polycarbonate, and unknown panes need nonmetal tools.
- Do not soak electronics, trim, frames, or insulated-glass edges. Use controlled mist and catch runoff.
- Do not mix cleaning chemicals. More chemistry does not mean more cleaning power, and incompatible products can create toxic gas or damage nearby materials.
- Do not retint over glue haze. Dry and inspect at a low angle because residue can spoil adhesion.
Expert Tips for a Cleaner, Safer Result
Use temperature as a control, not a contest. Film should release under light tension; if glue begins to string, warm the peel line again.
Separate clean and dirty tools, and replace glue-loaded towels before they become saturated. This prevents residue from returning to finished glass.
Use daylight for scratches and a low flashlight for glue trails. Clean both faces before deciding which side holds the mark.
Keep the peeled sheet until the job is done because it shows where the adhesive went. Stop if a printed line or coating appears on it.
Check the rules before choosing replacement film. Current tint limits vary by state and vehicle type, while federal guidance describes a 70 percent light-transmittance requirement for glazing areas needed for driving visibility. Visible light transmission measures the light passing through glass and film together.
DIY Removal vs. Professional Removal
DIY suits accessible side windows and small home panes when the surface is known and the film holds together. It saves labor, but damage to glass, grids, electronics, or frames can cost far more than removal.
Professional help suits rear defrosters, widespread delamination, large panes, safety film, cracks, high windows, warranties, and unknown coatings. It also simplifies immediate retinting and compatible surface preparation.
Ask whether a quote includes adhesive, cleanup, disposal, edge access, rear-grid risk, and retint preparation. For home glass, ask whether the film, pane, coating, and attachment system have been identified.
| Situation | DIY is reasonable | Professional help is wiser |
| Car side window | Intact film, easy access, known bare glass | Brittle layers, deep door-channel access, expensive trim |
| Rear car window | Only if film releases easily and grid is sound | Old film, antenna traces, damaged or valuable defroster |
| Small home pane | Known plain glass, reachable, ordinary film | Unknown coating, cracked pane, difficult access |
| Large or safety film | Rarely practical for a beginner | Large sheet, attachment sealant, overhead or safety role |
| Immediate retinting | Possible after complete residue removal | Best when surface prep and warranty matter |
Frequently Asked Questions
What is the easiest way to remove window tint?
For most applied film, the easiest beginner method is steady steam plus a slow, low-angle peel. It keeps adhesive warm and usually releases more cleanly than dry pulling, while a hair dryer works more slowly on small panes.
Rear defroster glass and unknown home coatings change that answer. Professional removal may cost less than damage to the surface beneath the film.
How to Remove Tint From Car Window Glass Safely?
To remove tint from a car window, lower it slightly, warm and lift a top corner, then peel close to the glass while adding steam. Raise the pane, finish the lower section, and push softened glue into rows with plastic.
Protect door electronics and keep liquid out of switches. Use no metal on rear defroster or antenna traces, and inspect dry glass before retinting.
How do I remove window tint from inside of car glass?
To learn how to remove window tint from the inside of car glass, first protect the cabin because the applied film is normally on that side. Cover trim and electronics, use controlled steam and plastic, and put cleaner on a cloth instead of flooding the interior.
Installers may shape film outside, but published instructions show final adhesive application on wet interior glass. Factory-colored glass cannot be peeled from either side.
How can I remove old window tint without heat?
Without heat, wet the film with a compatible solution, cover it with plastic, and lift softened sections with a plastic scraper. This is slower, so repeat the soak rather than forcing a dry edge.
Do not invent chemical mixtures to replace heat. Ammonia needs ventilation and strict separation from bleach, while strong solvents can attack trim and seals.
How to Remove Tint From Window Glass at Home?
To remove tint from a window at home, identify the pane, protect the room and frame, then test steam and plastic on one corner. Peel manageable sections and keep liquid away from the frame and insulated-glass edge.
Do not assume ordinary-looking glass is blade safe. Use mild cleaner and professional help for high panes, skylights, cracks, security film, and unknown coatings.
Can I use a razor blade to remove window tint?
A razor can scratch glass and destroy surface-mounted lines. Plastic is the safer default, especially on rear grids, coatings, acrylic, polycarbonate, heat-treated glass, and unknown panes.
Professionals sometimes use a new blade on confirmed plain, wet glass, but that does not make it universal. If plastic and compatible solvent fail, professional help may be cheaper than replacement glass.
Will removing window tint damage the defroster?
Yes, aggressive pulling, blades, and abrasives can break conductive lines. Use steam, a broad low-angle peel, soft towels, and parallel cleaning, then stop if a line moves.
Test the defroster before removal and after the glass dries so an old fault is not blamed on the job. Even professional removal cannot make weakened lines risk-free.
What removes window tint glue?
Warm soapy water with dwell time removes some softened glue. Stubborn residue may need compatible adhesive remover or isopropyl alcohol on a cloth, with runoff kept away from trim, seals, coatings, paint, and electronics.
Push softened adhesive into rows with plastic and lift it into a disposable towel. Circular wiping with one saturated cloth spreads sticky haze.
Final Thoughts
The best answer to how to remove window tint is to match the method to the surface. Use gentle, even heat, peel close to the glass, keep adhesive wet during cleanup, and reserve metal tools and strong chemicals for situations where their compatibility is certain. Side glass, rear defroster glass, and residential coated glass should never be treated as one identical job.
Start with a small test area and stop when the surface gives you a warning. If you can identify the film and glass, protect the surrounding materials, and work patiently, many simple windows are manageable at home. For rear grids, security film, cracked panes, large windows, or unknown coatings, request an itemized professional quote before taking the risk yourself.