


Can you paint over wallpaper? Yes, but only when it is firmly attached, smooth, dry, clean, and free from widespread bubbles or peeling seams. Painting can be practical when removal would damage the underlying drywall or plaster.
The key is recognizing that paper, vinyl-coated, solid vinyl, fabric-backed, embossed, and previously painted wallpaper do not react to primer in the same way. Your result depends more on surface condition and wallpaper type than on the price of your paint.
My approach is to test removal first. If the paper will not release without serious damage, repair every weak area, seal it with the correct primer, and treat it as a prepared wall surface.
Preparation decides whether the finish lasts or bubbles before the room is back together. This guide explains when to paint, when to remove, which materials to buy, and how to create a smoother result.
The Quick Answer: Is It OK to Paint Over Wallpaper?
It is usually okay to paint over wallpaper when the paper is smooth, firmly bonded, dry, and clean. It is a poor choice when the wallpaper is loose, heavily textured, damp, moldy, or made from a slick vinyl that your primer cannot grip.
Many paint manufacturers recommend removal first because seams can show through and moisture may loosen old adhesive. Current professional paint guidance on wallpaper recommends testing a fast-drying alkyd primer before coating the entire room.
| Wall condition | Paint over it? | Best action |
|---|---|---|
| Smooth paper, tight seams, no moisture | Usually yes | Clean, repair, seal, and paint |
| A few small loose seams | Often yes | Reattach or trim, patch, and test |
| Many bubbles or lifting edges | No | Remove the wallpaper |
| Heavy embossed texture | Only if texture is acceptable | Remove or seal and skim |
| Slick solid vinyl | Risky | Test adhesion or remove |
| Fabric-backed vinyl | Usually no | Strip it if possible |
| Mold, dampness, or active staining | No | Fix the moisture source first |
| Several wallpaper layers | Usually no | Remove or seek professional help |
A wallcovering trade group advises testing removal first because painted wallpaper becomes harder to strip later. Its wallpaper preparation advice also stresses repairing loose areas and seams before coating.

When Painting Over Wallpaper Makes Sense
Painting wallpaper is not always a bad shortcut. It can be the least damaging choice when paper was applied directly to unsealed drywall and removal tears away the drywall face.
It may also make sense over fragile plaster, exceptionally well-bonded paper, or during a short-term cosmetic update. A current step-by-step professional guide notes that removing unfinished drywall or plaster can damage it and that smooth, intact wallpaper may be paintable.
You may reasonably paint over wallpaper when:
- The paper lies flat across the room.
- Seams are tight or easily repaired.
- No leaks, mildew, or wall movement are present.
- The pattern is printed but not deeply embossed.
- A removal test causes serious damage to the wall.
- A primer test dries without blistering or lifting.
- You accept that later removal may be harder.
I would rather spend an extra hour testing one wall than strip a room and discover the drywall paper is coming off with it. The best way to paint over wallpaper begins with a controlled test, not a loaded roller.
When You Should Remove the Wallpaper Instead
Remove wallpaper when multiple seams are open, bubbles return after pressing, the surface feels damp, or mold is present. Paint changes the color, but it cannot restore failed adhesive or flatten deep texture.
Removal is also better for grasscloth, flocked paper, cork, fabric surfaces, several stacked layers, and wallpaper that peels easily during a test. Wallpaper removal guidance warns that high-sheen and heavily textured surfaces are especially poor candidates, as paint may not hide seams or prevent later peeling.
Identify the Wallpaper Before You Paint
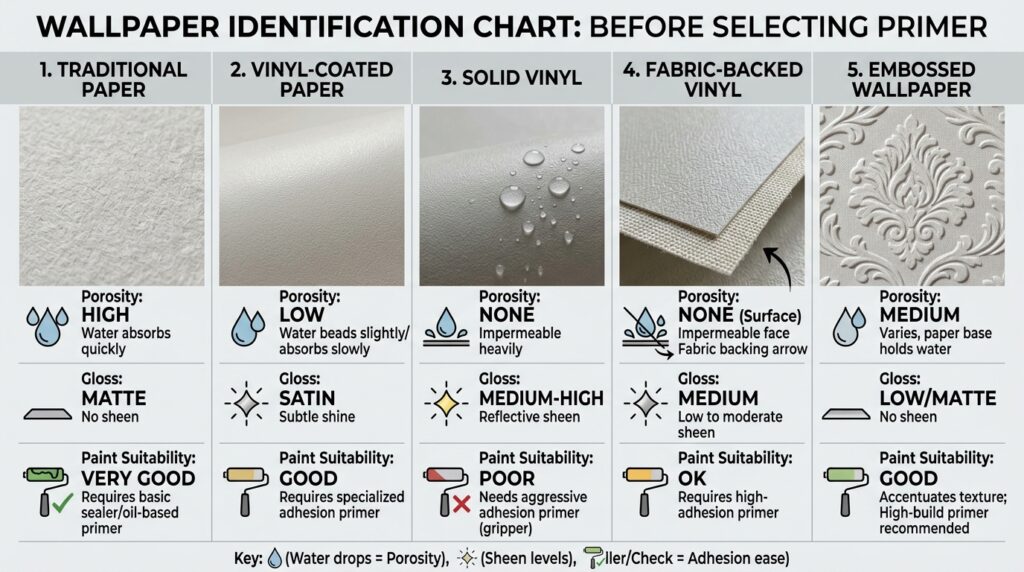
Before asking how to paint wallpaper, identify the surface. The face controls primer adhesion, while the backing and old paste control the chance of bubbling.
Traditional Paper Wallpaper
Traditional paper is porous and can absorb moisture from water-based products. A fast-drying oil-based or alkyd sealer is often used before latex paint to reduce the chance of reactivating paste.
Vinyl-Coated Paper
Vinyl-coated paper has a thin washable finish over paper. It may be paintable after gentle cleaning, light deglossing, and a successful primer test.
Solid Vinyl Wallpaper
Can you paint over vinyl wallpaper? Sometimes, but solid vinyl is risky because it is slick, flexible, and nonporous. If the vinyl face peels from its backing, removal is usually easier; if it cannot be removed, test a primer approved for vinyl and let it fully cure before proceeding.
Fabric-Backed Vinyl
Fabric-backed vinyl is heavy and flexible, so coating adhesion can be unpredictable. In most cases, removing it is more reliable than painting it.
Embossed, Textured, or Flocked Wallpaper
Paint changes color, not shape. Raised flowers, grasscloth fibers, and flocked patterns usually remain visible after several coats.
You can keep the texture as a feature, seal and skim a mild pattern, or remove the paper. Trying to bury deep texture under thick paint usually leaves roller marks and an uneven finish.
The Most Important Step: Test the Wall First
A test patch answers three questions at once: will the paper remain attached, will the primer grip, and will the pattern or seam still show through? Skipping this step turns the whole room into an experiment.
Choose a hidden area behind a door, curtain, or large piece of furniture. Make the test large enough to include a seam, as seams often respond differently than the flat center of a strip.
The Four-Part Test
- Try a removal corner. Lift a corner gently with a putty knife. If the wallpaper releases cleanly, removal may be easier and better than painting.
- Check adhesion. Press and rub the paper around seams, outlets, corners, and baseboards. Mark every hollow, loose, or moving area with painter’s tape.
- Clean a test section. Use the mildest method that removes dust and grease without soaking the paper. Allow it to dry fully.
- Apply the proposed primer and paint. Watch for bubbles, lifting, tackiness, staining, poor adhesion, or a visible pattern after drying.
Do not judge the test while it is merely touch-dry. Give it the full recoat-and-cure period stated on the product label, then score a small crosshatch in the test film and press painter’s tape over it. If large flakes lift away, the system is not reliable enough for the room.
Check for Hidden Moisture
Wallpaper can hide water stains and small areas of mold, especially around windows, bathrooms, plumbing walls, and exterior corners. If you see brown marks, softness, loose adhesive, or repeated bubbling in one area, fix the moisture source before doing cosmetic work.
Paint blistering is commonly linked to loss of adhesion caused by heat or moisture. The underlying cause must be corrected or the problem can return, as explained in this paint blistering troubleshooting guide.
Tools and Materials You Will Need
Correct preparation tools matter more than premium color. Gather everything before opening the primer so you do not leave a wall half-coated.
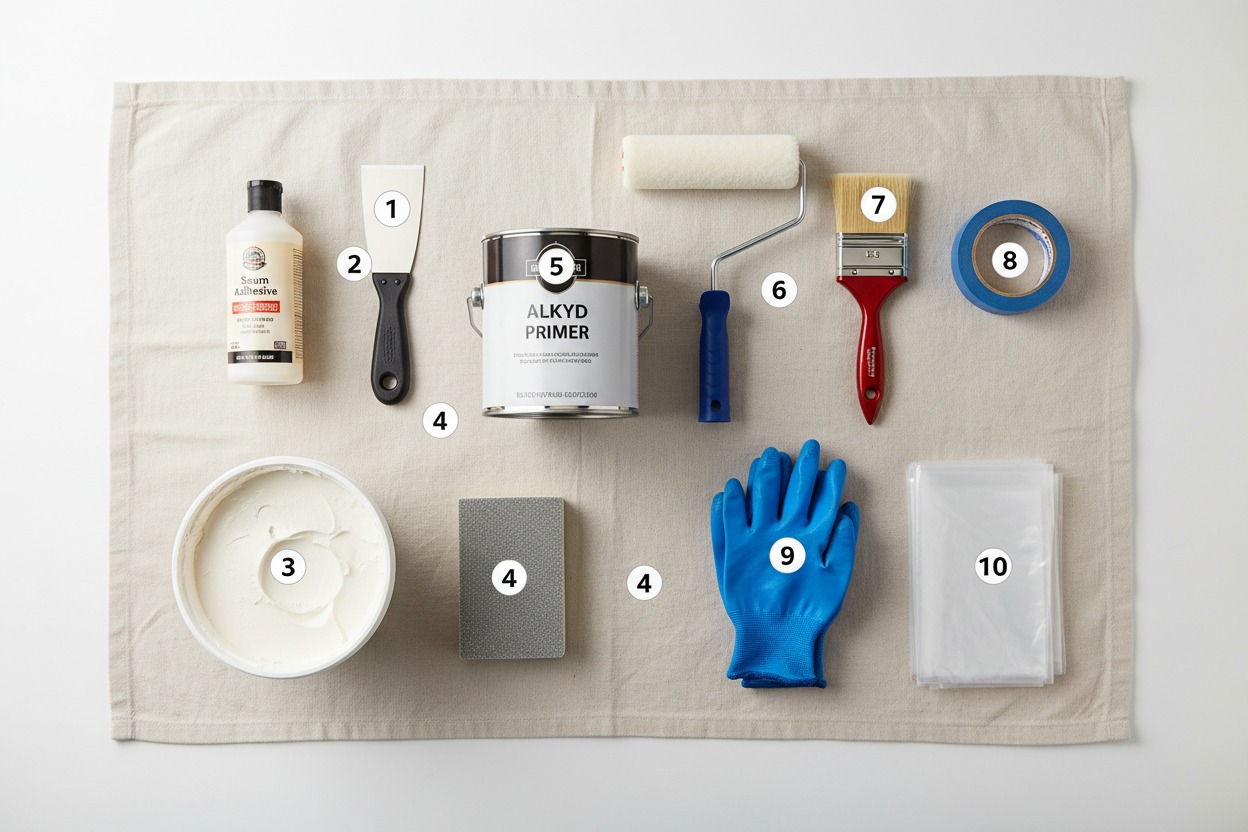
Essential Tools
- Drop cloths and painter’s tape
- Screwdriver and sharp utility knife
- Flexible putty knife and seam roller
- Wallpaper seam adhesive
- Lightweight joint compound
- Fine sanding sponge, usually 180 to 220 grit
- HEPA vacuum or fine-dust attachment
- Clean microfiber cloths
- Angled brush, roller frame, tray, and extension pole
- 3/8-inch nap roller for smooth paper
- 1/2-inch nap roller for light texture
- Gloves, eye protection, and suitable respiratory protection
The primer must seal out moisture, promote adhesion, and block stains where needed. A normal drywall primer may not do all three.
| Product type | Best use | Main caution |
|---|---|---|
| Fast-drying alkyd or oil primer | Sound paper wallpaper | Odor and solvent cleanup |
| Shellac sealer | Stains and odors | Strong fumes and short working time |
| Problem-surface sealer | Torn drywall or paste residue | May need another adhesion coat |
| Bonding primer | Some glossy vinyl | Test because water may affect paste |
| Wallpaper-specific sealer | Existing wallcovering when approved | Check topcoat compatibility |
| Acrylic latex paint | Finish over cured primer | Do not apply directly to raw wallpaper |
A product called wallpaper primer may be designed for hanging new paper rather than painting old paper. Read the technical label because wall size, problem-surface sealer, and paint primer are different products.
A current wallcovering primer description confirms that some specialty primers are intended for existing wallcoverings. Verify that the exact product is approved for your wall and chosen topcoat.
What Is the Best Primer for Painting Over Wallpaper?
For most firmly attached paper wallpaper, the best primer for painting over wallpaper is a fast-drying alkyd or oil-based primer-sealer. It limits the amount of water reaching the paper and old adhesive.
A shellac-based sealer may be better for smoke, odor, or stubborn stains. Slick vinyl may need a tested adhesion primer, while torn drywall paper or paste residue may need a penetrating problem-surface sealer before patching.
Why Water-Based Primer Can Be Risky
Water-based primer is convenient, but it can soak into porous wallpaper and reactivate water-sensitive paste. It will not fail on every wall, yet it should not be chosen simply because it is already in your garage.
When a Bonding Primer Is Useful
A bonding primer can help on clean, lightly dulled vinyl when its label approves vinyl or glossy surfaces. Test the complete system because good grip on the face does not guarantee that moisture will not loosen the backing.
Primer Selection Chart
| Wall condition | Primer approach |
|---|---|
| Smooth, sound paper | Fast-drying alkyd or oil primer-sealer |
| Dark pattern or stains | Stain-blocking alkyd or shellac |
| Glossy vinyl | Tested primer approved for vinyl |
| Torn drywall face | Penetrating problem-surface sealer |
| Old paste residue | Sealer approved for adhesive residue |
| Mild texture to be skimmed | Seal, skim, sand, then prime again |
Bring a clear photo or loose sample to a paint specialist. Ask whether the product is approved over existing wallcovering, what topcoats are compatible, and how long the test area should cure.
How to Paint Over Wallpaper Step by Step
The following method is the best way to paint over wallpaper when removal has been tested and rejected. Do not combine steps or rush drying time, because most failures begin below the finish coat.
Step 1: Protect the Room and Check Safety
Move furniture away from the walls and cover the floor. Remove switch plates, outlet covers, curtain hardware, and anything that prevents you from coating the wall continuously.
If the home was built before 1978, sanding, scraping, or disturbing older painted surfaces may create lead dust. Review lead-safe renovation practices for DIY projects, and consider professional testing or a lead-safe certified contractor before creating dust.
Do not dry-sand unknown old coatings aggressively. Contain dust, keep children and pets out of the work area, and use the protective equipment recommended for the task and product.
Step 2: Clean Without Soaking the Paper
Vacuum dust from the walls, ceiling line, baseboards, and seams using a soft brush attachment. In low-soil rooms, a dry or barely damp microfiber cloth may be enough.
For greasy kitchen wallpaper, use a mild cleaner suitable for the surface and work in small areas. Wring the cloth well, avoid flooding seams, and let the walls dry for at least the period recommended by the cleaner and primer manufacturers.
Do not scrub so hard that you polish glossy vinyl or damage printed paper. The wall must be clean, but it must also remain attached.
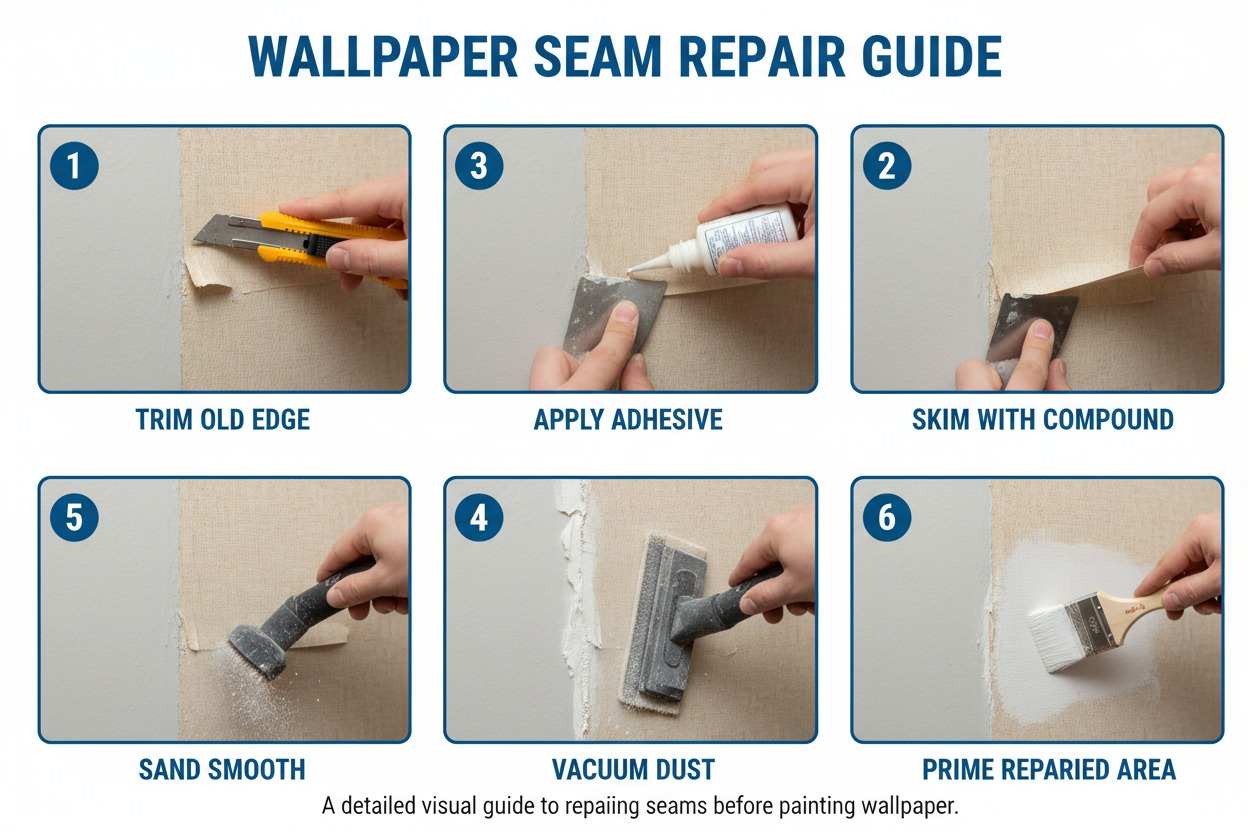
Step 3: Cut Away Unstable Paper
Do not paint down a loose flap and hope primer will hold it forever. Use a sharp utility knife to cut away paper that is torn, curled, or no longer bonded.
Create a clean, shallow edge rather than a ragged tear. Be careful not to cut deeply into drywall paper or score plaster underneath.
Step 4: Reattach Small Loose Seams
Gently lift a small, loose seam and apply a thin layer of wallpaper seam adhesive underneath. Press it flat with a seam roller or a clean cloth, then immediately remove any excess adhesive according to the product instructions.
Allow the repair to dry fully. If a seam will not stay down, trim the unstable edge and patch the depression instead of repeatedly adding more glue.
Step 5: Fill Seams, Dents, and Damage
Visible wallpaper seams often remain visible under paint because the raised edge casts a narrow shadow. Apply a very thin, wide coat of patching or joint compound across each seam, feathering the compound several inches on both sides.
Fill nail holes, cuts, torn areas, and low spots simultaneously. Avoid leaving thick ridges because every ridge becomes more obvious after paint.
Step 6: Sand Smooth and Remove Dust
Once the compound is fully dry, sand with a fine sanding sponge until the repaired area blends into the wall. Use gentle pressure around wallpaper so you do not expose fibers or create new loose edges.
Close your eyes and run your palm lightly across the repair. Your hand often detects raised seams and tool marks that are hard to see under flat work lighting.
Vacuum the wall and wipe away the remaining dust. Primer cannot bond properly to a layer of sanding powder.
Step 7: Apply the Primer
Stir the primer and follow its ventilation, temperature, drying, and cleanup instructions. Cut in around the ceiling, trim, corners, and repaired areas with a brush, then roll the wall field.
Use a controlled, even coat rather than pressing hard or repeatedly rolling the same wet area. Overworking wet primer can pull at a softened seam or disturb a repair.
After the first wall is coated, inspect it before continuing. Stop if large bubbles appear, seams lift, the primer remains soft, or the coating does not adhere.
Step 8: Recheck the Surface After Priming
Primer makes imperfections easier to see because it creates a uniform color. Shine a work light across the wall at a low angle and mark visible seams, dents, fibers, and ridges.
Patch minor imperfections over the fully cured primer, sand them, and spot-prime the repairs. This extra inspection is what separates “painted wallpaper” from a wall that simply looks painted.
Step 9: Apply Two Finish Coats
Once the primer is fully cured, apply a high-quality interior wall paint compatible with it. Cut in one wall at a time and roll while the brushed edge is still wet to reduce lap marks.
Two thin, even coats usually look better and cure more reliably than one heavy coat. Respect the label’s recoat time, especially in cool or humid rooms.
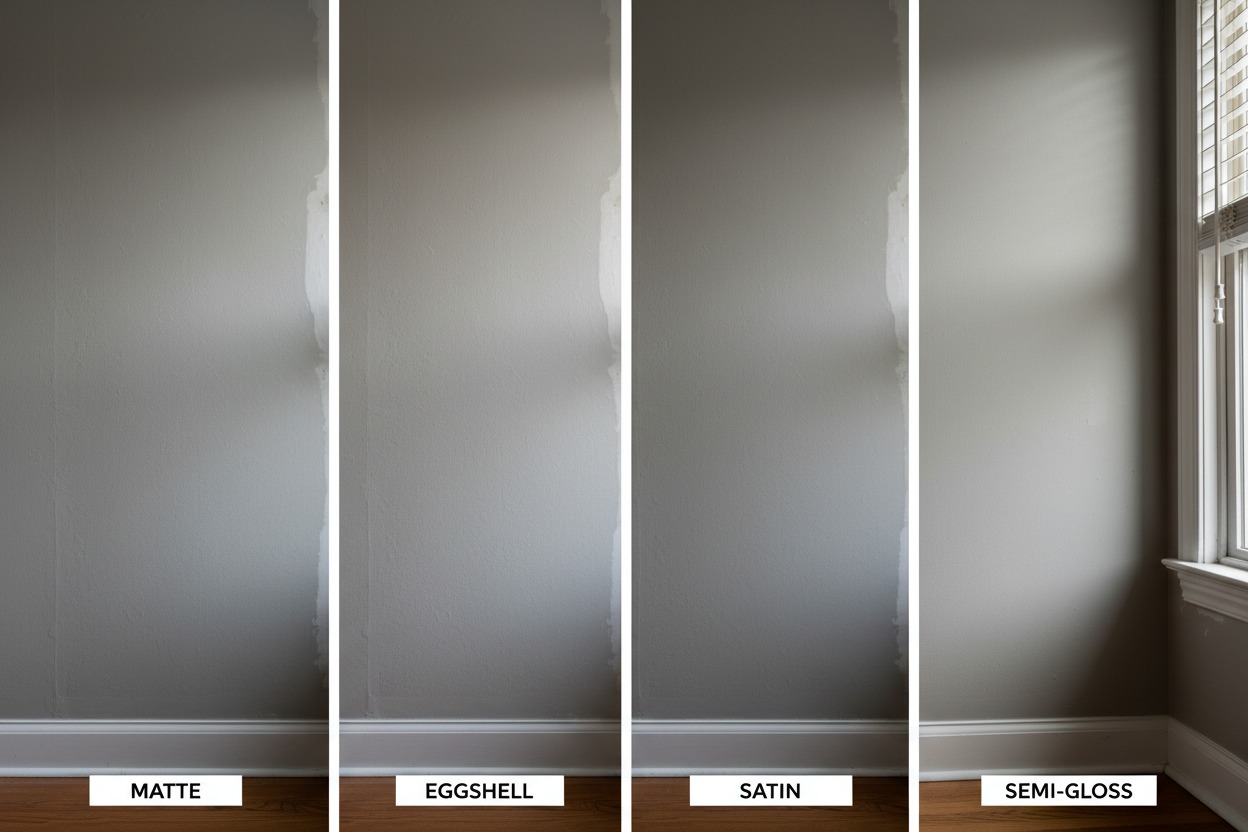
A matte or eggshell finish usually hides small flaws better than satin or semi-gloss. High sheen reflects light across every seam, patch, and textured area.
Step 10: Let the Finish Cure Before Heavy Use
Dry paint is not the same as cured paint. Avoid washing, rubbing, attaching adhesive hooks, or pushing furniture tightly against the wall until the finish has had time to harden.
Keep the room ventilated according to the product label. Reinstall covers and hardware only after the surface is dry enough that they will not stick to the paint film.
Can You Mud Over Wallpaper?
Can you mud over wallpaper? You can apply a skim coat of joint compound over some wallpaper, but only after confirming that the wallcovering is firmly bonded and sealing it to prevent the water in the compound from loosening the paper.
Applying wet compound directly to old paper is risky. The moisture can create bubbles, release seams, or soften the backing, leaving a smooth skim coat attached to wallpaper that is no longer attached to the wall.
Safer Skim-Coat Method
- Remove all loose or blistered paper.
- Reattach or trim weak seams.
- Clean and dry the wall.
- Seal the wallpaper with a suitable alkyd, shellac, or problem-surface sealer.
- Apply a thin test coat of joint compound.
- Let it dry completely and check for lifting.
- Skim the full wall in thin coats.
- Sand, vacuum, and prime the compound before painting.
Joint compound is designed for filling, finishing, and skim coating suitable drywall surfaces, but the wallpaper layer beneath it remains the weak link. Use mud to reduce shallow seams or light texture, not to rescue wallpaper that is already failing.
When Skim Coating Is Worth It
Skimming may be worth the added work when the wallpaper is well bonded but has many shallow seams or a mild embossed pattern. It can create a more uniform finish than painting directly over texture.
For deep grasscloth, heavy flock, large bubbles, or several layers of paper, removal or new drywall is often the more reliable option. Skim coating a bad base only adds weight and makes future repair more difficult.

How to Paint Over Vinyl Wallpaper
The vinyl surface requires more caution because it may be too slick for normal paint adhesion. Start by identifying whether the vinyl face can be peeled away from a paper or fabric backing.
If the face comes off easily, strip it rather than coat it. The remaining backing may then be removed, sealed, or repaired, depending on its condition.
If the vinyl cannot be removed, follow these steps:
- Wash away grease, polish, soap film, and residue with a cleaner approved for vinyl.
- Let the wall dry completely.
- Lightly dull the sheen without cutting through the vinyl face.
- Remove all sanding dust.
- Apply a tested primer approved for slick or vinyl surfaces.
- Wait through the full drying period and check adhesion.
- Apply compatible finish coats only after the test succeeds.
Do not sand deeply. Some vinyl coverings have a thin printed face, and aggressive abrasion can expose uneven backing or create shiny and dull patches that remain visible.
Common Problems and How to Fix Them
Even a careful job may reveal problems after primer. Correct the cause before adding more paint.
Wallpaper Bubbles After Priming
Tiny bubbles may flatten as the coating dries, but large or persistent ones mean the adhesive has released. If only one area fails, inject seam adhesive and press it flat; if bubbles appear across the wall, remove the wallpaper.
Seams Still Show Through
Paint cannot fill a ridge. Sand lightly, feather joint compound across the seam, sand smooth, spot-prime, and repaint.
Use a work light from the side. A seam that disappears under overhead light may reappear in daylight.
Dark Pattern Bleeds Through
A bold pattern may remain visible because the primer lacks hiding power or dyes are migrating. Apply a compatible stain-blocking primer, let it cure, then repaint.
Paint Scratches Off Vinyl
Weak scratch resistance points to contamination, excess gloss, or the wrong primer. Remove loose coating, clean and dull the area, then repeat the primer test.
Wallpaper Peels at Corners
Trim or reattach the weak edge, fill, sand, spot-prime, and touch up. Do not use ordinary caulk as a substitute for wallpaper seam adhesive.
Choosing Paint Color, Sheen, and Lighting
Wallpaper seams and texture are easiest to hide with lower-sheen paint. Matte provides the best camouflage, while eggshell offers a balance between appearance and ease of cleaning.
Satin and semi-gloss reflect more light and may reveal every raised seam. Reserve them for areas that genuinely need extra washability and only after the wall has been prepared to a very smooth standard.
Test Color in the Actual Room
Old wallpaper patterns can affect how the first paint sample looks until the wall is fully sealed. Apply color samples over the cured primer rather than directly over the wallpaper.
View the color in morning, afternoon, and artificial light. Before finalizing the shade, compare your bulbs using this guide to soft white vs. warm white lighting because bulb temperature can make the same painted wall appear creamier, grayer, or more yellow.
Best Colors for Imperfect Walls
Mid-tone neutrals and muted colors tend to hide subtle waviness better than brilliant white or very dark glossy colors. Extremely light colors can reveal shadows, while deep colors may highlight surface texture when light reflects across them.
The right color is still the one you enjoy. Just match the sheen and preparation level to the wall’s condition.
Cost, Time, and Buying Guide
Painting over wallpaper can cost less than removal because it avoids the need for stripping tools, disposal, and major wall repair. You still need the correct primer, seam adhesive, patching material, sanding supplies, and usually two finish coats.
Measure every wall, subtract large openings, and use the coverage printed on each product. Do not rely on a generic “one gallon per room” estimate because pattern, porosity, and color change affect coverage.
| Purchase | Why it matters | Avoid choosing by |
|---|---|---|
| Primer-sealer | Controls moisture and adhesion | Lowest price alone |
| Seam adhesive | Secures small loose edges | General craft glue |
| Joint compound | Hides seams and shallow damage | Fast-dry claims alone |
| Roller cover | Controls texture | Thickest nap available |
| Interior paint | Adds color and washability | One-coat marketing only |
If the makeover includes flooring, this 10-by-12 room carpet cost guide can help you estimate the full room budget. The guide to finding late-stage home-improvement markdowns may help with accessories, but never buy an unsuitable clearance primer.
Allow separate time for testing, repairs, primer, inspection, and two paint coats. The fastest plan is the one that doesn’t require you to redo the room.
Pros and Cons of Painting Over Wallpaper
Painting over wallpaper can be a sensible compromise, but you should understand what you are trading.
Pros
- Avoids damaging drywall or fragile plaster during removal.
- Reduces mess and disposal work.
- Can refresh a room faster than stripping several stubborn layers.
- Costs less when the wallpaper needs only minor repair.
- Works well on smooth, firmly bonded paper with a tested primer.
- Allows a short-term design update without major demolition.
Cons
- Seams and texture may remain visible.
- Water in the wrong primer can loosen adhesive.
- Slick vinyl can cause adhesion failure.
- Future wallpaper removal becomes more difficult.
- Moisture problems may remain hidden.
- Repairs can look different under side lighting.
- A failing wallpaper layer can eventually pull the paint film away.
The decision is not simply “paint or remove.” It is “which option gives the most stable wall with the least avoidable damage?”
Expert Tips for a Smoother, Longer-Lasting Finish
A few small habits help you catch problems before the finish coat makes them obvious.
- Test across a seam, not just the center of a strip. Seams are the most likely place for moisture to enter and lifting to begin.
- Use raking light. Hold a work light close to the wall so it shines sideways across repairs and exposes ridges.
- Feather repairs widely. A wide, thin patch is less visible than a narrow, thick one.
- Prime every exposed paper edge. Raw fibers can swell under finish paint and create fuzzy spots.
- Do not overwork wet primer. Roll it on evenly, then leave it to level and dry.
- Choose lower sheen. Matte or eggshell usually hides minor imperfections better.
- Keep a wet edge. Finish one wall section at a time to reduce lap marks.
- Save labeled leftovers. Keep a small amount of primer and paint for future seam repairs.
- Write down the system. Record the primer, paint, sheen, batch, and color so later touch-ups are easier.
Prepare one complete wall before buying all the finish paint. When it passes the adhesion test and looks smooth under side light, repeat the method.
Frequently Asked Questions
1. Can I Paint Over Wallpaper Without Using Primer?
No, painting directly over wallpaper is a high-risk shortcut. The wallpaper paint may absorb unevenly, the pattern may show, stains can bleed, and water in the finish coat may loosen old adhesive.
A suitable primer creates a more uniform surface and reduces these risks. Test it first because no primer can make loose wallpaper structurally sound.
2. Can Wallpaper Be Painted Over if It Has a Pattern?
Yes, can wallpaper be painted over when it has a printed pattern? It can, provided the surface is smooth, firmly attached, and sealed with a high-hiding primer.
A dark or highly pigmented pattern may require a stain-blocking or high-hiding primer and two finish coats. Raised patterns will remain visible unless you skim or remove them.
3. Can You Paint Wallpaper in a Bathroom or Kitchen?
You can paint wallpaper in a bathroom or kitchen only when it is dry, clean, firmly attached, and free of active leaks or constant splashing. Steam, grease, and moisture make these rooms less forgiving than bedrooms or hallways.
Fix ventilation and moisture problems first. Use a washable finish only after the wall has been properly sealed and smoothed.
4. Can You Paint Over Wallpaper That Is Already Painted?
Can you paint over wallpaper that already has one or more layers of paint? Yes, when the existing coating is sound and the wallpaper beneath it is not peeling, bubbling, or damp.
Clean the surface, repair failures, dull glossy paint, and apply a compatible primer where required. If old paint and wallpaper are peeling together, removal is the better repair.
5. Can U Paint Over Wallpaper or Should You Always Remove It?
The phrase can u paint over wallpaper has the same practical answer as the more formal question: yes, but removal is usually preferred when it can be done without damaging the wall. Paint only after a removal test, condition check, repair, and primer adhesion test.
People also ask can you paint wallpaper, can you paint over wallpaper, and can i paint over wallpaper. In every case, wall condition matters more than wording.
Final Verdict: Can You Paint Over Wallpaper?
Can you paint over wallpaper? Yes, when the wallpaper is smooth, dry, firmly bonded, and passes a primer adhesion test. Remove it when it is loose, damp, deeply textured, heavily layered, or made from a difficult vinyl that will not hold the coating system.
The best results come from careful inspection, minimal-moisture cleaning, seam repair, fine sanding, the right primer, and two controlled finish coats. Do not let a quick cosmetic shortcut create a larger removal job later.
Start with one hidden test area today. If it stays flat, hard, and well bonded after curing, you have a workable plan for the room; if it lifts or blisters, stop and remove the wallpaper before spending more money on paint.