


How to Plant Plumeria Seeds and Care for the Seedlings
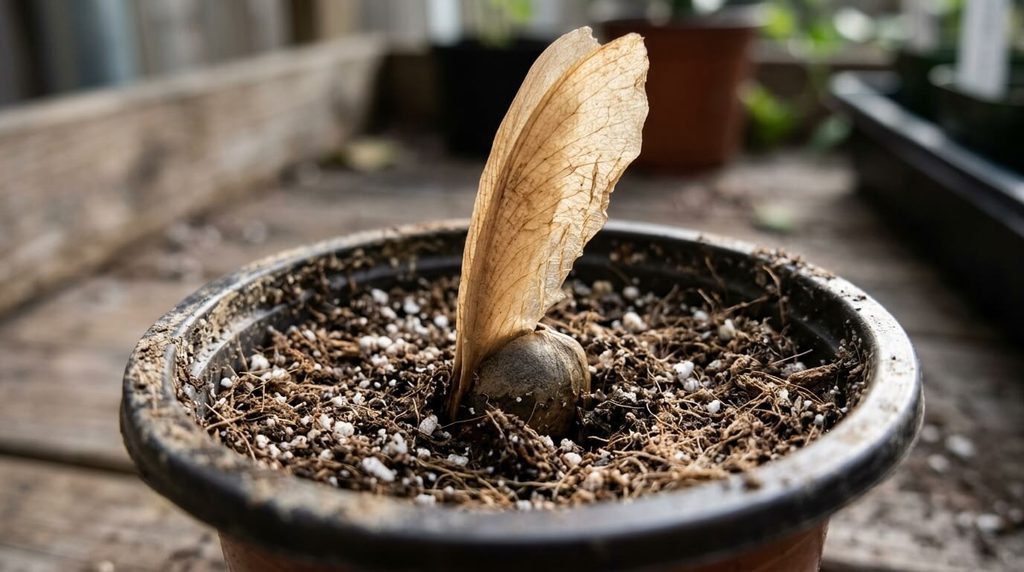
Learning how to plant plumeria seeds starts with recognizing the two ends of the seed. The thick section holds the developing plant, while the thin, papery wing helps the seed travel. For a simple upright planting method, place the thick end in the growing mix and leave the wing above the surface.
You do not need an expensive propagation setup to begin. A few small pots, fresh seed-starting mix, warmth, and careful watering are enough for a small batch. The bigger commitment comes afterward, because growing a seedling to flowering size takes years rather than weeks.What to know before planting
- Plant the individual seeds, not the whole seed pod.
- For upright sowing, place the thick seed body down and leave the papery wing exposed.
- Use small containers with drainage holes and a clean seed-starting mix.
- Keep germinating seeds moist without leaving the mix waterlogged.
- Seedlings may differ from the parent plant and often take three to five years or longer to flower.
Before You Start: Seeds Do Not Copy the Parent Plant
Growing plumeria from seed is a good choice if you enjoy watching a plant develop and are comfortable with some uncertainty. The flowers may differ from the parent plant’s. A seed packet showing a pink flower does not guarantee that every seedling will produce that exact bloom.
A seedling also doesn’t become the named parent variety just because its flowers look similar. This distinction matters when labeling, sharing, or selling plants. Keep the parent information as part of the seedling’s history rather than treating it as proof of cultivar identity.
If you want to preserve a particular named selection, the usual route is a take a cutting from the correct plant. This plumeria propagation overview explains the difference between seed-grown plants and vegetative propagation. Choose seeds for the growing experience and possible variation, rather than an exact copy.
What You Need to Plant Plumeria Seeds
Gather your supplies before you soak or open a seed packet. That keeps seeds from sitting around while you search for pots or mix. For a small batch, the following supplies are enough:
- Plumeria seeds from a reliable source.
- Small nursery pots or individual seed-starting cells with drainage holes.
- Fresh, freely draining seed-starting mix.
- A tray to catch drainage.
- A gentle watering container or spray bottle.
- Labels and a pencil or waterproof marker.
- A warm growing spot.
- A suitable light source for emerging seedlings.
A soil thermometer is useful if you are unsure how warm the mix stays overnight. A seedling heat mat can help in a cool room, provided you use it according to its instructions. Neither a heat mat nor a humidity cover should be treated as a substitute for checking the pots.
Choose Seeds With a Developed Seed Body
Look at the thick end rather than judging the papery wing. A developed seed should have some substance to that section. A flat wing attached to an almost empty seed body is less promising.
Avoid seeds that are visibly rotten or badly damaged. Ask the seller about harvest timing and storage if those details are missing. Freshness and handling matter more than a dramatic photograph of the parent flower.
Don’t rely on a floating test alone to decide which seeds are worth planting. Water absorption varies, and floating doesn’t prove a seed is dead. If you are testing a small batch, label questionable seeds separately and compare the results.
When Is the Best Time to Plant Plumeria Seeds?
Spring and early summer are convenient because warmth and daylight are increasing. That gives seedlings time to grow before colder weather arrives. Your indoor conditions matter more than choosing one exact calendar date.
You can start seeds indoors at other times if you can maintain suitable warmth and light. However, a warm room with a dark windowsill is not a complete growing setup. Plan where the seedlings will go after germination, not just where the seed tray will fit.
Think about space as well. A few seedlings are easy to accommodate, but many young trees eventually need larger containers. Start with a number you can keep through several growing seasons.
How to Plant Plumeria Seeds in Pots
Direct sowing in a growing mix is a straightforward first method. It avoids moving a newly exposed root from water or paper into a pot. Follow the steps below and change one thing at a time if you later experiment.
1. Prepare Small Containers
Choose pots or cells with open drainage holes. Small individual containers make it easier to track seedlings and move them without separating tangled roots. You don’t need to start with a large decorative planter.
Wash reused containers and remove old soil and plant debris. Follow any cleaning-product directions if disinfecting them. Let excess rinse water drain before adding the growing mix.
2. Moisten the Mix Before Planting
Gradually add water to the seed-starting mix and stir it through. Aim for an evenly damp texture that remains loose. If water collects at the bottom or the mix drips heavily when squeezed, let it drain before proceeding.
Fill each container without packing the mix tightly. Leave a little space below the rim to make watering easier. Avoid heavy garden soil that becomes dense in a small pot.
3. Decide Whether to Soak the Seeds
A short soak is an optional prep step many growers use. About four to six hours in clean, lukewarm water is a reasonable approach when following that method. Avoid hot water and do not leave seeds forgotten in a soaking container for days.
Soaking is different from growing a root in water. Its purpose is to moisten the seed before sowing. You can also plant without soaking if that is the method supplied with your seeds.
4. Plant the Thick End Down
Make a narrow planting hole rather than forcing the seed through firm mix. Insert the thick seed body downward and leave the papery wing standing above the surface. Gently bring the mix against the seed so it remains upright.
The important point is contact between the seed body and moist growing mix. Do not bury the entire wing beneath a deep layer. These seed planting instructions describe the same wing-up approach.
5. Label Each Pot
Write the sowing date and any reliable parent or source information on a label. Keep labels with the pots when moving them. A phone photo of the labeled batch provides a useful backup.
Labels become more valuable as the plants grow. Seedlings that look similar now may flower differently years later. Record what you know without guessing at missing parent information.
6. Water Gently and Let the Pots Drain
Settle the mix with a gentle watering if it needs it. Avoid a strong stream that shifts the seed or washes mix away from its base. Empty the catch tray after drainage finishes.
Check moisture each day rather than automatically adding water. The mix should remain lightly moist during germination. Constantly saturated conditions don’t improve even moisture.
Warmth, Light, and Covers During Germination
A practical starting target is a growing-mix temperature around 75–85°F. That sits within the warm conditions used in plumeria seed-growing guidance. Check the temperature where the pots sit, especially if nights are cool.
Keep the setup in a bright location, but don’t expose a covered tray to strong direct sun. A clear cover can trap heat quickly. If you use one, ensure it’s well-ventilated and inspect the mix daily.
As seedlings emerge, give them good light and increase airflow. Gradually open or remove the cover rather than keeping growing plants sealed inside. Warmth helps germination, but excessive heat and wet conditions can damage a young plant.
How Long Do Plumeria Seeds Take to Germinate?
One to three weeks is a useful planning estimate, not a deadline. Some seeds sprout sooner, while others take longer. Seed condition, temperature, and moisture all affect the pace.
Visible growth above the mix is not necessarily the first activity inside the pot. A root may be developing before you see leaves. Repeatedly digging up a seed to inspect it can damage that early growth.
If nothing appears, check temperature and moisture before changing methods. Keep firm, apparently sound seeds under suitable conditions while watching for decay. Discard a clearly rotten seed rather than keeping it in a wet pot indefinitely.
How to Plant Plumeria Seeds in Water
Water germination is an alternative method, not a required stage. In one established approach, a floating support holds each seed upright with its lower tip in water and its wing above the surface. Later, the seed is transferred into growing mix.
The water-rooting method calls for changing the water daily and potting seedlings when roots are about half an inch long. Protect the fragile root during that move. Make a hole in the prepared mix rather than pushing the root through it.
For a first attempt, direct sowing is easier to manage because it avoids this transfer. If you try water germination, use a separate small batch. Do not assume a successful water start means the seedling should remain in plain water for the long term.
Can You Germinate Plumeria Seeds in a Paper Towel?
A damp paper towel lets you observe seeds without digging through mix. However, it introduces another handling step when roots appear. Keep the towel damp, not dripping, and check the container regularly.
Carefully transfer a germinated seed before the root becomes tangled in the paper. If a root has attached, avoid pulling it free by force. Direct sowing remains a sensible option when you want fewer opportunities to damage a new root.
Choose one method for each batch and record it. Moving unsprouted seeds repeatedly between water, paper, and soil makes the results harder to judge. Consistent conditions are more useful than changing the setup every few days.
How to Get Plumeria Seeds From a Pod
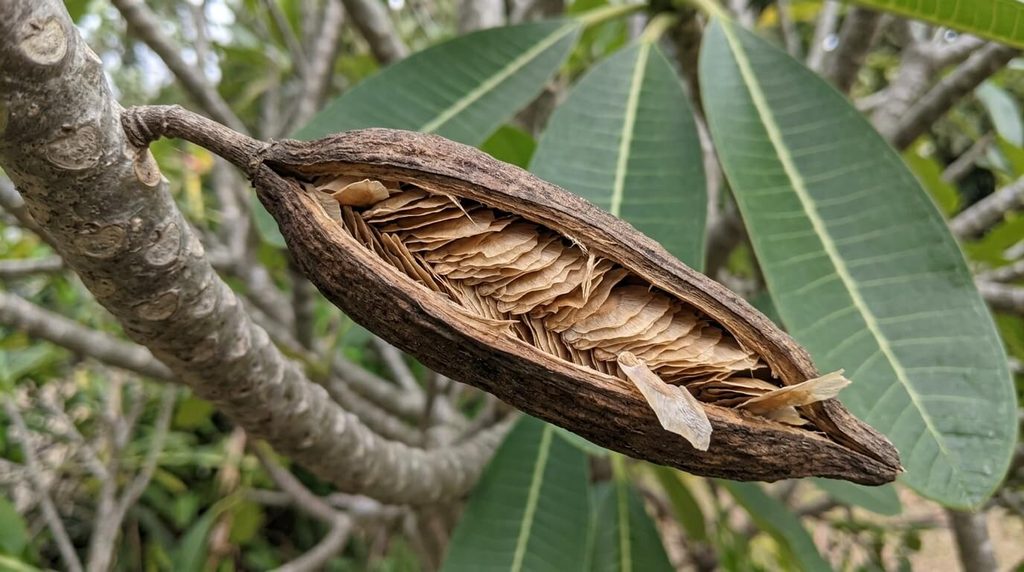
If you are wondering how to plant plumeria seed pods, first collect the individual seeds. A whole pod should not be buried like a bulb. The pod is a container that must mature before you collect its seeds.
Plumeria pods can take roughly eight to nine months to mature. Leave them on the plant while they develop rather than cutting them off because they have reached a large size. This seed and seedling guide explains the long ripening period and how to catch released seed.
A loose, breathable mesh covering can help prevent ripe seeds from blowing away. It should allow airflow and leave room for the pod. Don’t seal a developing pod in a plastic bag.
Plumeria Seed Pod Stages
- Development: A pod forms and enlarges on the plant.
- Maturation: The pod remains attached while the seeds develop inside.
- Drying and splitting: The mature pod dries and begins to open.
- Seed release: Winged seeds become exposed and can disperse.
- Collection: Gather the seeds, inspect them, and keep track of their source.
Do not judge maturity by size alone. A large, firm green pod may still need time. Watch its condition and development instead of forcing it open.
Caring for Plumeria Seedlings After They Sprout
The first pair of leaves are seed leaves, also called cotyledons. True leaves develop afterward. Keep that difference in mind when deciding whether a seedling is ready for a larger container.
Do not pull off a seed coat simply because it remains attached. The tender tissue beneath it can tear. Give the plant time, and avoid making coat removal a routine part of your care.
Provide enough light to keep growth sturdy, but introduce stronger sun gradually. Don’t move a seedling raised under cover or indoors straight into harsh afternoon sun. Watch both the leaves and the moisture in its small pot during the change.
Water Seedlings According to Their Stage
Young seedlings need a steady supply of moisture around their small roots. Don’t treat them like unrooted plumeria cuttings kept comparatively dry. At the same time, they still need a mix that drains and allows air around the roots.
Check the pot’s weight and the mix before watering. If it remains wet, wait and investigate rather than adding another drink. If the root zone is drying, water gently and let the excess drain away.
Start Feeding Carefully
Check whether the growing mix already contains fertilizer. New seedlings don’t need several products at once. Once they are actively growing, follow a suitable fertilizer’s directions for seedlings or young container plants.
Do not use extra fertilizer to compensate for poor light or wet soil. Correct those conditions first. Keep a record of feeding dates so you don’t accidentally repeat applications.
When to Repot Plumeria Seedlings
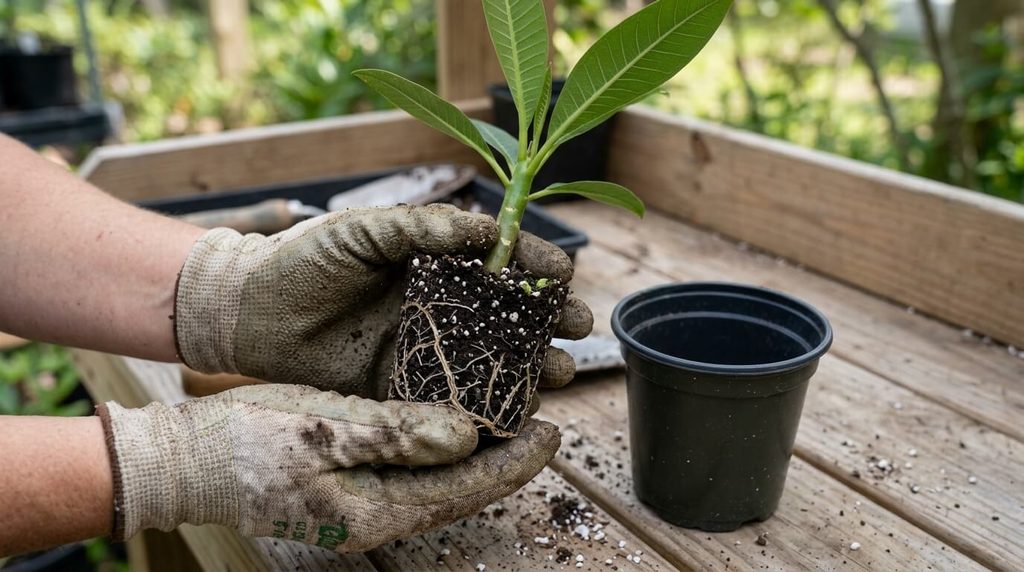
Look for several true leaves and a root system strong enough to support a move. Look for roots filling the starter container or emerging from drainage holes as signs to inspect. Avoid choosing a repotting date based only on the calendar.
Move into a container modestly larger than the starter pot. Support the root ball and keep the plant at approximately its previous growing depth. Water as needed to settle the new mix without leaving it saturated.
Make later increases in pot size as the plant grows. A very large container around a tiny root system can be harder to water well. Plumeria grows best in pots when the container suits the current plant.
Common Plumeria Seed Problems
Seeds Have Not Sprouted
Check whether the mix stays warm overnight and whether it has dried around the seed body. Also review seed age and storage if known. Slow progress alone does not prove the entire batch has failed.
Seeds Become Soft or Moldy
Check for waterlogged mix, standing water, and poor ventilation. Remove clearly decayed seeds and clean affected equipment before reuse. Don’t add more water just because the remaining seeds haven’t emerged.
A Seedling Falls Over at the Soil Line
A pinched or rotting stem base can indicate damping-off or another serious problem. Isolate the affected pot and review moisture, cleanliness, and airflow. Avoid assuming it only needs a support stick.
Seedlings Grow Tall and Weak
Review the light reaching the plants. Move the light source or growing location as appropriate, following equipment directions where relevant. Do not suddenly place weak indoor seedlings in intense sun.
Leaves Wilt Even Though the Mix Is Wet
Check drainage and root condition before watering again. Wet roots may not support normal growth. If wilting persists, seek advice from a local nursery or extension office.
How Long Until Seed-Grown Plumeria Flowers?
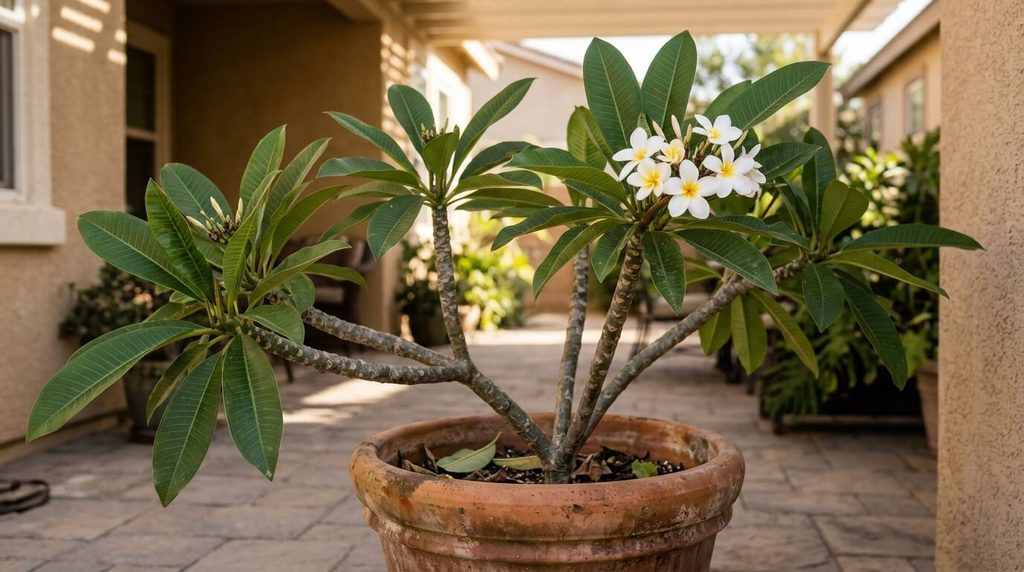
Expect a wait measured in years. Three to five years is a common planning range, and some seedlings take longer. Growing conditions and the individual plant affect when the first flowers appear.
Don’t buy seed expecting a guaranteed flower color or a quick first bloom. The early goal is a healthy plant with sound roots and sturdy growth. Keep records and enjoy the changes without treating each season as a missed deadline.
If you want flowers while waiting, consider growing other suitable plants alongside your plumeria collection. This guide to growing velvet flowers offers a separate warm-season planting option. Keep each plant’s light, watering, and container needs distinct.
Conclusion
The simplest way to learn how to plant plumeria seeds is to begin with a few labeled pots and a consistent method. Plant the thick end in a moist, airy mix, leave the wing exposed, and provide warmth, then good seedling light. Start with a manageable batch, check it daily, and give the plants time to develop before expecting flowers.
Which end of a plumeria seed goes down?
The thick seed body goes down when using the upright method. Leave the papery wing above the growing mix. Gently firm the mix around the body to keep it in place.
Do you have to soak plumeria seeds before planting?
No, soaking is not required for every planting method. Some growers use a short soak before sowing. Follow the instructions supplied with your seeds and avoid leaving them submerged for days as a pretreatment.
Can you plant a whole plumeria seed pod?
Collect and plant the individual seeds instead. Let the pod mature before opening or collecting it. A whole pod should not be buried like a bulb.
Can you plant plumeria seeds indoors?
Yes, if you can provide suitable warmth and good light after emergence. Small pots with drainage holes are convenient for a first batch. Plan where the seedlings will grow as they become larger.
Should floating plumeria seeds be thrown away?
Floating alone is not a dependable reason to discard a seed. Inspect the seed body and consider its condition and source. You can label questionable seeds separately and observe whether they germinate.
Will seedlings have the same flowers as the parent plant?
They may resemble the parent, but an exact match is not guaranteed. Seedlings can differ in flower color, form, fragrance, and growth. Use a correctly identified cutting when preserving a named selection is your goal.