


How to Build a Backyard Archery Range
The first thing most people think about when searching for how to build a backyard archery range is distance. They want to know whether their backyard is long enough to shoot 10, 20, or even 40 yards. While distance matters, I think it is actually the second question you should ask.
The first question is much more important: Where will the arrow go if I miss the target?
That question changes how you should plan the entire range. An arrow can miss to the left or right, pass over the target, travel through a worn-out target, or behave differently after hitting an unsuitable surface. Even a skilled archer can make an unexpected shot, while beginners naturally need more room for error as they learn.
That is why I recommend planning a backyard archery range from the outside in. First, look at your property and decide where an arrow can safely travel. Then choose the shooting direction, define the safety area, select an appropriate backstop, and only then decide where the target should go.
This approach may take a little more planning at the beginning, but it can save you from making expensive changes later. A target is easy to move. A poorly planned shooting lane, unsafe backstop, or unsuitable location is much harder to fix once everything has been installed.
A home range also does not have to be complicated. If you have enough space and can create a controlled shooting environment, you may be able to build a simple setup that gives you a convenient place to practice without turning your backyard into a professional competition facility.
In this guide, I will explain the process step by step, including how to choose the location, plan the shooting lane, select a target, build or choose an Archery backstop, and create a setup that works for beginners and more experienced archers.
Before You Build, Check Your Local Rules
Before you buy a target or start building a backstop, check the rules that apply to your property. Archery regulations can vary by location, and local governments or homeowners associations may have restrictions that affect whether you can practice in your backyard.
I would start by checking your city or county government website for rules related to discharging bows or other projectiles. If the information is unclear, contact the appropriate local office instead of relying on advice from a random online forum.
You should also check any neighborhood or homeowners association rules that apply to your property. A setup that is acceptable from a general local law perspective may still be restricted by community rules.
Your property insurance may also have its own requirements. I would not assume that insurance automatically covers every type of backyard activity simply because you own the property.
This is the part of the project that is easy to skip because it is not exciting. However, it is much better to spend a few minutes checking the rules before you spend money on equipment.
The same planning principle applies to other outdoor projects. When you are making changes around your property, it is useful to understand the space you have available before investing in materials, just as you would when researching the average size of a backyard pool before planning a pool installation.
How to Choose the Best Location for Your Backyard Archery Range
The best location is not necessarily the longest or most attractive part of your backyard. The safest shooting direction should be your priority.
Walk around your property and look at the yard from the position where you expect to shoot. Imagine an arrow traveling beyond the target. Then look at everything that exists in that direction.
- Is there another house?
- Is there a road?
- Is there a public path?
- Could a neighbor walk into the area?
- Could children or pets enter the space?
- Are there windows, vehicles, sheds, or other structures that could be damaged?
These questions matter because the range does not end at the target. The area beyond the target is part of your shooting environment too.
A good location should give you a clear shooting lane and a controlled area behind the target. You should also think about the sides of the range because a poor shot does not always travel directly forward.
I would also recommend observing your backyard at different times of day before choosing a permanent location. A quiet area in the morning may become busy later in the afternoon when children are playing outside, or neighbors are walking nearby.
Wind is another factor worth noticing. Strong or changing wind can affect how comfortable and consistent your practice sessions are. You do not need to build a weather station, but spending a few days observing the property can reveal things you would otherwise notice only after building the range.
If you are unsure about the location, use a temporary target setup first. Practice from the proposed shooting line for a few sessions and see how the space actually works before committing to a permanent installation.
Measure the Entire Shooting Area, Not Just the Distance to the Target
When people ask how much space they need, they often think only about the distance between the archer and the target. That is an incomplete way to measure a backyard range.
You need to consider the entire controlled area.
Your range includes the shooting position, the distance to the target, the target itself, the backstop, and the space around and beyond the target. You should also leave enough room to move safely when retrieving arrows and checking your equipment.
For example, a 20-yard shooting distance does not mean you simply need 20 yards of empty ground. The target takes up space, the backstop takes up space, and you still need to think about what happens if an arrow misses.
I recommend physically walking the proposed shooting lane before buying equipment. Stand at the shooting line and look toward the target location. Then walk beyond the target and inspect the area from that direction as well.
This gives you a better understanding of the range from both perspectives.
| Area | What to Consider |
|---|---|
| Shooting line | Where the archer will stand |
| Shooting lane | Clear path between archer and target |
| Target area | Target and target stand |
| Backstop area | Barrier or material behind the target |
| Side clearance | Space for left and right misses |
| Overshoot area | What happens if an arrow goes beyond the backstop |
| Retrieval area | Safe access for collecting arrows |
The most important point is that you should not design the range around your best shot. You should design it around realistic mistakes.
How to Build a Backyard Archery Range for Beginners

If you are learning how to build a backyard archery range for beginners, I recommend keeping the first version simple. You do not need several targets, multiple shooting lanes, or an elaborate structure to start practicing.
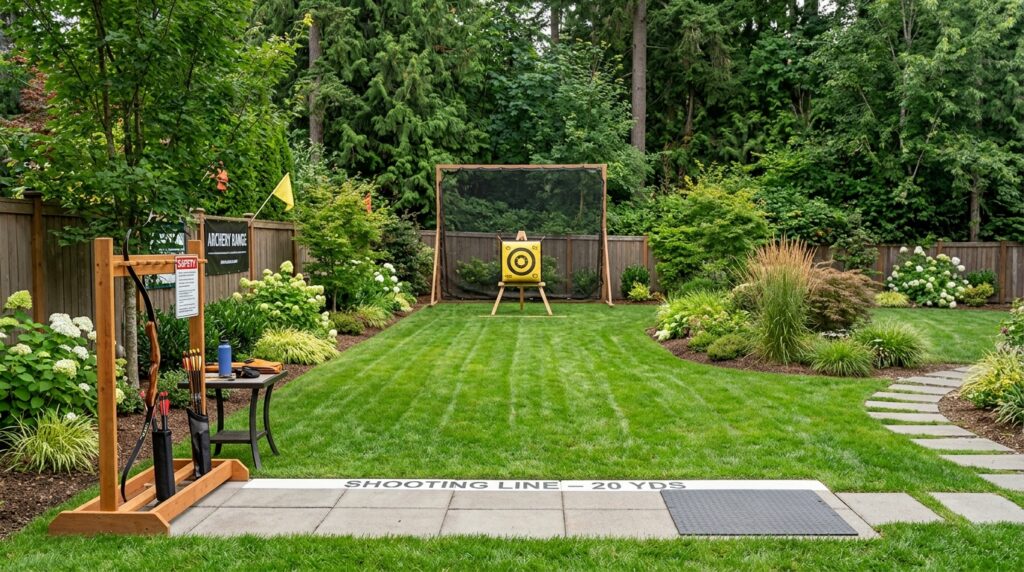
A beginner-friendly range can consist of one appropriate target, a stable target stand, a suitable backstop, and a clearly marked shooting line. This simple setup gives you enough to work on your stance, anchor point, aiming, release, and consistency.
Starting at a shorter distance can also make your practice more productive. You can focus on developing consistent form instead of spending every session searching for arrows that missed the target.
Once you become more accurate, you can move the shooting line farther away if your property allows it. This gradual approach also gives you time to discover problems with your setup.
Maybe the target is too low. Perhaps the target stand moves when you shoot. You may find that the afternoon sun makes it difficult to see the target clearly, or that your backstop needs to be adjusted.
These are much easier problems to solve when you have a simple temporary setup than when you have already built a permanent structure.
A Beginner Range Should Be Easy to Use
I also think beginners should pay attention to convenience. If setting up the range takes 30 minutes every time you want to shoot, you may eventually stop using it.
Your goal should be to create a space where you can walk outside, inspect the range, and begin practicing without a complicated setup process.
That is one of the biggest advantages of practicing at home. You can shoot for a short period without having to travel to another location.
However, convenience should never replace safety. The range still needs to be controlled every time you use it.
How Much Space Do You Need for a Backyard Archery Range?
There is no single backyard size that automatically works for every archer. The space you need depends on the bow you use, your skill level, your preferred shooting distance, the target, and the amount of controlled space available beyond the target.
A beginner who wants to practice basic form may be perfectly happy with a relatively short range. An experienced archer who wants to practice longer distances will obviously need more room.
This is why I would not tell every homeowner that they need a specific minimum distance without knowing the property and equipment involved.
Instead, start with your intended practice distance and then plan outward from there. You need enough room to create a safe shooting lane, place the target and backstop, and manage the area beyond and around the target.
If your backyard is small, you may still be able to create a useful practice area. You may simply need to focus on shorter-distance practice rather than trying to recreate a full-size outdoor range.
A shorter range can actually be valuable for beginners. You can work on form and consistency without worrying about long-distance accuracy.
If your goal is to practice at longer distances, however, you may be better served by visiting a dedicated facility rather than forcing a long shooting lane into a property that is not suitable for it.
The Most Important Part: Choosing an Archery Backstop
The target gives you something to aim at, but it should not be your only line of protection. A suitable Archery backstop can help catch arrows that miss the target, but the correct material depends on your equipment and shooting conditions.
- Your bow’s draw weight matters.
- Your arrow type matters.
- Your target matters.
- The condition of your target matters.
- Your shooting distance matters.
This is why I would be cautious about any article that recommends one backstop material for every backyard range.
A setup that works for a low-poundage beginner bow may not be appropriate for a stronger bow. Even Archery360’s guidance distinguishes between different backstop options and notes that certain types of netting are intended for lower draw weights and specific conditions.
The basic principle is simple: your backstop should help absorb or catch a missed arrow without creating a dangerous hard surface that could damage the arrow or cause unpredictable behavior.
Common Backstop Options
Several materials are commonly used for backyard archery setups.
Commercial archery netting can be convenient, but you should verify that the product is rated for your specific bow and shooting conditions. Not every net is designed to stop every type of arrow.
Hay or straw bales are another traditional option. They can be relatively inexpensive, but they require inspection because repeated arrow impacts can create gaps or worn areas. Archery360 also recommends monitoring hay bales and rearranging them when arrows create holes or weak spots.
Foam materials can also be useful when selected appropriately. Their ability to absorb impact makes them attractive for home ranges, but the exact material and thickness should be matched to the equipment being used.
A natural earth berm can also provide a substantial barrier in the right property layout. However, building one can become a major landscaping project, and you should still consider local regulations and drainage.

Never Assume a Fence Is an Archery Backstop
One of the most common mistakes is treating a backyard fence as the only protection behind the target.
A wooden privacy fence is not automatically designed to stop arrows. The same is true for vinyl fencing, decorative walls, or a row of bushes.
A hard surface can damage an arrow when struck directly. Archery360 specifically warns that arrows hitting walls, fences, or other solid surfaces can break upon impact, which is why a suitable backstop and adequate space behind it are important.
If you have a fence behind your target, think of it as part of the overall property boundary rather than assuming it is your primary arrow-stopping system.
How to Build a Safer DIY Archery Backstop
If you want to create your own backstop, start by thinking about stability and maintenance rather than simply finding the thickest material you can buy.
The structure should remain stable during normal use and weather conditions. It should not easily tip, shift, or collapse when the target is struck or when wind moves through the yard.
The stopping material should also be appropriate for your bow and arrows. This is where many DIY guides become too general. A backstop should be tested and maintained based on the equipment you actually use.
For example, if you build a setup for a beginner bow and later increase your draw weight, you should reassess the backstop instead of assuming that the original system will still perform the same way.
The same principle applies when changing arrow types.
Make Your Backstop Larger Than the Target
Your backstop should provide coverage beyond the target rather than matching the exact dimensions of the target face.
The reason is simple. Beginners and experienced archers can both miss. A slightly larger catch area provides more protection against shots that land outside the target.
The exact size will depend on your property, equipment, and range design. You should also think about misses to the sides and above the target rather than focusing only on arrows traveling directly through the center.
Test Your Backstop Carefully
Do not assume a backstop is safe because it looks thick.
Test it gradually with the equipment you actually intend to use. Start at a conservative distance and inspect what happens when an arrow strikes the target and when a shot misses.
- Look for penetration.
- Look for damage.
- Look for movement.
- Look for arrows behaving unexpectedly after contact.
If you are uncertain about a DIY setup, consider using a commercially manufactured backstop that provides clear specifications for the equipment it is designed to handle.
Choose the Right Target for Your Bow
The target you choose should match your equipment. This sounds obvious, but it is easy to buy a target based only on price or appearance without checking how it is intended to be used.
Some targets are designed for field points. Others may be intended for specific arrow types or shooting conditions. Certain targets are easier to remove arrows from, while others may become difficult to pull from after repeated use.
Always check the manufacturer’s recommendations before buying.
I would also consider how often you expect to practice. If you plan to shoot several times a week, target durability becomes more important than it would be for someone who shoots occasionally.
Bag Targets
Bag targets are popular for home practice because they are convenient and often provide multiple aiming points. They can be a practical choice for beginners who want a simple target that is easy to set up.
However, outdoor exposure can affect their lifespan. Rain, moisture, and prolonged sunlight can contribute to deterioration, so I recommend protecting the target when it is not being used.
Foam Targets
Foam targets are another common choice for home practice. They are available in different designs and densities, which means you should still check whether a specific model is suitable for your bow and arrows.
One advantage of foam is that many products are designed to make arrow removal relatively manageable. That can become important when you practice frequently.
3D Targets
If you want your practice to feel more realistic, a 3D target may be appealing. These targets can make sessions more engaging, especially for archers who enjoy practicing from different angles.
However, they usually require more space and may need a different setup than a simple bag target. You should still maintain an appropriate backstop behind the target.
How to Build a Backyard Archery Range Without a Permanent Structure
If you are searching for how to build a backyard archery range without a permanent installation, you may be better off creating a temporary or portable range.
This can be especially useful if you rent your home, have limited space, or simply want to test different locations before committing to construction.
A portable setup can include a movable target stand, a temporary shooting line, and a backstop that can be stored when you are not practicing.
I actually like this approach for beginners because it gives you a chance to learn how your property behaves.
You may discover that one part of the yard receives too much afternoon sunlight. You may find that wind is stronger in one corner. You may realize that your neighbors use a nearby path more frequently than you expected.
A temporary setup lets you make changes without rebuilding the entire range.
When a Temporary Range Makes More Sense
A portable range can be a good choice when you:
- Rent your home
- Have limited backyard space
- Share your yard with children or pets
- Want to test the best shooting direction
- Are new to archery
- Do not want permanent construction
The important point is that temporary does not mean careless. You still need to create a controlled shooting environment every time you set up the range.
Backyard Archery Range Ideas That Improve Your Practice

The best Backyard archery range ideas are the ones that make your practice more consistent.
You do not need expensive technology or complicated landscaping. A few simple improvements can make your home range easier and more enjoyable to use.
Mark Multiple Shooting Distances
If your property allows it, mark several shooting positions. You might have one short-distance line for warming up and beginners, another for regular practice, and a third for longer-distance shooting.
Every position should remain within the safe shooting layout you have planned.
Create a Permanent Distance Marker
Simple distance markers can make your practice more consistent. You can use small ground markers or clearly visible signs so you always know where you are standing.
This is useful when you are trying to measure improvement over time.
Keep a Practice Notebook
This is one of my favorite ideas because it turns casual shooting into structured practice.
Write down the date, shooting distance, number of arrows, equipment used, weather conditions, and anything you noticed during the session.
Over time, you may notice patterns. Perhaps your groups become less consistent when you are tired, or maybe strong wind affects your accuracy more than you expected.
Your backyard range then becomes more than a place to shoot arrows. It becomes a place where you can actually learn how you shoot.
Create a Small Equipment Station
A small bench, shelf, or storage box near the shooting area can make the range more convenient.
Keep your arrows, bow accessories, arrow puller, and other equipment organized. This reduces the amount of time you spend walking back and forth. However, keep anything that could be damaged or create a hazard outside the shooting lane.
Build the Range Around Your Daily Routine
A range can be perfectly designed and still fail if you never use it.
Think about when you are actually likely to practice. If you work during the day, perhaps evening sessions are more realistic. If your yard becomes busy after school, morning practice may be easier.
Sunlight can also affect your experience. A target that looks clear in the morning may become difficult to see when the sun is directly behind it.
I recommend observing the proposed location for several days before finalizing the setup. Look at the yard in the morning, afternoon, and evening.
Pay attention to people, pets, wind, sunlight, and noise. This simple observation can prevent a lot of frustration later.
Do Not Forget About Noise
Noise is rarely mentioned in discussions about Home archery range ideas, but it can affect your relationship with neighbors.
An arrow hitting a target repeatedly can create a noticeable sound, particularly in a quiet residential area. If you practice frequently, your neighbors may eventually notice the repeated impact.
You do not necessarily need to avoid backyard archery. Instead, be considerate about when you practice.
Avoid very early morning and very late evening sessions. Keep the range as far from neighboring property lines as practical, and consider talking to your closest neighbors before installing a permanent setup.
A short conversation can prevent misunderstandings. It also allows you to explain what you are doing and reassure them that the range has been planned responsibly.
Protect Your Target and Equipment From Weather
Outdoor archery equipment has to deal with rain, sunlight, humidity, and wind.
Your target may deteriorate faster when it is constantly exposed to the elements. Backstop materials can also wear over time, depending on what you use and how they are installed.
I recommend protecting your equipment whenever possible. A simple weather-resistant storage box may be enough for smaller accessories. Larger equipment can be stored in a covered area or suitable shed.
If you are planning broader improvements to your outdoor space, you can also explore practical Outdoor & Garden ideas on HomeUpright. The important thing is to keep valuable equipment protected when you are not using it.
Create a Simple Range Maintenance Routine
Your backyard range is not something you build once and forget. Targets wear out, backstops develop weak spots, frames loosen, and outdoor materials deteriorate over time. Weather can also change the condition of your equipment, especially when the range is exposed to rain, sunlight, wind, and humidity.
Before every serious practice session, I recommend checking the target and backstop for holes, tears, damage, movement, or other signs of deterioration. You should also inspect the area behind and around the target to make sure no people, pets, or other unexpected obstacles have entered the shooting area.
Once a month, perform a more detailed inspection of the entire setup. Check the target frame, mounting points, backstop material, shooting line, and overall condition of the range. This is especially important if you practice frequently because repeated use can gradually create problems that may not be obvious during a quick inspection.
A range that was safe when you first built it may not remain in the same condition months later. Regular maintenance helps you identify worn or damaged components early and allows you to repair or replace them before they become a bigger problem.
Test Your Range Before Regular Shooting
One of the most useful things you can do is avoid rushing into a full practice session immediately after building your range. Start conservatively by using the equipment you actually intend to shoot and beginning at a shorter distance. This gives you a chance to see how the entire setup performs before you start regular practice.
Check whether the target remains stable after repeated shots and pay attention to how the backstop responds. Look for signs of penetration, damage, movement, or other problems that could affect the safety of the range. You should also make sure that arrows can be retrieved easily without creating another safety issue.
After your initial test, inspect the entire area again. The goal is not to prove that your setup can handle one perfect shot. The goal is to understand how the complete system behaves during normal use and how it performs when something does not go exactly as planned.
Your bow, arrows, target, backstop, shooting line, and surrounding property all work together as one system. A good backyard range considers every one of these factors rather than focusing only on hitting the center of the target.
Expert Tips I Would Follow
Start Smaller Than You Think
A small range that you use regularly is more valuable than a large range that becomes difficult to maintain. Start with the equipment you actually need and expand only when you understand what your practice requires.
Design for Realistic Misses
Do not plan the range around your best shot. Think about beginner mistakes, rushed releases, equipment problems, and unexpected misses.
Match the Backstop to Your Equipment
Do not assume that a backstop designed for one bow will automatically work for another. Reassess your setup whenever your equipment changes.
Protect Your Target
Outdoor targets can deteriorate faster when exposed to rain and sunlight. Protecting them when they are not being used can help extend their useful life.
Keep Pets Away
Pets do not understand shooting lanes. A dog running into the range at the wrong moment can create an unnecessary hazard.
Inspect Before Shooting
A quick inspection takes very little time but can reveal problems before they become serious.
Practice at Shorter Distances First
Short-distance practice can help you work on consistency before moving farther away.
Keep the Setup Flexible
A portable range can be a smart choice when you are still learning how your property and equipment work together.
Make Arrow Retrieval Convenient
If collecting arrows is frustrating every time you practice, you may eventually use the range less often. A practical layout should make retrieval as easy as possible.
Backyard Archery Set: What Do You Actually Need?
A Backyard Archery Set does not have to include every accessory sold by an archery retailer.
For a basic home practice setup, you may need a bow, compatible arrows, a suitable target, a stable target stand, and an appropriate backstop.
You may also want a shooting line marker, arrow puller, and storage solution. The exact equipment depends on your bow and how you plan to practice.
| Equipment | Purpose |
|---|---|
| Bow | Main shooting equipment |
| Compatible arrows | Matched to your bow |
| Target | Provides the aiming surface |
| Target stand | Holds the target securely |
| Archery backstop | Helps catch missed arrows |
| Shooting line marker | Creates a consistent shooting position |
| Arrow puller | Helps remove difficult arrows |
| Storage | Keeps equipment organized |
| Weather protection | Helps protect outdoor equipment |
I recommend buying the target and backstop first rather than purchasing every accessory at once. Use the range for a while. Then see what you actually need.
You may discover that a simple storage box is enough. You may decide that additional shooting lines would improve your practice, or you may realize that your biggest problem is target visibility rather than equipment.
Build the range around your real needs instead of buying everything before you know what you need.
Should You Build a Home Indoor Archery Range?
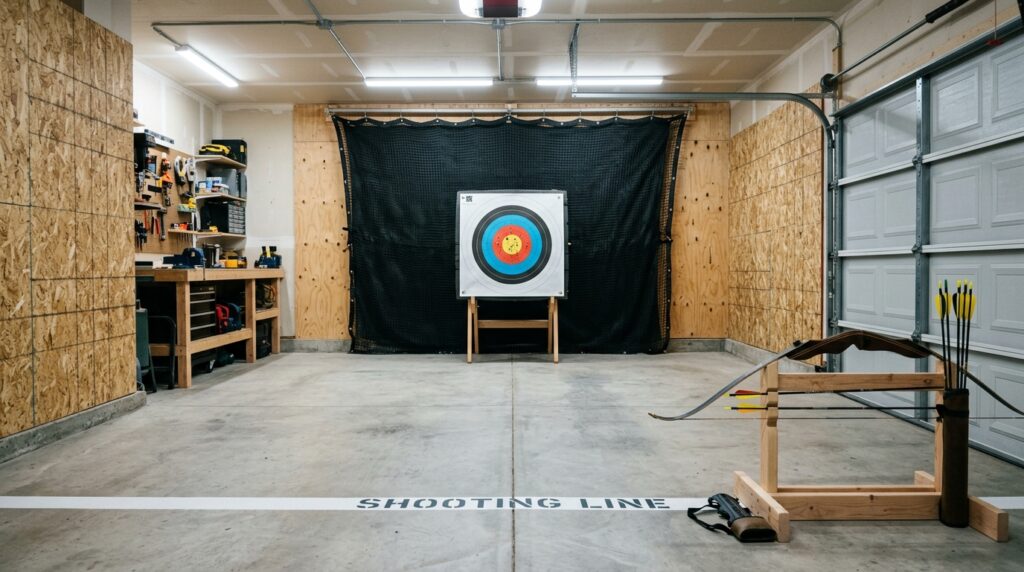
A Home indoor archery range can be useful when weather makes outdoor practice difficult, but indoor shooting requires just as much planning as an outdoor setup.
A garage may provide a practical location for short-distance practice if the space is suitable. However, you still need to control the shooting direction and protect walls, windows, vehicles, and other valuable objects. You also need an appropriate target and backstop.
The fact that you are indoors does not automatically make the setup safe. In fact, hard surfaces can create additional concerns because an arrow striking a wall or other solid object may be damaged.
For a narrow indoor space, I would focus on short-distance practice and form work rather than trying to recreate a long outdoor range. A compact indoor setup can help maintain your technique in bad weather, while longer practice sessions can take place at a suitable outdoor range.
How to Find an Archery Range Near Me
Sometimes the best option is not building a backyard range at all. If your property is small, surrounded by neighbors, or difficult to arrange safely, searching for an Archery range near me may give you a better place to practice.
A dedicated archery facility can also be useful when you want to shoot at distances that are not practical in your backyard. Visiting a professional range can teach you a lot before you build your own setup. You can see how shooting lines are organized, how targets are positioned, how arrows are retrieved, and how range commands are handled.
If you are new to archery, I would seriously consider taking a lesson or visiting an organized club before creating a permanent home range. USA Archery provides resources for people interested in participating in archery, including information about clubs and programs. The experience can help you understand what you actually need at home instead of copying a range design that may not suit your property.
Common Mistakes to Avoid
Building Before Checking Local Rules
Always confirm the rules that apply to your property before spending money on a permanent setup.
Using the Fence as Your Only Protection
A fence is not automatically an appropriate arrow-stopping system. Consider the entire range and use a suitable backstop.
Choosing the Location Only Because It Is Long
The safest shooting direction is more important than having the longest possible distance.
Buying the Cheapest Target
A low-cost target may not always be the best value if it wears out quickly or is difficult to use with your equipment.
Ignoring Weather
Outdoor equipment needs protection and maintenance. Rain, sunlight, and wind can all affect your setup.
Forgetting Side Misses
Do not think only about what happens directly behind the target. Plan for arrows that miss to either side as well.
Allowing Pets to Enter the Range
Keep pets away whenever anyone is shooting.
Assuming Experience Eliminates Risk
Experienced archers still make mistakes. Your range should be designed to handle unexpected shots.
Making the Range Too Complicated
You can always add features later. Start with a simple setup and improve it based on experience.
Never Inspecting the Range
Targets and backstops wear out. Frames loosen. Materials deteriorate. Regular inspections are part of responsible range maintenance.
Pros and Cons of Building a Backyard Archery Range
| Pros | Cons |
|---|---|
| Convenient practice at home | Requires careful safety planning |
| No travel for every session | Available space may be limited |
| Easy to practice regularly | Local rules may apply |
| Can be customized | Targets and backstops require maintenance |
| Useful for beginners | Weather can affect outdoor equipment |
| Can start with a simple setup | Noise may affect neighbors |
The biggest advantage is convenience. You can walk outside and practice without driving to another facility. That makes it easier to fit short practice sessions into your routine.
The biggest disadvantage is responsibility. At a dedicated range, the environment is designed specifically for archery. At home, you are responsible for creating and maintaining the controlled shooting environment yourself.
That means your backyard range needs more than a target. It needs thoughtful planning.
A Practical Step-by-Step Backyard Range Plan
If I were starting from scratch, this is the order I would follow.
Step 1: Check Local Rules
Confirm that backyard archery is permitted where you live and check any applicable community restrictions.
Step 2: Study Your Property
Walk around the yard and identify the safest possible shooting direction.
Step 3: Measure the Space
Mark your proposed shooting line and target location, then inspect the entire area beyond and around the target.
Step 4: Decide How You Will Practice
Think about whether you need short-distance beginner practice, longer shooting distances, or multiple shooting positions.
Step 5: Plan the Backstop
Choose a backstop that is appropriate for your bow, arrows, target, and shooting conditions.
Step 6: Select the Target
Choose a target designed for your equipment and expected shooting frequency.
Step 7: Create the Shooting Line
Mark a consistent position where the archer will stand.
Step 8: Test the Setup
Begin at a conservative distance and inspect how the target and backstop perform.
Step 9: Check the Surrounding Area
Make sure the shooting area is clear of people, pets, and unexpected activity before every session.
Step 10: Improve Over Time
Only add permanent features or additional equipment when you know they will make your range more useful.
This process may seem slower than simply buying a target and placing it in the backyard, but it gives you a much better chance of creating a range that works for your actual needs.
Frequently Asked Questions
How far should a backyard archery range be?
The ideal distance depends on your goals, equipment, skill level, and available property. Beginners can start at shorter distances to work on form and consistency, while experienced archers may want more room for longer-distance practice.
The important thing is not simply how far you can place the target. You also need to consider the target, backstop, surrounding area, and what happens if an arrow misses.
Can I build a backyard archery range without a permanent structure?
Yes, a temporary or portable range may be a practical option. A movable target stand, suitable backstop, and removable shooting line can give you flexibility without requiring permanent construction.
This can be especially useful if you rent your home or want to test different locations before deciding on a permanent setup.
What is the best archery backstop?
There is no single backstop that is best for every backyard range. The correct option depends on your bow, arrow type, target, draw weight, shooting distance, and property layout.
Commercial products can make selection easier because they often provide specifications for their intended use. DIY options can also work in suitable situations, but they should be carefully selected, tested, and maintained.
How do I build a backyard archery range for beginners?
Start with a simple setup that includes an appropriate target, stable target stand, suitable backstop, and clearly marked shooting line. A shorter shooting distance can make it easier for beginners to focus on form and consistency.
Once you become more accurate and comfortable, you can move the shooting line farther away if your property allows it.
Can I build a home indoor archery range?
A garage or other suitable indoor space can sometimes work for short-distance practice. However, you still need a suitable target, appropriate backstop, controlled shooting direction, and enough clearance.
You should also protect walls, windows, vehicles, and other valuable objects. An indoor space is not automatically safe simply because it is enclosed.
Final Thoughts: Build the Range You Will Actually Use
Learning how to build a backyard archery range is not about creating the biggest or most impressive range possible. It is about creating a practical place where you can practice consistently while keeping the shooting environment under control.
Start by looking at your property and checking the local rules that apply to backyard archery. Then choose the safest shooting direction, think carefully about what could happen if you miss the target, and plan your backstop before selecting the target and shooting line.
I would also recommend starting small. You do not need to build a professional-looking range on your first attempt. A simple setup with an appropriate target, reliable backstop, and clearly marked shooting position may be all you need to discover whether backyard practice works for you.
Use the range for a while and pay attention to how it performs. You may find that you need better weather protection, a more stable target stand, or a different shooting distance to make your practice more useful. These are normal discoveries, and they are much easier to address when you start with a simple setup.
The best backyard range is not the one that looks impressive in a photograph. It is the one that gives you a safe, convenient, and practical place to practice regularly. If you are also improving other parts of your property, you can find more practical ideas in HomeUpright’s Outdoor & Garden section.
Before every practice session, take a moment to inspect the entire range. Check the target, backstop, shooting lane, and area beyond the target, and make sure no people or pets have entered the surrounding space.
Then ask yourself one final question: If I miss the target, where will the arrow go?
If you have planned your range around that question, you are already thinking about your backyard archery setup in the right way. Start with safety, keep the design simple, practice consistently, inspect your equipment, and improve the range as you gain experience.