



My ice started tasting like plastic and dust about four months after I bought my countertop unit. That is when I finally sat down and figured out how to clean Frigidaire ice maker models the right way, instead of just running water through it and hoping for the best.
Most guides online skip half the story. They tell you to press a button, but never explain what to do if your model does not have one. They mention vinegar, but never what to use if you are out of it.
This guide is built differently. There is one main process that works for almost every Frigidaire ice maker, with clear notes on exactly where your model might differ. Follow it top to bottom, and you will not need to jump between five different articles to get a full answer.
How to Clean Frigidaire Ice Maker
Step 1: Figure Out Which Frigidaire Ice Maker You Have
Before touching anything, confirm what type of machine you are working with. This single decision changes almost nothing about the core cleaning steps, but it does change a couple of small details later in this guide.
| Your Model Type | What It Looks Like | Where to Find Your Model Number |
|---|---|---|
| Portable countertop (like the EFIC117-SS) | Small standalone unit, sits on your counter, no plumbing | Sticker on the back or bottom of the unit |
| Nugget or chewable ice maker | Standalone unit, produces soft pellet-style ice | Sticker on the back or bottom of the unit |
| Frigidaire Gallery countertop or nugget | Same as above but Gallery-branded | Sticker on the back or bottom of the unit |
| Built-in refrigerator ice maker | Inside your Frigidaire fridge or freezer door | Inside the fridge compartment, usually the frame |
If you own a portable, countertop, nugget, or Gallery standalone unit, the main process below applies directly to you. If you have a built-in refrigerator ice maker, jump to the dedicated section further down, since that setup works differently.
Knowing your exact model number also helps if you ever need to look up a specific manual, since Frigidaire uses very similar model codes across different unit types. A quick photo of the sticker on your unit saves you from having to guess later.
Step 2: Gather Your Supplies
Get everything ready before you start so you are not stopping halfway through with wet hands. This is the exact list I keep next to my machine now.
- White vinegar or food-grade citric acid
- A soft cloth or sponge, never anything abrasive
- A small brush, an old toothbrush works fine, for tight corners
- A measuring cup for mixing your solution
- A towel to catch drips during draining
- Mild dish soap, for exterior wiping and washing removable parts
Skip anything abrasive, including scouring pads or bleach-based sprays, since Frigidaire’s own care instructions specifically warn against harsh chemicals that can damage internal plastic components.
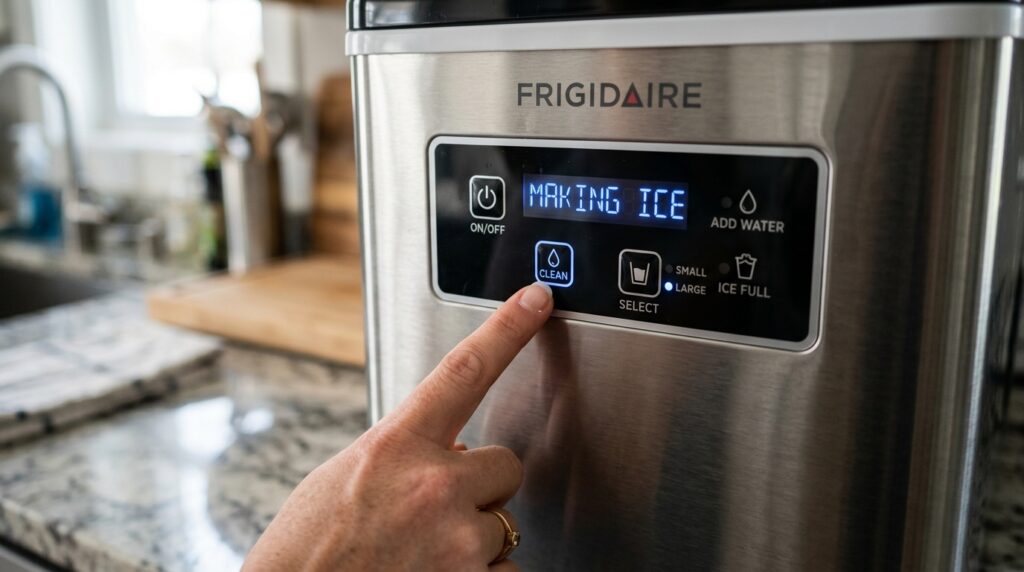
Step 3: Check for a Clean Button First
Look at your control panel for a button labeled Clean, Wash, or ICE/CLEAN. Many newer Frigidaire portable and countertop models include this, but plenty of popular models, including the EFIC117-SS, do not have one. I own the EFIC117-SS myself, and I spent ten minutes looking for a button that simply does not exist on it before I gave up and checked the manual.
This matters because it only changes one part of the process below: how the cleaning solution circulates through the machine. Everything else stays the same whether you have the button or not.
Step 4: Choose Your Cleaning Solution
You have four solid options here, and any of them will work through the same process. Pick based on what you have on hand and how much you mind the smell.
- White vinegar, mixed one part vinegar to one part water. Cheap and always available, but leaves a strong smell that needs extra rinsing.
- Food-grade citric acid, one tablespoon dissolved in one quart of water. According to a detailed breakdown of vinegar-free cleaning methods for Frigidaire units, citric acid outperforms vinegar for heavy mineral scale and has a much milder smell.
- Commercial ice maker cleaner tablets, such as Affresh or Nu-Calgon Ice Machine Cleaner. These remove the guesswork of mixing ratios, though they cost more per use.
- Warm soapy water, for light routine cleaning without heavy mineral buildup. Not strong enough on its own if you already see visible scale.
I personally switched to citric acid packets after getting tired of my kitchen smelling like a salad for an hour after cleaning. A single container lasts me almost a year of monthly cleanings.

Step 5: Run the Complete Clean, Start to Finish
This is the full process. If your model has a clean button, follow the version in brackets at Step 5d. If it does not, use the manual version, which is the process confirmed in the official EFIC117-SS user manual.
- Press the Power button to stop the ice-making cycle, then unplug the unit completely and let it warm to room temperature, which usually takes 20 to 30 minutes.
- If the water tray is not resting flat behind the evaporator fingers, gently push it back so any leftover water drains into the reservoir.
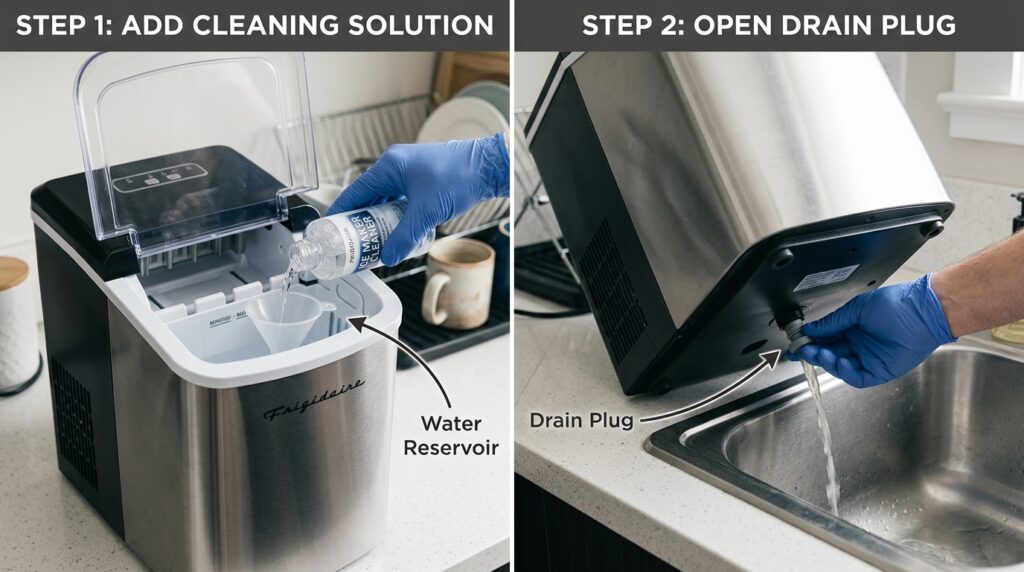
- Open the drain plug at the bottom or back of the unit and let all the water drain completely. Empty the ice basket completely.
- Remove the water tube screen and rinse it under running water, then set it aside with the ice basket and scoop.
- If you have a clean button: replace the drain plug, pour your chosen cleaning solution into the reservoir up to the fill line, plug the unit back in, and press and hold the Clean button for 3 to 5 seconds until the cycle starts. Let the full 15-minute cycle run without interrupting it. If you do not have a clean button: dampen a soft cloth in your cleaning solution and wipe down the entire interior cavity by hand, using your small brush for tight seams and corners. Do not clean the evaporator fingers directly, since these are the metal prongs where ice actually forms, and scrubbing them can bend or damage the coating.
- Drain the used solution completely through the drain plug.
- Refill the reservoir with plain water and run one full ice-making cycle. Discard every piece of ice this cycle produces without exception.
- Run a second plain water cycle and taste one piece of ice from it. If any vinegar or citric taste remains, run a third cycle before using the machine normally.
- While the rinse cycles run, wash the ice basket, water tube screen, and scoop separately in warm, soapy water, then rinse them and let them air-dry completely.
- Reassemble every part only once it is fully dry, wipe the exterior with a damp cloth and mild soap if needed, and plug the unit back in for normal use.
Do not drink or use any ice made during cleaning or the first rinse cycles. It will carry a strong taste of the cleaning solution and should always be thrown away.
What to Do If the Clean Cycle Does Not Seem to Work
Occasionally the clean button starts, but nothing appears to happen inside the machine. Before assuming something is broken, check a few simple things first.
Confirm the reservoir was filled to the correct fill line, since too little solution can prevent the pump from engaging properly. Check that the drain plug was fully closed before you started the cycle, since an open plug lets the solution drain out as fast as it fills.
If you still see no movement or circulation after checking both of these, unplug the unit for two minutes and try again. A short power cycle resolves this in most cases; if it does not, the manual method in Step 5 serves as a reliable fallback, regardless of whether your clean button is functioning.
Step 6: Know the Small Differences for Your Specific Model
The process above covers the full clean from start to finish. A few models need one or two extra notes on top of it.
Nugget or chewable ice makers. The core steps are identical, but pay closer attention to the auger and shaving mechanism during Step 5, since mineral buildup tends to show up there first on nugget-style machines rather than on flat interior surfaces. If your nugget ice starts coming out smaller, cloudier, or with a slight odor, that is your cue to clean early.
Frigidaire Gallery standalone countertop or nugget units. Follow the exact same process. Support threads on JustAnswer covering the Gallery clean cycle note that during Step 5d, you should see the unit visibly pumping water from top to bottom. If nothing circulates, check for a clog in the water line or pump before assuming the whole unit has failed.
EFIC117-SS specifically. The water reservoir on this model is fully removable from the back, which makes Step 5 easier and more thorough than wiping it out in place. Also check the ice scoop holder built into the lid during Step 9, as it collects moisture and is easy to overlook.
Step 7: Cleaning a Built-In Refrigerator Ice Maker
If your ice maker is in a Frigidaire Gallery refrigerator rather than on your counter, the process above does not apply directly, since the ice-making mechanism is located inside the freezer compartment behind the wall. This setup relies far more on filter maintenance than the wipe-down and rinse cycle used on portable units.
- Remove the ice bin from the freezer door or compartment and dump out any old or stale ice.
- Wash the bin in warm soapy water, rinse thoroughly, and dry it completely before it goes back in.
- Wipe down the dispenser chute opening with a cloth dampened in warm water and a small amount of dish soap.
- Check and replace the water filter if it has been six months or longer, following Step 8 below.
- Run and discard the first batch of ice produced after reassembly, then resume normal use.
Step 8: Replace the Water Filter on Built-In Models
Portable countertop units do not use a replaceable filter, but built-in refrigerator models do. Frigidaire refrigerators commonly use PureSource 3, PureSource Ultra, or PurePour filter cartridges depending on the model, and filters cannot be cleaned and reused the way the rest of the unit can.
According to Frigidaire’s own PureSource filter guidance, these cartridges are designed for replacement every six months and are certified to reduce contaminants such as chlorine, lead, and mercury in your water supply.
- Locate the filter, usually in the upper right corner of the refrigerator compartment or at the base grille, depending on your model.
- Twist the old filter counterclockwise to remove it.
- Insert the new filter and twist clockwise until it clicks or locks into place.
- Run two to three gallons of water through the dispenser to flush out air or carbon particles before using the ice or water normally.
If your ice output has slowed down or your water tastes slightly off, that is usually a sign your filter needs replacing sooner than the six-month mark, especially in homes with hard water.

Step 9: When to Go Beyond a Standard Clean
If your machine still smells musty or produces cloudy ice after a full clean following Step 5, it needs a deeper disassembly clean rather than a repeat of the same process.
- Unplug the unit and let it reach full room temperature.
- Remove every part you safely can, including the ice basket, scoop, water tube screen, and the reservoir itself if your model allows it to slide out.
- Wash each piece separately in warm, soapy water, rinse, and set aside to air-dry fully.
- Use your small brush on any seams, corners, or grooves a cloth cannot reach.
- Wipe the main interior cavity again with your cleaning solution, avoiding the evaporator fingers as before.
- Reassemble only once every single piece is completely dry.
Do not attempt to open or remove the compressor, fan housing, or evaporator assembly yourself. These are sealed components, and opening them typically voids your warranty and risks damaging the refrigerant system.
How Often You Should Repeat This Process
There is no single universal answer, since it depends on how often you use the machine and how hard your local water is. That said, most manufacturer guidance and appliance technicians land in a similar range.
| Situation | Recommended Cleaning Frequency |
|---|---|
| Light household use, soft water | Every 3 months |
| Daily use, average tap water | Every 4 to 6 weeks |
| Heavy use or hard water | Every 2 to 4 weeks |
| Machine unused for over 2 weeks | Clean before next use |
| Built-in refrigerator filter | Every 6 months |
If you live in a hard water area, you will likely land on the more frequent end of this table. Hard water contains higher levels of dissolved calcium and magnesium, and those minerals concentrate on interior surfaces each time a batch of ice forms and then melts back into the reservoir, eventually creating the white, chalky scale you may have noticed on older machines. A simple way to check is your local water utility’s annual quality report, which most providers publish online.
Beyond the schedule, treat any of these as an immediate signal to clean regardless of timing: cloudy or flecked ice, a metallic or musty taste, visibly slower ice production, an odor when you lift the lid, or more than two weeks of the machine sitting unused.
None of these signs mean something is broken. They simply mean the machine is telling you it is time to repeat Step 5, and catching it early always takes less effort than waiting until the smell becomes hard to ignore.
Why Skipping This Actually Matters
It is tempting to skip cleaning altogether, since ice looks clean even when it is not. That assumption is exactly the problem.
Ice is legally classified as a food product, and the same sanitation rules that apply to countertops apply to the inside of your ice maker. A review published in Food Safety Magazine explains that ice machines develop biofilms, protective layers that shield bacteria from normal cleaning and make certain pathogens far harder to remove once established.
This is not just a commercial kitchen concern. A CDC-affiliated review of ice-related infection investigations tracked dozens of cases in which contaminated ice contributed to the spread of harmful organisms, with mold, yeast, and bacteria all found in machines that were not cleaned on a regular schedule. Your home countertop unit is a much smaller risk than a hospital ice machine, but the same basic rule applies: a machine that never gets cleaned will eventually grow something you do not want in your drink.
There is also a much less alarming reason to stay on top of this. Mineral buildup restricts water flow over time, and I learned that the expensive way. My first ice maker started producing noticeably smaller cubes about six months in, and I assumed it was a mechanical fault. It turned out to be nothing more than scale slowing the water flow, and a single cleaning cycle fixed it completely.

Common Mistakes to Avoid
A few mistakes show up over and over in forums and support threads, and most of them are easy to avoid once you know what to watch for.
- Using bleach without fully rinsing it out. Bleach can sanitize effectively, but leftover residue is not something you want in your drink, and it can degrade certain plastic components over repeated use.
- Scrubbing the evaporator fingers directly. These are the metal prongs that form the ice, and physical scrubbing can bend or damage them.
- Skipping the rinse cycles. Drinking cleaning-solution-flavored ice is unpleasant, and it means dissolved mineral residue is still sitting in your machine.
- Ignoring the exterior vents. Dust buildup around the fan and air intake can affect cooling efficiency, not just appearance.
- Reassembling before parts are dry. Trapped moisture in a closed, damp space is exactly the environment mold prefers.
- Using hot water on plastic components. Very hot water can warp certain interior plastic parts over repeated exposure. Warm water is enough for every step in this process.
- Forgetting to label your cleaning schedule. It sounds minor, but a simple reminder on your phone or calendar is the difference between a habit and a machine you only think about once it smells bad.
Expert Tips for Long-Term Maintenance
A regular cleaning schedule handles most of the work, but a few extra habits genuinely stretch the time between deep cleans and keep ice quality consistent in the meantime.
Use filtered or bottled water in portable countertop models if your tap water is particularly hard. This alone can noticeably reduce how often you need a deep clean, since lower mineral content means less scale buildup.
Leave the lid open for an hour or two after your last use of the day if you are not running the machine again soon. This lets residual moisture evaporate rather than sit in a closed, damp space overnight.
If you also deal with mineral buildup elsewhere in your kitchen, the descaling logic is nearly identical. My guide to preventing calcium buildup on faucets covers the same hard water principles that apply to other fixtures.
And if you own other small kitchen appliances that need a similar vinegar-based clean cycle, my guide on cleaning a Breville espresso machine walks through a comparable descaling process you can apply the same weekend.
Vinegar vs Citric Acid vs Commercial Cleaner: Pros and Cons
| Method | Pros | Cons |
|---|---|---|
| White vinegar | Cheap, always available, effective on scale | Strong smell, needs extra rinse cycles |
| Citric acid | Stronger on mineral deposits, mild smell | Slightly more expensive, less commonly on hand |
| Commercial ice maker cleaner | Formulated specifically for the job, no guesswork | Costs more per use, requires buying separately |
| Warm soapy water | Gentle, good for routine light cleaning | Not strong enough for heavy mineral buildup |
Frequently Asked Questions
How do I clean my Frigidaire ice maker if it does not have a clean button?
Follow Step 5 in the manual version: unplug the unit, drain it, and wipe the interior by hand with a cloth dampened in your cleaning solution. Rinse with two to three cycles of plain water, discarding all ice from those cycles before using the machine normally.
Can I clean a Frigidaire ice maker without vinegar?
Yes. Food-grade citric acid, commercial ice maker cleaner tablets, or plain warm soapy water for light cleaning all work as substitutes in the same process, and citric acid actually outperforms vinegar against heavy mineral scale.
How often should I run this cleaning process?
Most households should clean every 4 to 6 weeks with average tap water, more often with hard water or heavy daily use, and less often with light use and soft water. Always clean the machine before use if it has sat idle for more than two weeks.
Why does my Frigidaire ice maker smell musty even after cleaning?
This usually means moisture is sitting somewhere it should not, often behind the water tray or inside the drain area. Make sure every part is fully dry before reassembly, and leave the lid open for an hour after use.
Can I take apart my Frigidaire ice maker to clean it deeply?
Yes, following Step 9. You can safely remove and clean the ice basket, water tube screen, scoop, and reservoir. Avoid opening sealed components such as the compressor or evaporator assembly, as this typically voids the warranty.
Do cleaning tablets work better than vinegar for a Frigidaire ice maker?
Tablets like Affresh or Nu-Calgon are formulated specifically for ice equipment, so they remove any guesswork around mixing ratios and often clear heavier buildup faster. They cost more per use than vinegar, so many people save them for a deeper clean and use vinegar or citric acid for routine monthly maintenance.
Final Thoughts
Learning how to clean a Frigidaire ice maker comes down to a single process, with a few small adjustments depending on your model. Identify your machine, gather your supplies, run the full clean in Step 5, and check the model-specific notes if anything applies to you.
My own routine now takes about fifteen minutes a month, and I have not had cloudy or off-tasting ice since I started sticking to it. Run through this guide once this week, then set a recurring reminder so it becomes a habit rather than a fire drill.
If your kitchen has other appliances accumulating mineral buildup or grime, take a look at more practical, tested cleaning guides in Home Upright’s kitchen section for the same no-nonsense approach used throughout the rest of your home.