


Core Residential Plumbing Services for Water Heater Systems
Waking up to cold showers or facing unexpected leaks can disrupt your daily routine. Your home’s plumbing system works hard every day, often out of sight, making it easy to overlook. Yet, it is vital for our comfort and health.
Ignoring essential maintenance can lead to costly repairs and major headaches. Proactive care helps prevent emergencies, saves money, and extends the life of our home’s critical systems. Keeping your plumbing in top shape is key to a smooth-running household.
This article focuses on a common yet critical task: electric hot water heater element replacement. This is just one example of the many comprehensive residential plumbing services that contribute to a healthy home. We will guide you through diagnosing issues and safely replacing these vital components.
We will cover what tools you need and important safety tips. Our goal is to empower you with the knowledge to maintain your water heater efficiently. You will learn to recognize signs of a failing element and understand the step-by-step process for replacement.
Our electric water heater is essential for daily comfort, supplying hot water for showers, dishwashing, and more. Like any appliance, it needs regular care to work well and prevent breakdowns. Besides replacing the heating element, proper maintenance includes checking the tank, adjusting the thermostat, and flushing out sediment. These steps help keep your water heater efficient, safe, and long-lasting.
Regular tank checks can spot early signs of rust or damage, stopping small problems from becoming big leaks. Adjusting thermostats keeps your water heater at the right temperature, saving energy while keeping you safe and comfortable. Flushing out sediment from the tank helps your heater work better and protects its parts. Taking care of these tasks as part of regular maintenance keeps your water heater reliable and efficient. For more help, check out comprehensive residential plumbing services for tips on all parts of water heater care.
Evaluating Component Health with Residential Plumbing Services
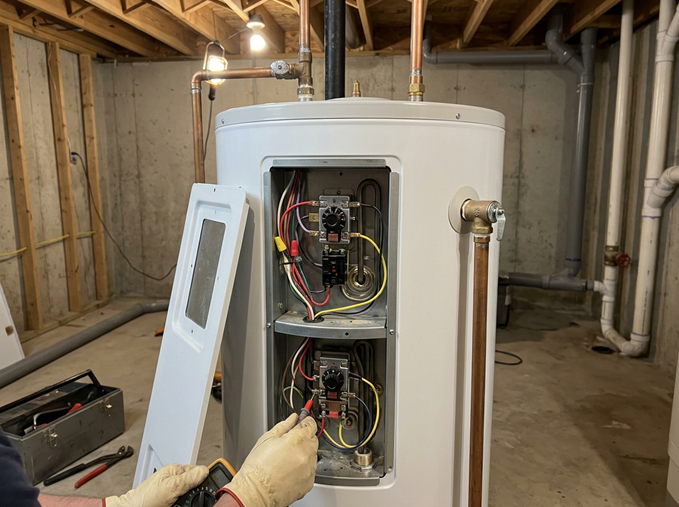
Before we embark on replacing an electric water heater element, accurately diagnosing the problem is paramount. We need to confirm that the element is indeed the culprit. This diagnostic process often involves using a multimeter, a versatile tool that allows us to test the electrical continuity and resistance of the heating elements.
First, make sure the power to the water heater is off at the circuit breaker before starting any electrical tests. Safety comes first. After the power is off, access the heating element terminals. Set your multimeter to measure resistance (ohms) and test each element. A good heating element usually shows between 10 and 16 ohms. If the reading is far from this range or shows infinite resistance, the element is likely faulty.
Besides checking resistance, we also need to check for “ground shorts.” This happens when the heating element’s wire touches its metal case, letting electricity bypass the heating coil and go straight to the tank. A ground short can make circuit breakers trip often, showing a serious electrical issue. To test, with the power off and the element connected, put one multimeter probe on an element terminal and the other on a bare metal part of the tank. If you get any resistance reading instead of an open circuit, it means there is a ground short and the element must be replaced immediately. This careful electrical check is important in plumbing to fix the real problem and keep things safe.
Diagnostic Signs of Water Heater Failure
Recognizing the symptoms of a failing water heater element is crucial for timely intervention and avoiding prolonged discomfort. The signs often vary depending on which element, upper or lower, has malfunctioned, as most residential electric water heaters utilize two heating elements.
If you are unsure whether the heating element is the only problem, review these key signs your water heater needs immediate attention before deciding on the next step.
If you find yourself running out of hot water much faster than usual, or if the water is merely lukewarm, the lower heating element is often the primary suspect. The lower element is responsible for heating the bulk of the water in the tank and maintaining its temperature. When it fails, the upper element might still work, providing some initial hot water, but the tank’s overall capacity to heat and sustain temperature is severely compromised, leading to a rapid depletion of hot water.
If there is no hot water at all, the upper heating element is usually the first part to check. This element heats the water first and often has the safety switch called the ECO (Emergency Cut-Off). If the element breaks or the ECO trips, the water won’t heat. Pressing the red reset button on the upper thermostat might fix the problem for a short time, but if it keeps tripping, there is a problem with the element or thermostat.
Another less common but important phenomenon is “thermal stacking.” This occurs when repeated small draws of hot water cause layers of water inside the tank to become significantly hotter than the thermostat setting, sometimes by as much as 30°F. While not directly a sign of element failure, it can lead to inconsistent hot water delivery and may indicate issues with thermostat calibration or water usage patterns that stress the elements.
A significant increase in the water heater’s recovery time – the duration it takes for the tank to reheat a full supply of water after it’s been depleted – is a strong indicator that one or both elements are struggling to perform their function efficiently. Understanding these diagnostic clues allows us to pinpoint the problem accurately and proceed with the necessary repairs.
Step-by-Step Heating Element Replacement Protocol
Replacing an electric water heater element is a manageable DIY task for those comfortable with basic electrical and plumbing work, but it demands strict adherence to safety protocols. We cannot overstate the importance of safety, especially when dealing with high-voltage electricity and potentially scalding water.
Our first and most critical step is to completely disconnect electrical power to the water heater. Locate the dedicated 240V circuit breaker in your home’s electrical panel and switch it to the “off” position. Do not rely solely on the on/off switch on the water heater itself, as this may not fully de-energize the unit. After turning off the breaker, use a non-contact voltage tester to confirm that no power is reaching the element terminals. This verification step is non-negotiable for your safety.
Next, turn off the cold water supply valve going into the water heater. This stops new water from entering the tank while draining. To avoid burns, run a hot water faucet in your home until the water coming out is cool. This lowers the water temperature inside the tank. When the water is cool, attach a garden hose to the drain valve near the bottom of the heater. Place the other end of the hose in a drain, bucket, or outside. Open the drain valve. To help the water flow out faster, open a hot water faucet in your house to stop any vacuum from forming. Let the tank drain completely before moving on.

Element Removal and Thread Preparation
With the power off and the tank drained, we can now safely access and remove the faulty element. You’ll typically find the heating elements behind access panels on the side of the water heater, often covered by insulation and a plastic protective shield. Carefully remove these covers.
The most common type of electric water heater element is a screw-in design. To remove it, you’ll need a specialized tool: a 1.5-inch deep well socket or a dedicated water heater element wrench. These tools are designed to fit the hexagonal head of the element and provide the leverage needed to unscrew it. Turn the element counter-clockwise to loosen and remove it. Be prepared for a small amount of residual water to escape as the element is removed.
Once the old element is out, inspect the tank’s threaded opening. It’s crucial that this area is clean and free of sediment, mineral buildup, or corrosion. Use a rag, and if necessary, a nylon brush or even an old toothbrush, to thoroughly clean the threads. This ensures that the new element can be securely installed and form a watertight seal.
Before installing the new element, verify its specifications. Ensure the replacement element’s wattage and voltage ratings precisely match those listed on your water heater’s data plate. Using an element with different specifications can lead to inefficient heating, electrical issues, or even damage to the unit. Also, pay close attention to the gasket or O-ring that comes with the new element. This sealing component is vital for preventing leaks, and it should always be replaced with a new one during installation. Never reuse an old gasket.
Safe Installation and Dry-Fire Prevention
Installing the new element correctly is as important as its removal, with a particular focus on preventing leaks and a critical issue known as “dry-firing.”
First, put the new gasket on the base of the replacement part. To get a good seal and avoid pinching or tearing the gasket when tightening, put a small drop of liquid dish soap or an approved lubricant on the gasket. This helps the gasket press down evenly. Carefully screw the new part clockwise into the tank opening. Start by hand to make sure it goes in straight. When it feels tight by hand, use a 1.5-inch socket or element wrench to tighten it firmly. It should be tight enough to seal, but don’t overtighten to avoid damaging the gasket or threads.
Now comes one of the most crucial steps: refilling the tank and purging air. Dry-firing is the instantaneous destruction of a heating element that occurs if electrical power is restored before the element is completely submerged in water. This happens because the element heats up incredibly fast without water to dissipate the heat, burning out within seconds. To prevent this, ensure the tank drain valve is closed. Then, slowly open the cold water supply valve to begin refilling the tank.
To ensure all air is purged from the tank, go to the nearest hot water faucet in your home. Remove the aerator (the small screen at the tip of the faucet) to prevent any dislodged sediment from clogging it. Open the hot water faucet fully and let it run. You’ll hear sputtering and spitting as air escapes the tank. Continue running the water at a full stream for at least three full minutes, or until a steady, air-free stream of water flows. This guarantees that the tank is completely full and the heating elements are fully immersed.
Before restoring power, meticulously check around the newly installed element and all plumbing connections for any signs of leaks. Once you’re confident there are no leaks and the tank is full of water, you can reinstall the plastic protective shield, insulation, and outer access covers. Finally, return to your electrical panel and switch the 240V circuit breaker for the water heater back to the “on” position. Your water heater will now begin heating the water, which may take up to two hours to reach its set temperature.
Essential Home Plumbing Care and Pressure Regulation
Replacing a heating element is a good time to also check your home’s plumbing, especially water pressure and system protection. Keeping the right water pressure helps your plumbing and appliances last longer. We recommend water pressure between 50 and 60 psi for homes. If the pressure is often above 80 psi, it can damage pipes, fixtures, and appliances, causing leaks and early failure. Many homes use a pressure reducing valve (PRV) on the main water line to keep water pressure at a safe level.
Another important part of modern plumbing is a thermal expansion tank. Many places have rules from the Safe Drinking Water Act of 1974 that made people install backflow preventers. These preventers create a “closed” plumbing system in your home. When water in the heater gets hot, it expands. Without an expansion tank, this extra pressure has nowhere to go and can cause damage. It can harm the water heater, cause leaks from relief valves, and put stress on other pipes. The thermal expansion tank soaks up the extra water, keeping your system safe from high pressure.
Furthermore, when connecting your water heater to your home’s plumbing, especially when copper pipes meet steel water heater fittings, the use of dielectric unions is a best practice. These specialized fittings prevent galvanic corrosion, which can occur when dissimilar metals come into contact in the presence of water, leading to premature pipe failure and leaks. Incorporating these elements into your residential plumbing services ensures a robust and long-lasting system.
Integrating Residential Plumbing Services for Leak and Scale Prevention
Beyond pressure regulation, proactive measures against corrosion and scale buildup are essential for maximizing the lifespan and efficiency of your water heater. One often-overlooked component is the anode rod, sometimes referred to as the “sacrificial rod.” Made of a more reactive metal (usually magnesium, aluminum, or zinc), this rod sacrifices itself by corroding instead of the steel tank lining, protecting the tank from rust. Regular inspection and replacement of the anode rod, typically every 3-5 years, is a fundamental aspect of water heater maintenance.
Hard water, prevalent in many regions, poses a significant challenge to water heaters. Minerals like calcium and magnesium accumulate as scale on heating elements and inside the tank. This mineral buildup acts as an insulator, forcing the elements to work harder and less efficiently, ultimately shortening their lifespan and increasing energy consumption.
When choosing replacement elements, especially in hard water areas, think about using low-watt density (LWD) elements. Unlike standard high watt density (HWD) elements, LWD elements spread heat over a bigger surface area. This lowers the heat per square inch, which slows down scale build-up and makes the element last longer. Materials like stainless steel alloy or premium titanium resist corrosion better than regular metal or copper elements, making them more durable in tough water conditions.

By integrating these considerations into your residential plumbing services, we can effectively combat the twin threats of leaks and scale, ensuring your water heater operates reliably and efficiently for years to come.
Frequently Asked Questions About Residential Plumbing Repairs
We understand that maintaining your home’s plumbing can bring up many questions. Here, we address some of the most common inquiries regarding electric water heater elements and overall plumbing health.
How do I know if my water heater heating element has failed?
Several indicators can signal a failed heating element. The most common signs include experiencing only lukewarm water, running out of hot water much faster than usual, or having no hot water whatsoever. If your circuit breaker connected to the water heater trips frequently, this could also point to a shorted element.
To definitively confirm a failure, we recommend performing a multimeter diagnosis. After safely turning off the power to the unit, we can test the element’s resistance (ohms) and continuity. A healthy element will show a specific resistance reading (typically between 10 and 16 ohms) and good continuity. An element that reads as an open circuit (infinite resistance) or shows a short to ground is definitively faulty and requires replacement. Sometimes, a tripped high-limit reset (ECO) button might be the issue, but if it keeps tripping, it often indicates an underlying problem with an element or thermostat.
What causes a replacement heating element to burn out immediately?
The most frequent cause of a new heating element failing almost instantly is “dry firing.” This occurs when electrical power is restored to the water heater before the tank is completely full of water and all air has been purged from the system. Without water to absorb and dissipate the intense heat generated by the element, it overheats and burns out within seconds.
To prevent this critical error, we always emphasize the importance of a thorough tank refilling process. After installing a new element, ensure the tank drain valve is closed, and the cold water supply valve is fully open. Then, open a hot water faucet, preferably one on an upper floor, and let it run at a full stream for at least three minutes. This full-stream purging ensures that all trapped air escapes and the elements are fully immersed in water before the circuit breaker is switched back on.
What is the ideal water pressure for residential plumbing systems?
For optimal performance and longevity of your home’s plumbing system, we advise maintaining a working water pressure between 50 and 60 psi. While plumbing codes often allow for pressures up to 80 psi, consistently higher pressures can contribute to premature wear on fixtures, appliances, and pipes, potentially leading to leaks and failures.
A pressure regulator, or PRV, is installed on your main water line to keep water pressure at a safe and steady level for your home. It lowers the high pressure from the city water supply to the right amount. In homes with closed plumbing systems, a thermal expansion tank works with the PRV to absorb pressure changes when water heats up, protecting your pipes and fixtures. Regularly checking your water pressure and making sure these parts work well is important for good plumbing care.
Conclusion
Understanding and addressing the maintenance needs of your electric water heater, particularly the replacement of heating elements, is a fundamental aspect of essential residential plumbing care. From recognizing the diagnostic signs of failure to executing the step-by-step replacement protocol with stringent safety measures, we empower homeowners to maintain their systems effectively.
Beyond specific repairs, the integration of routine maintenance practices—such as checking water pressure, installing thermal expansion tanks, and considering element types that resist hard water—contributes significantly to the overall health and efficiency of your home’s plumbing. By embracing preventative repairs and proactive system management, we not only extend the longevity of our appliances but also ensure consistent hot water, enhance household safety, and promote efficient operation. Regular attention to these critical components ultimately translates into long-term savings and uninterrupted comfort for your home.